Showing posts with label Birthday Card. Show all posts

Thursday, January 29, 2026

Patchwork Birthday Card

 Hello!


Today, I'm sharing this cute Patchwork Birthday card!  


The background patchwork is pieced with squares of patterned paper.  It's easier than it sounds when done with strips fastened to a paper backing and then cut crosswise to make strips of 1/2 inch squares.  

I've posted all the details, supplies and directions on Scrapbook Adhesives by 3L Blog today.  Click HERE to go there.

Thanks for visiting!

Judy


Materials Needed:
Scrapbook Adhesives by 3L®

E-Z Runner® Petite Permanent Dots Refillable Dispenser

Thin 3D Foam Squares White Mix

Adhesive Sheets 6 x 12in.

Other: Papers, Stickers + Ephemera: Doodlebug Designs Inc. (Summer Fun - Patterned Cardstock, Solid Cardstock, Stickers, Bits & Pieces); White Cardstock

Thursday, February 13, 2025

Number of Years Birthday Card

 I've added a unique texture and feel to this birthday card with fabric that's fastened to cardstock before embossing.  Wish you could feel it and see it up close! 


All the details are posted on Scrabook Adhesives by 3L Blog.  Click HERE to read it


Thanks for visiting!

Judy


Materials Needed:
Scrapbook Adhesives by 3L®

E-Z Runner® Ultra Strong Refillable Dispenser

3D Foam Squares White Regular

Adhesive Sheets 4 x 6in.

Other: Stamp: Penny Black (Birthday Love); Ink: Ranger Ink (Distress Ink Scorched Timber, Iced Spruce, Faded Jeans); Embossing Powder: Ranger Distress Glaze (Scorched Timber); Embossing Folder: Sizzix (Tim Holtz Numbered); Birch Cardstock; Fabric (Natural Color Light Weight Canvas); Cream Color Twine

Sunday, December 29, 2024

Snowflake Birthday Card

 Today, I'm sharing this pretty Snowflake Birthday Card that's perfect for a winter birthday. 


Metallic Foil adds shiny bits of color on an embossed white background.  I've added bands of foil across the greeting band to set it off. Simple and very pretty!

I posted all the directions to make it on Scrapbook Adhesives by 3L Blog HERE.  Check it out!


Thanks for visiting!

Judy

Materials Needed:
Scrapbook Adhesives by 3L®

E-Z Runner® Ultra Strong Refillable Dispenser

Adhesive Dots Micro, Adhesive Dots Mini

Home Hobby by 3L®

Premium Double-Sided Tape 1/8in.

Other: Stamp: Pinkfresh Studio (Happy Birthday Sentiments); Ink: Tsukineko (Versafine Onyx Black); Craft Dies: Pinkfresh Studio (Happy Birthday Sentiments); Embossing Folder: Spellbinders (Flurry of Snowflakes); White Cardstock


Friday, September 13, 2024

Number 70 Birthday Card

Hello Friends!

I was recently invited to a party to celebrate a 70th birthday and needed to wrap a gift. So I stamped some Kraft packing paper.  It turned out so well that I decided to use the leftover paper to make a card. 


I'm super happy with how it turned out!  

All the directions with step out photos are on Scrapbook Adhesives by 3L Blog today.  Click HERE to read it.


This design could be used for any age number.  I used recycled Kraft packing paper on this card.  A different paper would change the whole look!  I may be using this idea for a few more cards!


Here's the how the gift wrap turned out!

Thanks for visiting!

Judy

Supplies:

Scrapbook Adhesives by 3L®


Other: Inks: Ranger Ink (Distress Oxides Tumbled Glass, Broken China, Chipped Sapphire, Uncharted Mariner); Embossing Powder: Ranger Ink (Clear); Stamps: Stampers Anonymous Tim Holtz (Numeric, Merchant, Simple Sayings, Inquisitive, Crazy Talk), Small Alphabet Set; Paper: Recycled Kraft Packing Paper; Kraft, Navy and White Cardstock

Thursday, August 29, 2024

Time to Celebrate Birthday Card

Hello friends!

I'm sharing a masculine birthday card today.  I'm so happy with how this turned out! 


The patterned papers are from Photo Play Collection Birthday Bash.  I like the colors! The greeting panel is a sticker with added navy and yellow mats. 

The fun part was making the glazed stars!  Stars are 3D Foam Stars covered with Distress Embossing Glaze Fossilized Amber and heated carefully. They have a little shine and texture.  I don't mind that stars curl a little when heated.  It adds to the charm of this card. 

You can find lots more details and directions for making this card at Scrapbook Adhesives Blog today.

Thanks for visiting!

Judy

Supplies:

Scrapbook Adhesives by 3L®

3D Foam Stars

Thin 3D Foam Squares White Mix

E-Z Dots® Permanent Refillable Dispenser

Other: Papers: Photo Play (Birthday Bash: Element Stickers, Looking Good, You're a Classic, Get your Party On); Ranger (Distress Glaze Fossilized Amber); White, Yellow Cardstock


Monday, January 15, 2024

Cute Kitty Card

 Hi everyone!

Today, I'm sharing a Cute Kitty card I made for Scrapbook Adhesives by 3L.


This is a very easy to make card using Doodlebug Design "Pretty Kitty" Collection of papers and sticker along with adhesives from Scrapbook Adhesives by 3L.  I've posted all the instructions with photos at Scrapbook Adhesives by 3L Blog.

Thanks for visiting!

Judy


Materials Needed:
Scrapbook Adhesives by 3L®

E-Z Runner® Petite Permanent Dots Refillable Dispenser

E-Z Dots® Repositionable Refillable Dispenser

Crafty Foam Tape White 108ft.

Other: Papers, Stickers + Ephemera: Doodlebug Design Inc.(Pretty Kitty Collection); White Cardstock; Bakers Twine

Saturday, July 29, 2023

Foiled Banner Happy Birthday Card

 Today, I'm sharing a Happy Birthday Card with metallic foil accents and banners over a collage background.


It may appear difficutl to make but each step is not hard. I've posted detailed instructions with step out photos on Scrapbook Adhesives by 3L blog HERE .

The collage background is easy! 


Start with a piece 6 x 12 inch piece of white cardstock and apply Adhesives Sheets 6 x 12in. to it.  Then tear assorted patterned papers and fasten them to adhesive on cardstock leaving a gap between each one.  Once it's covered with paper, place a pink metallic foil from Metallic Transfer Foil Sheets Pastel Colors over it, press foil into spaces between paper and lift away foil. The collaged sheet can be used for several projects. Here are two other projects:  Collage Tag with Metallic Transfer Foil and Joy Collage Frame Canvas


The banners are made with
3D Foam Pennants.  I placed die cut letters on each one and then applied foil over them.  An easy technique with such a pretty metallic sheen! 

For all the details and directions, click HERE

Thanks so much for visiting!

Happy crafting

Judy


Materials Needed:
Scrapbook Adhesives by 3L®

Home Hobby by 3L®
Other: Papers: Assorted Patterned Papers for collage; Stamp: Company Name (Name Stamp Set); Ink: Ranger Ink (Distress Oxide in COLOR); Embossing Powder: ; Craft Dies: Sizzix (Tim Holtz Alphanumeric Tiny Type Upper); White, Off White & Black Cardstock; String or Crochet Thread


Saturday, May 20, 2023

Sweet 16 Birthday Card

 Today, I created a Sweet 16 Birthday Card to share.  This was fun to put together once I got going!  Sometimes I struggle to find a direction until I actually start cutting and making. 


I used a piece of cheesecloth to add texture interest for the background.  It was something I colored awhile ago and was just waiting to be used.  

I've posted lots more details and directions on Scrapbook Adhesives by 3L Blog.  Click HERE to see my  post. 


Thanks for stopping!

Judy


Materials Needed:
Scrapbook Adhesives by 3L®


Other: Papers, Stickers + Ephemera: Company Name (Name Collection); Paint: Ranger Ink (Distress Paints in Uncharted Mariner, Speckled Egg, Spun Sugar, Saltwater Taffy, Carved Pumpkin); Paint: DecoArt (Marvelous Metallics Glorious Gold); Craft Dies: Sizzix (Tim Holtz Celebrate, Colorize, Alphanumeric Bulletin, Alphanumeric Tiny Type Upper); White Cardstock; Cheese Cloth dyed with Distress Broken China Ink; Yellow Marker


Wednesday, March 29, 2023

Masculine HBD Card

 Hello crafty friends!


Today, I posted this masculine happy birthday card on Scrapbook Adhesives by 3L Blog.  You can find more details and step out directions by clicking HERE.

Thanks for visiting!

Judy


Materials Needed:
Scrapbook Adhesives by 3L®

E-Z Runner® Ultra Strong Refillable Dispenser

Thin 3D Foam Squares Black Mix

3D Foam Squares Micro Black

3D Foam Creative Sheets Small Black

Metallic Transfer Foil Sheets Nature Colors

3D Foam Frames

Other: Stamp: Stampers Anonymous Tim Holtz (Curiosities, Warehouse District, Visual Artistry); Ink: Ranger Ink (Distress Ink Vintage Photo, Black Soot, Tattered Rose, Archival Black Soot); Craft Dies: Sizzix (Tim Holtz Alphanumeric Bold); Ivory Index, Black Cardstock

Saturday, October 29, 2022

Birthday Card for a Guy

 Hello!

I'm back with another card.  This Birthday Card for a Guy features papers from Photo Play "For the Love of Winter" Collection pack.  I'm not wanting to think of winter right now but I sure like the blue color papers in this collection and they seemed appropriate for a guy card.  


I posted many step out photos and all the directions to make this card on Scrapbook Adhesives by 3L Blog.  Click HERE to see post.


Thanks for visiting!

Judy


Supplies:


Buttons Galore and More (buttons), Hero Arts Stamps (Sending Love Mail), Imagine Crafts/Tsukineko Versafine Clair (Medieval Blue), PhotoPlay Paper Co. (For the Love of Winter Collection), Ranger Ink (Distress Glaze-Uncharted Mariner), Spellbinders Paper Arts (Yanna's Layered Script Sentiment), Thread or Crochet Thread (Cream), Cardstock (White, Scrap of Black)


Sunday, March 13, 2022

Bright Flowers Birthday Card

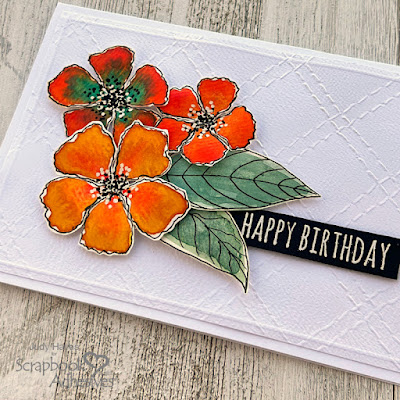
Thinking bright, sunny and warm today with this Bright Flowers Birthday Card to beat the winter dreariness!  


 I made this card for Scrapbook Adhesives by 3L and you can find it on their blog.  Lots more details posted there.

I made all the flowers with watercolors.  Once they were dry, I added black outlines with Uni-Ball Stabilo 207 pen and used it and a white pen for the dots in center of flowers.  Leaves were also painted with watercolors and outlined.  Then I fussy cut them out.  I've come to enjoy the process of painting them and "doodling" the outlines, centers and more.  Even the fussy cutting is relaxing!  I usually do all the steps over a few days....no rush. I generally take time to go to my craft room every night before bed.  I usually don't start any projects then but I doodle around flowers or cut them out.  It's mindless and enjoyable.  

These particular flowers I painted one afternoon while showing my sister how to make them. The flowers really come to life with the outlines and added dots and lines.  


Here's some of the flowers in my fodder keeper.  I learned the basics for making these flowers and the fodder keeper in Fodder School which is a yearlong class with different instructors each month.  The instructor for this class was Tiffany Sharpe.  You can find her on Instagram as TiffanySimplySharpe. Fodder School was created by Tiffany and Wendy Solganik.  Wendy is on IG as Willa.Wanders.  Fodder School has been great so far!  I'm a bit behind but it's always there for me to do when I have time.

You can find me on Instagram as judesigns7  I have photos posted there of my fodder keeper and more flowers.

Thanks for stopping by! 

Happy Crafting!

Judy


Thursday, November 18, 2021

Masculine Birthday Card

Hello friends!

A change in style....definitely more grunge!

I created this card for my son's birthday.  It's personalized to his day.


It's posted on Scrapbook Adhesives Blog HERE.  More details and a list of supplies that I used can be found there.  

I started with round gauge by adding 3D Foam Circle around it and embossing it with Distress Prize Ribbon Glaze.  While it was hot from embossing, I pressed a needle tool into the to add ridges. 


The card evolved from that gauge and number "13" both from an Idea-ology Halloween Layers ephemera package.  Sometimes, I just the creative vibes lead me!

I put Prize Ribbon Glaze on photo corners to add to 2 corners and as little "arrows" on the side.  

Lots of layers of stamping and inks on the background.  Something I haven't done in a long time but truly enjoy!

 Thanks for visiting!

Judy

Friday, August 13, 2021

3D Circles Birthday Card

 Here's a fun dimensional card I made for Scrapbook Adhesives by 3L.  Directions and step out photos showing how to make it are on their blog HERE.


 Supplies:


Monday, June 10, 2019

Introducing Royal Flourish | Card and Box Ensembles

Sponsored:  As a designer for Amazing Paper Grace, I receive dies to create projects.   I'm also a designer for Scrapbook Adhesives by 3L and receive product to use for projects.


Glimmeristas, I hope you are ready for more Glimmer Fun!!!  We have a new mini collection we are introducing today called Royal Flourish.   With two card fronts as well as an oval border shape and square border shape - we'll have some stash-worthy things for you to look at.    We thought it would be fun to make a card and a matching box using some of our favorite die sets and the new Royal Flourish Glimmer Plates.  It's easy to do and is a show stopper when we need to give a gift.  

Inspiration for Royal Flourish

Have you ever noticed during period dramas like Game of Thrones that the Royalty each have their own insignia and way of writing? It's so cool and really fascinating that these things mattered to them.  There was actually a lot of thought and flair behind the written word.   It’s really no different today; we all have our own flourishes of style that we lay down to call things our own.  It was this spirit of honing a style that Becca said provided the inspiration for Royal Flourish.  Glimmer is such a lovely way to add rich detail and embellishment!
We especially love using borders with glimmer.  For this collection, Becca created two border sets that you can cut with Hemstitch Squares and Hemstitch Ovals.   Card fronts that can take a sentiment seem to be the favorite, so happily there are two details plates that will make lovely frames to your favorite sentiments.

My Project For Today: 


I'm happy to introduce GLP-125 Imperial Adorned Ovals


Imperial Adorned Ovals is such a pretty set of Glimmer plates!  It reminds me of Scandinavian design.  
For my project today, I've used Imperial Adorned Ovals along with Hemstitch OvalsSwirl Tags and Cinch and Go Flowers V  to decorate a box and make a coordinating card. The greeting on the card is from Elegant Occasions Sentiments
The box is a paper Mache box that I painted.  I also painted some white card stock to make matching paper for the card.  On top of the box, I used the medium Imperial Adorned Ovals plate to add Skybright foil to piece of navy card stock cut to fit box.  The little foil flowers on the corners are fussy cut and glued in place.  One of the foil pieces I made as I was working on this project didn't quite turn out but the little flowers were good so I cut them out to add to the box corners. A white card stock Swirl Tags piece was foiled with smallest Imperial Adorned Ovals. It's popped up slightly with Thin 3D Foam Squares.  You can see the foil design peeking out around the flowers.  Flowers were made with Cinch and Go V from white card stock and colored with Distress Oxide inks.  On each long box side I foiled navy card stock using the largest Imperial Adorned Ovals plate and Skybright foil.  I cut the curve with Hemstitch Ovals and layered it on white card stock also cut with Hemstitch Ovals.  The box ends have the same design only made with the medium Imperial Adorned Ovals plate.  Edge was cut with smaller Hemstitch Ovals die.
The card has Imperial Adorned Ovals foil design that is actually two layers.  The base layer was made with largest Imperial Adorned Ovals with Skybright foil on a rectangle of navy card stock. The next layer is medium Imperial Adorned Ovals on navy card stock that I fussy cut around edges.  I wanted it to be popped up and yet not cover up the large foil design.  I used Skybright foil for Happy Birthday and die cut it.  It's popped up over a Swirl Tags piece with foil applied with smallest Imperial Adorned Ovals.  I like that a few foil dots show around the verse and the shape really accents the birthday greeting shape!  Those pieces are popped up as well.  Flowers are the same as I used on the box with a few leaves and some white satin ribbon tucked in.  The green mat is painted card stock. The card is 5 x 7 inches.


Availability:

These plates are available right now on the Spellbinders website —–>HERE

Prizes:

There are two dies that are being given away.  One name will be randomly picked from comments left on the combination of our seven blogs on the Introducing The Royal Flourish post between June 10 and June 15, 2019, at midnight US Central Time.  

We encourage all of our international friends to participate!  The randomly selected names will be announced on the Amazing Paper Grace Blog on June 16th.  (All giveaways for this hop are managed by and the responsibility of Amazing Paper Grace).

Up for grabs is your choice of one an Amazing Paper Grace Die of the Month from November 2018December 2018, January 2019February 2019March 2019April 2019 or May 2019.  If you missed one, this giveaway is for you - they can only be purchased through Spellbinders but Becca managed to snag a few extras.  

And hey, if you are already a Die of the Month Member, no worries - we'll send the die to a friend of your choice and you'll get to pick a die from one of Becca's other collections - Vintage Elegance Collection, the Graceful Borders Collection, the Venise Lace Collection, the Chantilly Paper Lace Collection, the 3D Vignettes Collection, the Romancing the Swirl Collection,  A Charming Christmas Collection, the Glorious Glimmer Collection or the Shadowbox Vignettes Collection and The Gilded Age.

There will be a total of two dies offered and a winner can win once among all the blogs.  If your name is selected, simply claim it within 2 weeks of the announcement by sending your address through the form under the Contact Tab on the Amazing Paper Grace Blog.  There won’t be a reply back but if you leave your choice, we’ll get it, I promise.  When sent, you will get an email that your die is on the way. The dies will be mailed out from Amazing Paper Grace.

Creative Team:

Visit Joanna   – joannakrog.blogspot.com
Visit Teresa   –  victorianpaperqueen.blogspot.com
Visit Melissa  – keepsakesbymelissa.blogspot.com 
Visit Ewelina -  elinaart.blogspot.com
Visit Judy       – judyhayesdesign.blogspot.com 
Visit Kate       – craft2owls.blogspot.com
Visit Becca     – amazingpapergrace.com/blog

Don't forget to say hi to Amazing Paper Grace's June Designer of the Month, Kathy Clement.  She's doing amazing things with Amazing Paper Grace dies over on her blog  - you can see her latest APG Creation -----> HERE

Leave us a comment and let us know what you're creating these days, cards, journals, mini-albums - what's your jam?

Supplies:
Card Stock - My Colors Velvet Night, White
DecoArt Americana Blue Mist Paint
Paper Mache Box
Ranger Distress Oxide Inks - Tattered Rose, Spun Sugar, Iced Spruce, Bundled Sage
Flower Stamens
Sheer Green Ribbon
White Satin Ribbon
Hot Glue Gun and Glue