Showing posts with label #AmazingPaperGraceClubKit. Show all posts

Wednesday, December 11, 2019

Amazing Paper Grace December Die of the Month Blog Hop

Sponsored: As a designer for Amazing Paper Grace, I receive dies to create projects.   I'm also a designer for Scrapbook Adhesives by 3L and receive product to use for projects.


Every now and again you need easy, right?  We've become huge fans of slip-in cards.  They are cards that are cut partially inlaid so that you can simply slip a decorative panel into place and you're done.  This months Die of the Month is called Rose and Filigree Duo Slip in Card.

 Your panel can be decorative, textured or simply a sentiment.  The partial inlay can be positioned just where you want it on your card from one side to another or midway.  It can even be used to make a gate fold card or an actual belly band.

My favorite part of this December Die of the Month is that the band can be set wherever I want it within the rectangle.  I also like that there's a separate outer cutting die for each band design.  That makes it so easy to cut a contrast background to fit behind.  I especially like the rose band.  It made me think of stained glass windows when I saw it.  I've used it to create that look on my second project.

On the card shown above, I've cut the band slightly towards lower edge of rectangle and used it horizontally on my card.  I cut gray solid piece to fit behind it as well as pearlescent white paper to make contrast edges.  My photo doesn't' show that very well.  To make border, I simply cut the background piece n half horizontally and fastened the pieces with a narrow reveal along the edges.  I used Hemstitch Rectangles to cut my insert.  It fits so well!  I stamped LOVE at the top and script at the bottom with gray ink.  I added pearls and a heart gem to the band.
Rose and Filigree Duo Slip In Card
Project One:


This card uses the Die of the Month as it's designed to cut a band across a rectangle.  It's a beautiful element that requires only an insert slid behind the band.  I've added stamped elements to my insert.

Project Two:  


For my second card, I chose to cut the band to fit a 4.25 x 5.5 inch card.  The band is separate and cut at each end to fit the card.  

First, I cut the the rose design band from black card stock with Adhesive Sheets applied on back side to make it easy to fasten to the background piece.  I cut a solid band from white card stock using the outer die only.  I placed the rose die on it and put it through my die cut machine with an embossing sandwich.  I used a thinner plate so the embossing wouldn't cut the paper  That allowed me to see the design so I could color the roses and leaves with Distress markers.  I love the stained glass look!
  
Along each edge of the band is a gold border and black one.  To get those, I cut a solid band from black and one from gold.  I cut each one in half so I could fasten the edges beyond the band on each side.  The band is fastened over music paper with gold strips along the fold edge.  I added a verse popped up with 3D Foam Squares. 


This Die of the Month is so easy to used for a band card with insert!  But, it's also easy to use the bands separately by cutting them at each end.

I hope you've enjoyed my projects.......and taken some inspiration to use on your own projects! 

Be sure to check out the other designers projects!  All unique projects with inspiring ways to use this Die of the Month!  Links are below.

Thanks for visiting!
Judy

Supply List:
Stamps:  Penny Black 'love chapter'; KaiserCraft 'Sympathy'
Paper: Card Stock - Bazzill Pink, Fig Swirl, Black, Cream, White; Pearlescent White; Music Paper; Gold Metallic
Ink: Ranger Cool Graphite Dye Ink; Imagine Crafts/Tsukineko Versafine Onyx Black
Accessories: Pearls; Heart Gem;
Distress Markers - Peeled Paint, Tattered Rose, Worn Lipstick, Candied Apple
Dies:  Spellbinders Hemstitch Rectangles
If you want to find out more about the Club - prices, how you sign up and what's included, please look --------HERE.

If you missed the introduction and want to know more about what inspired the Die of the Month Club, look -------HERE.

More inspiration is just a click away.  Stop by with each Creative Team Member to see how they manipulated this die to come up with a unique project for you to try!
Visit Kate        - craft2owls.blogspot.com
Visit Joanna   – joannakrog.blogspot.com
Visit Teresa   –  victorianpaperqueen.blogspot.com
Visit Ewelina -  elinaart.blogspot.co.uk
Visit Becca     – amazingpapergrace.com/blog

We can’t wait to see what you make with these exclusive dies – be sure to post your creation on the Amazing Paper Grace Die of the Month page ------ HERE or on Instagram using the hashtag #AmazingPaperGraceClubKit


Tuesday, November 5, 2019

Amazing Paper Grace November Die of the Month Blog Hop

Sponsored:  As a designer for Amazing Paper Grace, I receive dies to create projects.   I'm also a designer for Scrapbook Adhesives by 3L and receive product to use.


Christmas is on the horizon and of course, as makers, made Christmas Cards are our hallmark during the holidays.  This month's APG Die of the Month is Winters Solstice Snowflake.  It is a delicate doily looking snowflake done in a regal way to usher in the Holiday Season.

The Snowflake was designed by Becca but if you know her well, as a budget crafter, she intends for you to use the design year-round.  Her holiday offerings always can be dressed up for Holidays and dressed down for any other occasion and the same is true with Winters Solstice Snowflake.  

For today's hop, I made a card and matching gift bag.  This Die of the Month is so versatile because it's a classic design that can be used for the holidays as well as everyday card making. I chose to make a holiday gift bag and card.   Check out the other designers posts for a diverse array of projects.  Links to their blogs are at end of my post. 
My Project Today:


I've layered a die cut in cream cut with large design element over dusty green paper.  I added a gold frame to accent the center.  These were all done with the dies as they are, no special cutting!  If you follow my blog, you know I like to push the limits and make my dies do other things! Not so with this projects. 

 I used the large outer from die to cut gold paper to make the gold edges.  I re cut the large piece to make borders.  


I cut the poinsettias from white paper.  I used Distress Oxide Sprays and Distress Inks to color them.  The centers are sparkly....not really visible in the photo.  I also misted the flowers with Imagine Crafts Shimmer Spritz Sparkle. 


Both the card and gift bag are very similar.  On the card, I added a cream open border below the main image.  Plus I added the verse across the top.  The gift bag has 3 beads hanging on gold cord at the point of main die cut image.  No verse on my bag but one could easily add that to the bag as well.  Or make a matching tag.


If you want more details, feel free to send me an email or leave a comment with your questions.  Be sure to leave an email address so I can respond.  

Thank so much for visiting today!

Judy


Stamps: Taylored Expressions Simple Strips - Christmas
Paper:  Digital Print, Dark Green, Cream, White
Ink: Versafine Onyx Black with Gold Embossing Powder
Accessories:  Flower Stamens, Imagine Crafts Shimmer Spritz Sparkle Mist, Gold Cord, Tim Holtz Gold Pearls, Tim Holtz Gold Paper, Kraft gift bag

If you want to find out more about the Club - prices, how you sign up and what's included, please look --------HERE.

If you missed the introduction and want to know more about what inspired the Die of the Month Club, look ------HERE.

More inspiration is just a click away.  Stop by with each Creative Team Member to see how they manipulated this die to come up with a unique project for you to try!

Visit Kate        - craft2owls.blogspot.com
Visit Joanna   – joannakrog.blogspot.com
Visit Teresa   –  victorianpaperqueen.blogspot.com
Visit Ewelina -  elinaart.blogspot.co.uk
Visit Melissa  – keepsakesbymelissa.blogspot.com 
Visit Becca     – amazingpapergrace.com/blog

We can’t wait to see what you make with these exclusive dies – be sure to post your creation on the Amazing Paper Grace Die of the Month page -------HERE or on Instagram using the hashtag #AmazingPaperGraceClubKit


Thursday, September 5, 2019

Amazing Paper Grace September Die of the Month Blog Hop


Sponsored:  As a designer for Amazing Paper Grace, I receive dies to create projects.   I'm also a designer for Scrapbook Adhesives by 3L and receive product to use for projects.


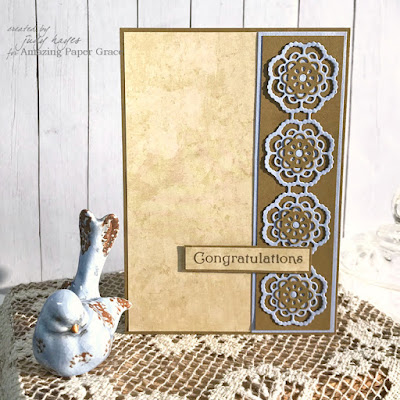
Another month has come and this month behind the scenes we've been marveling at all the ways you can use the September Die of the Month called Snip It Flowers.  (Hint: Inspirational PDF attached)

At first glance, it looks like a background die; it is anything but a background die.  It was designed so that each of the flowers can be snipped out to create a panel, frame or element.  Whether you want the 4 x 4 frame, the 3 x 4 frame, a one layer border, a two-layer border or a corner, all you have to do is "snip".  Each one of us has taken the die and spun it into a creation - we hope to inspire!!

When I first cut Snip It Flowers, I was reminded of a crocheted doily or a granny square afghan. That's what inspired me for my first card.  It's quite easy to snip out sections and flowers to make different sizes.  I really like that there are small flower dies to use as accents or even on their own! I used them to layer over the top of the larger Snip It Flowers.
Amazing Paper Grace Die of the Month - Snip It Flowers

My Project Today:


For my first card, I chose to snip the large Snip It Flowers to 4 x 3 flowers.  I also snipped out 2 flowers in the center.  I wanted the verse piece to lay flat against the card so the tiny added flowers would also lay flat.  (One could get almost the same look by leaving the 2 center flowers in place.)  The flower panel is layered onto olive paper cut big enough to show through the flower centers.  I layered small white flowers over the blue.  I like how the olive paper shows through the centers. Once the verse was in place, I added tiny flowers around it.  I made the flower centers with a hole punch. The flower panel is layered over patterned paper with a subtle design and then onto a white card.  The card is 4.75 x 6 inches. 

Supply List:
Stamps: Penny Black "special sentiments"

Paper:  Cardstock: Blue, Olive, White; Digital Printed Pattern Paper
Ink: Versafine Clair Fallen Leaves
Accessories: Hole Punch
Adhesives:  E-Z Runner® Micro Refillable Dispenser, E-Z Dots® Permanent Refillable Dispenser,
Adhesive Dots Micro


I made a second card with the strip of 4 flowers that I cut off for the first card.  You can see how different the flowers look with different paper colors.  I layered the flower strip over olive strip.  I added small flowers cut from olive paper.  For the centers, I found the tiny dots of blue and put them back in the flower centers.  A patterned paper with texture design covers the front with a narrow olive border.  I popped up the verse with Thin 3D Foam Squares.  I love the simple elegance and rich earthy colors of this card!


If you want to find out more about the Club - prices, how you sign up and what's included, please look -------- HERE.
If you missed the introduction and want to know more about what inspired the Die of the Month Club, look -------HERE.

More inspiration is just a click away.  Stop by with each Creative Team Member to see how they manipulated this die to come up with a unique project for you to try!

Visit Kate        - craft2owls.blogspot.com
Visit Joanna   – joannakrog.blogspot.com
Visit Teresa   –  victorianpaperqueen.blogspot.com
Visit Ewelina -  elinaart.blogspot.co.uk
Visit Melissa  – keepsakesbymelissa.blogspot.com 
Visit Becca     – amazingpapergrace.com/blog

We can’t wait to see what you make with these exclusive dies – be sure to post your creation on the Amazing Paper Grace Die of the Month page ------- HERE or on Instagram using the hashtag #AmazingPaperGraceClubKit

Monday, August 5, 2019

Amazing Paper Grace August Die of the Month Blog Hop

Sponsored:  As a designer for Amazing Paper Grace, I receive dies to create projects.   I'm also a designer for Scrapbook Adhesives by 3L and receive product to use for projects.


We're so pleased to get to show you a new Amazing Paper Grace Die of the Month for August called Elegant Knots.  Becca's dies don't normally have an abundance of embossing but this one has a ridge throughout the design so that it can be stenciled to add charm.  When released on August 1st Becca showed how easy it was to use for Valentines Day, Christmas and an anniversary - it goes with everything!! Each one of us has taken the die and spun it into a creation.  Please join us as we bring you more inspiration.

I really like that this die can be embossed or inked through the intricate design pattern.  On my card I inked through the die to give a subtle design.  I cut the intricate  pattern into a piece of paper with border die along one edge, the bottom edge on my card.  I cut the die with full border from white to tuck behind the design for a shadow effect. 

August Die of the Month - ELEGANT KNOTS


My Project Today:


I chose to make a masculine card with this Die of the Month.  I often think of intricate designs like this die as more feminine but it can be used for a masculine card, too.  I like that the die has a full outer die as well as a border die that cuts slightly different than full edge of the die.  I used that at the lower edge of the design on my card.  I've used subtle patterned paper behind for interest and a full design of white cut with border die to use as a shadow. I popped up the simple rectangle greeting to add more interest.  Dots of black dimensional Neon Amplify! finish the card.


For a second project, I covered a small notebook with the design embossed and inked, not cut out.  The paper is gray.  Once it was embossed, I inked through the die and around it so it's dark around the edges.  I added a silk ribbon as a book mark when I fastened the cover to the notebook.  This was a quick project and easier than I expected!


With a little creative imagination, there are so many ways to use this die!  Be sure to check out all the other Creative Team blogs for lots of inspiration!  They all do amazing things with Becca's dies!

Supply List:
Stamps: Spellbinders Oh Happy Day
Paper:  Gray, White Card stock; DCWV Patterned Paper
Ink: Imagine Crafts/Tsukineko Versafine Clair Nocturne; Distress Black Soot
Accessories:  Imagine Crafts/Tsukineko Neon Amplify! Black; Scrapbook Adhesives by 3L: Thin 3D Foam Squares Black, E-Z Runner Dots Permanent; E-Z Runner Micro; notebook; silk ribbon

If you want to find out more about the Club - prices, how you sign up and what's included, please look ------- HERE.
If you missed the introduction and want to know more about what inspired the Die of the Month Club, look -------HERE.

More inspiration is just a click away.  Stop by with each Creative Team Member to see how they manipulated this die to come up with a unique project for you to try!

Visit Kate        - craft2owls.blogspot.com
Visit Joanna   – joannakrog.blogspot.com
Visit Teresa   –  victorianpaperqueen.blogspot.com
Visit Ewelina -  elinaart.blogspot.co.uk
Visit Melissa  – keepsakesbymelissa.blogspot.com 
Visit Judy       – judyhayesdesign.blogspot.com
Visit Becca     – amazingpapergrace.com/blog

We can’t wait to see what you make with these exclusive dies – be sure to post your creation on the Amazing Paper Grace Die of the Month page ------- HERE or on Instagram using the hashtag #AmazingPaperGraceClubKit


Wednesday, July 10, 2019

Amazing Paper Grace July Die of the Month Blog Hop


We're so tickled to get to show you a new Amazing Paper Grace Die of the Month.  For July Becca created Graceful Concertina.  It's a die that has tabs on the side so that you can link each panel together to make a concertina card.  Don't stop there though, there's much more that can be made.   Cut the side tabs off to make a votive candle holder or a box or a book cover.  Please join us as we bring you more inspiration.

When I first saw the July Die of the Month, I immediately thought of a wrought iron garden gate.  So I decided to make a garden gate card using black card stock to show off the beauty of Graceful Concertina die!  I really like the arched top of the large die. The outer die can be used with the intricate die cut in the center or left open.  Since the outer die is separate, it can used to cut a solid piece to fit behind the intricate arched shape.  To me, that makes it more versatile.
July APG Die of Month - Graceful Concertina

My Project Today:


On my card front, I used an arch cut from black card stock layered over a pretty floral paper. I cut off tabs of both pieces.  With the outer inset die, I cut green paper to fit in the opening of the arch "gate".  I also cut the same shape from black card stock and cut off the top to fit at top of the verse to fill in peak area on arch.  I use Adhesive Sheets on back of my card stock so it's easy to fasten such an intricate piece to the paper behind.  The flowers are made with Cinch and Go V die.  I rubbed a touch of pink ink over petals of larger ones and left small centers white.  The back of the card is cut with outer large die from black card stock, and floral paper.  I turned over the black piece so tabs were on left.  I cut tabs off of the floral paper and fastened it over black piece.  I added an arch same as on front with inset cut from white card stock for a place to write a note.  The tabs are fastened to front of card with Extreme Double-Sided Tape.  I also added intricate inset with top cut off to inside of card front.

My card was my inspiration for a gift bag/box.  The front and back are basically made with same papers and die cuts as the card except I added the center intricate die panel instead of a verse. I also cut a black solid piece to put behind floral paper.  It adds strength and covers the back of the patterned paper.  To make it into a box, I cut a piece of black card stock 3 x 10.5 inches.  I scored  long edges .5 inch from each edge and I scored 3.5 inch from each end.  I cut notches where the score lines crossed to make flaps along the edge for fastening to front and back of box.  The piece goes from one side across bottom and up other side.  Panels cut with inner dies are fastened over each side.


Both the card and box make me think of a pretty garden with an ornate wrought iron fence!


Be sure to check out the other designers projects! Links to their blogs are below.  You'll be blown away by all their unique projects made with July Die of the Month!

Thank you so much for visiting!

StampsPenny Black “Sentiments” stamp
PaperPhotoPlay Belle Fleur – Petty Peonies, Choose Happy; Black, White Card Stock 
Ink: Imagine Crafts Versafine Onyx Black
Accessories:  Ranger Clear Embossing Powder, Pearls, Seam Binding
Adhesives:  Scrapbook Adhesives by 3L®: Adhesive Sheets 4 x 6 inchExtreme Double-Sided Tape ½ inchE-Z Dots® Permanent Refillable DispenserE-Z Runner® Ultra Refillable DispenserAdhesive Dots Mini

If you want to find out more about the Club - prices, how you sign up and what's included, please look --------HERE.
If you missed the introduction and want to know more about what inspired the Die of the Month Club, look -------HERE.

More inspiration is just a click away.  Stop by with each Creative Team Member to see how they manipulated this die to come up with a unique project for you to try!

Visit Kate        - craft2owls.blogspot.com
Visit Joanna   – joannakrog.blogspot.com
Visit Teresa   –  victorianpaperqueen.blogspot.com
Visit Ewelina -  elinaart.blogspot.co.uk
Visit Melissa  – keepsakesbymelissa.blogspot.com 
Visit Judy       – judyhayesdesign.blogspot.com
Visit Becca     – amazingpapergrace.com/blog

We can’t wait to see what you make with these exclusive dies – be sure to post your creation on the Amazing Paper Grace Die of the Month page -------HERE 
or on Instagram using the hashtag #AmazingPaperGraceClubKit