Showing posts with label Quietfire Design. Show all posts

Wednesday, December 27, 2017

My Favorite Projects for Top Ten 2017 Blog Hop


Hello friends! 
 
It's certainly been a long time since I posted! 
It's been a year of challenges in many different ways.
Unfortunately, blogging lost it's priority. 
I hope to get back to it more in 2018. 
 
 
Today, I'm participating in Top Ten 2017 Blog Hop organized by Christine Meyer.  I
t's a blog hop to showcase our top10 projects (more or less) for 2017. 
I'm following  Rebecca Keppel
Your next stop is Isha Gupta

Enjoy all the creative inspiration in this list of participants:  
Judy Hayes you are here!
 
 
* * * * *
Here are some of my favorite projects created in 2017. 
 Many were created as a Design Team member for  Scrapbook Adhesives by 3L
 
Winter Birthday Card - Tim Holtz stamp and Greenery dies
 
Beautiful Birthday Card - Spellbinders Dies
Penny Black Stamps
 

Friend Mini Canvas - Spellbinders Flower die
Penny Black Verse
 
Flower Topped Gift Box
 
USA Banner

 
Tiny House - Tim Holtz Dies
 
Season's Greetings Candle Glass - Quietfire Design die


Handmade Journal


Merry Christmas Banner - Little B banner die
Spellbinders Alphabet dies
 
Bell with Poinsettia - Penny Black stamps and dies
Distress Inks

Thanks so much for visiting! 
Until next time.....

Happy Creating!

Judy


Thursday, January 1, 2015

Seasons Givings 2014 Blog Hop - Judy Hayes

Happy New Year blog friends!!!

Today, I'm joining the Seasons Givings Blog Hop. 


A big Thank YOU! to Latisha Yoast for starting this blog hop!  What a wonderful way to thank all of you blog readers!  There are lots of designers and companies participating in this hop!!!  Lots of gorgeous inspiration to bring in the New Year!  I believe every blog is giving away at least one prize!!!  So be sure to comment to have a chance for the prizes!  I'll be giving away 3 surprise bundles that will include Spellbinders dies plus other goodies! The winners will be announced on Sunday.

To celebrate this Seasons Givings Blog Hop and bring in the New Year, I've created a pretty tag.

 
This is an inspiration for myself as well as you.  It's a little reminder as I start 2015 to never stop dreaming and to reach for and work for those dreams! 
 
Supplies:

Directions:

1. Cut one each 3¾ x 7¼ʺ black and grey cardstock
 
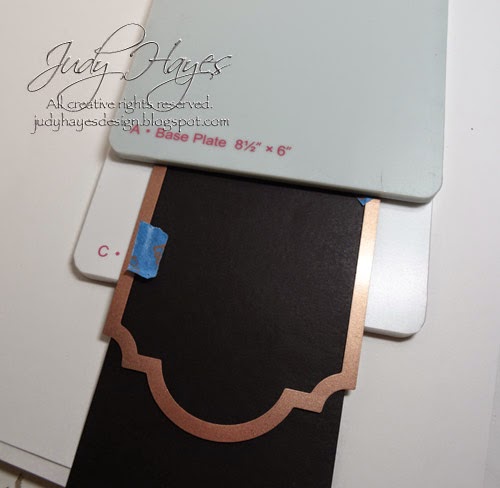
2. Use Labels 28 #6 (#1 being smallest) to cut tag ends.  For top: align black paper in die so sides are between cut edges and top is at top of paper. Use low tack tape to hold in place.  Place die on cutting plate.  Cover only area to cut tag top with base mat (mats are offset). Pass through Grand Calibur machine. For other end: align paper in die with straight edge of paper even with notches on die (curved end will not cut).  Again place die on cutting mat and cover only part to cut with base mat.  Pass through Grand Calibur machine.  Repeat for grey cardstock making it just a tiny bit longer.
 
3. Emboss black tag in Ocean Dreams folder.
 
4. Apply Adhesive Sheet to back of black card stock.  Cut/emboss Enchanted Labels 28 #2 from it.
 
5. Rub Metallic Lustre Brilliant Turquoise over it.   Buff with crumpled paper towel.  Fasten to embossed tag.

6. Stamp verse on grey cardstock. Align Labels 28 #3 around verse and tape in place.  Cut and emboss.   Rub Black soot ink along edges.  Fasten to tag with Crafty Power Tape.

7. Rub Black Shimmer around edges of black tag. Add a light touch of Brilliant Turquoise.  Buff with paper towel

8. Apply Bling at each end of tag.

9. Cut 3 Bitty Blossoms from Adhesive back Fabric.  For each one:  Sprinkle with Ice Rink embossing powder.  Starting at small end roll into flower shape (quilling tool works well for this) Glue to base.  Use heat gun to melt embossing powder on flowers.  Fasten flowers to tag with glue.

10. Cut 2 leaves and twig from grey cardstock.  Rub with Black Soot ink.  Glue around flowers.

11.  Fasten black tag to grey tag.  Rub Black Soot ink along edges.

12. Punch hole

13. Rub Black Soot ink randomly over piece of white seam binding.  Rub Brilliant Turquoise Lustre randomly over seam binding.  Mist well with water.  Crumple and roll in hands to distribute color.  Repeat misting and crumpling as needed.  Apply more color if needed.  Dry with heat gun.

14. Loop seam binding, black cord and silver cord through tag hole. 
 
 
Wishing you a prosperous, healthy New Year!  A year to make your dreams come true!
Happy Creating!
Judy

The next blog on the list is Kim Watson

Here's the complete list:
Scrapbook Adhesives by 3L Lawn Fawn Spellbinders Paper Arts Reverse Confetti Clearsnap Ice Resin My Favorite Things Technique Tuesday Paper Smooches Sweet & Sassy Stamps Stamp Simply Ribbon Store Avocado Arts A Jillian Vance Design Latina Crafter Die-Versions Unity Stamp Company Splitcoaststampers Verve Stamps Latisha Yoast AJ Otto Vera Yates Julia Stainton Judy Hayes Kim Watson Yana Smakula Chari Moss Taheerah Atchia Shemaine Smith Emily Spahn Kimberly Crawford Lee Murphy Lovely Linda Laura Williams Lori Tecler Chaitali Narla Darsie Bruno Lydia Fiedler Giovana Smith Teri Anderson Beth Pingry Dina Kowal Daniela Dobson Lisa Adametz Piali Biswas Kelli Green Keri Lee Sereika Jocelyn Olson Julee Tilman Michelle Woerner Lori McAree Theresa Momber Anita Autore Melody Rupple Sean Fetterman Bunny Vance Tricia Traxler Lisa Arana Lorena Cantó Amy Tsuruta Jodi Collins Tenia Nelson Kelly Klapstein Jill Cornell Emily Leiphart Becky Williams Margie Higuchi Lee Ann Barrett Lisa Hoel Heather Campbell Lisa Henke Sheri Holt Michele Kovack Ashley Harris Sharon Harnist Lori Craig Nicole Nowosad Laurel Beard Michele Boyer Christiana Reuling Laurie Schmidlin Jennifer Priest Stacey Schafer Heidi Blankenship Heather Pulvirenti Anita Madden Gloria Stengel Sarah Gough Rachel Kleinman Natalie Dever Lorine Mason Loretta Lock Meihsia Liu Sarah Martina Parker Angeline Choo Christine Emberson Karen Hightower Sabrina Alery Debbie Seyer Dana Joy Cat Tidwell Deborah Saaranen Ceal Pritchett Lisa Lara Colleen Schaan Anabelle O'Malley Megan Hoeppner Monika Davis Marisa Ritzen Wanda Guess Jenny Peterson Annette Allen Gracie Chavez Christina Griffiths Niki G. Kristi Schurr Jennifer Ingle Karolyn Loncon Camille Robinson Lindsey M-P Kathy Clement Maria Levine Savitri Wilder Savannah O'Gwynn Teresa Horner Laurel Seabrook Libby Hickson Yvonne Van de Grijp Leigh Penner Lisa Lee Tina McDonald Nina Yang Angel Johns

Friday, December 20, 2013

Card on the Quietfire Creations Blog

Today, I have a card posted on the Quietfire Creations Blog! 


Hop on over the Quietfire Creations to see all the details!
 
Happy Creating!
judy


Friday, December 6, 2013

Quietfire Design Guest Designer

Hello everyone!

Today, I'm the guest designer for Quietfire Design on the Quietfire Creations blog!  What an honor and a pleasure to work with Suzanne's beautiful calligraphy stamps! 

Here's a little sneak peak of my project....


Isn't that verse beautiful?  It's so elegant. 

You'll need to hop over to their blog to see the whole project and all the details!  Enjoy!

Happy Creating!

-judy

Wednesday, February 6, 2013

An Embossed and Gilded Tag

I finally took time this evening to make something just for my blog!!!  It's been a very long time.......  Thanks and big hugs to all my loyal followers who haven't given up on me!!!

So tonight I set out to do a quick tag..... 


The embossing was quick!  The rest was a bit more involved!

I used one of Spellbinders new 3D M-Bossabilities folders to emboss a manilla tag!  The embossing is amazing!  Very deep!  This pattern is E3D-005 Ornamental Swirls.  The folder embosses a 5 x 7" area.  I used just the bottom of it for my tag.  At the top I embossed lines using just a portion of EL-026 Framed Petite Labels (not 3D).  Okay, that was the easy part!!!

Next, I rubbed on Baroque Art Gilders Paste.  I just recently added a few of these to my stash.  The shine is amazing after buffing. I don't think they were exactly developed for paper but they work! 

I started with Patina.
 
Then I added Blue Iris......
 
Pretty cool!  Except I didn't exactly like the tag color showing in the deep areas of the embossing.  So I decide to try Tattered Angels Pomegranate Glimmer Mist over the tag.  The Gilders Paste is a waxy product so I expected it to repel the Glimmer Mist.


It did repel the color in some areas.  Other areas absorbed more than I wanted.  The question: Start over or keep adding color?   I added more color!!

I dried the Glimmer Mist.  Then I added more Gilders Paste.  I added Antique Gold next.  Then more Iris Blue and even a touch of Copper.  I kept rubbing on color, buffing it and adding more until it was "okay".  I needed to get it done so I could go to bed!  LOL!


Once I added the ribbon and tag, I loved the colors!

The frame part of the tag was cut from white cs.  I sprayed it with Pomegranate Glimmer Mist and added a touch of Iris Blue Gilders Paste around the edges.  The greeting from Quietfire Designs is stamped on pale sage card stock and glued behind.  Both tags are from Spellbinders S4-392 Framed Tags One.  Love these tags because there's a cut out for each one that's also a tag in itself.  You can see the set here

The sheer ribbon is from May Arts.  I tied the tag on with gold thread. 

The color is wonderful but the most amazing part is the detail and incredible dimensional effect of the embossing created with the 3D M-Bossabilities folder!  You will love these!!!

Supplies:

Spellbinders  E3D-005 Ornamental Swirls
Spellbinders EL-026 Framed Petite Labels
Spellbinders S4-392 Framed Tags One
Tattered Angels Glimme Mist - Pomegranate
Quietfire Design Stamp
Baroque Art Gilders Paste - Patina, Iris Blue, Antique Gold, Copper
May Arts Ribbon
Manilla Tag
Card Stock - white, sage
Tsukineko Versafine - Onyx Black
Gold Thread


Thank you for visiting today!!! 

Happy creating!
-judy