Showing posts with label Worldwin. Show all posts

Thursday, September 5, 2019

Amazing Paper Grace September Die of the Month Blog Hop


Sponsored:  As a designer for Amazing Paper Grace, I receive dies to create projects.   I'm also a designer for Scrapbook Adhesives by 3L and receive product to use for projects.


Another month has come and this month behind the scenes we've been marveling at all the ways you can use the September Die of the Month called Snip It Flowers.  (Hint: Inspirational PDF attached)

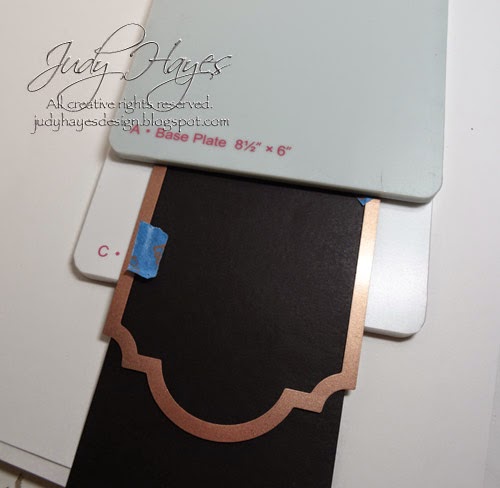
At first glance, it looks like a background die; it is anything but a background die.  It was designed so that each of the flowers can be snipped out to create a panel, frame or element.  Whether you want the 4 x 4 frame, the 3 x 4 frame, a one layer border, a two-layer border or a corner, all you have to do is "snip".  Each one of us has taken the die and spun it into a creation - we hope to inspire!!

When I first cut Snip It Flowers, I was reminded of a crocheted doily or a granny square afghan. That's what inspired me for my first card.  It's quite easy to snip out sections and flowers to make different sizes.  I really like that there are small flower dies to use as accents or even on their own! I used them to layer over the top of the larger Snip It Flowers.
Amazing Paper Grace Die of the Month - Snip It Flowers

My Project Today:


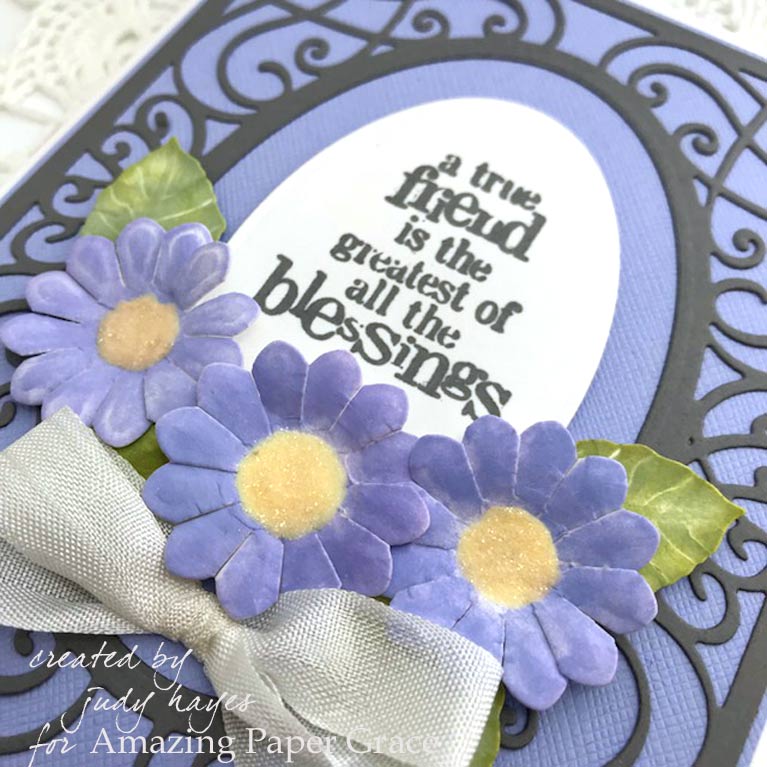
For my first card, I chose to snip the large Snip It Flowers to 4 x 3 flowers.  I also snipped out 2 flowers in the center.  I wanted the verse piece to lay flat against the card so the tiny added flowers would also lay flat.  (One could get almost the same look by leaving the 2 center flowers in place.)  The flower panel is layered onto olive paper cut big enough to show through the flower centers.  I layered small white flowers over the blue.  I like how the olive paper shows through the centers. Once the verse was in place, I added tiny flowers around it.  I made the flower centers with a hole punch. The flower panel is layered over patterned paper with a subtle design and then onto a white card.  The card is 4.75 x 6 inches. 

Supply List:
Stamps: Penny Black "special sentiments"

Paper:  Cardstock: Blue, Olive, White; Digital Printed Pattern Paper
Ink: Versafine Clair Fallen Leaves
Accessories: Hole Punch
Adhesives:  E-Z Runner® Micro Refillable Dispenser, E-Z Dots® Permanent Refillable Dispenser,
Adhesive Dots Micro


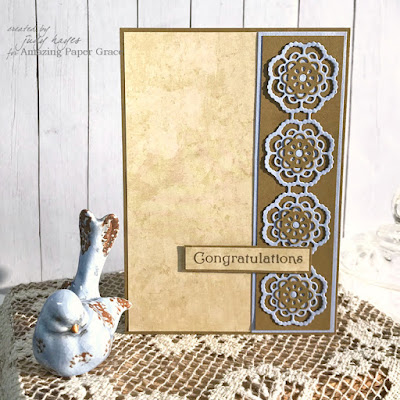
I made a second card with the strip of 4 flowers that I cut off for the first card.  You can see how different the flowers look with different paper colors.  I layered the flower strip over olive strip.  I added small flowers cut from olive paper.  For the centers, I found the tiny dots of blue and put them back in the flower centers.  A patterned paper with texture design covers the front with a narrow olive border.  I popped up the verse with Thin 3D Foam Squares.  I love the simple elegance and rich earthy colors of this card!


If you want to find out more about the Club - prices, how you sign up and what's included, please look -------- HERE.
If you missed the introduction and want to know more about what inspired the Die of the Month Club, look -------HERE.

More inspiration is just a click away.  Stop by with each Creative Team Member to see how they manipulated this die to come up with a unique project for you to try!

Visit Kate        - craft2owls.blogspot.com
Visit Joanna   – joannakrog.blogspot.com
Visit Teresa   –  victorianpaperqueen.blogspot.com
Visit Ewelina -  elinaart.blogspot.co.uk
Visit Melissa  – keepsakesbymelissa.blogspot.com 
Visit Becca     – amazingpapergrace.com/blog

We can’t wait to see what you make with these exclusive dies – be sure to post your creation on the Amazing Paper Grace Die of the Month page ------- HERE or on Instagram using the hashtag #AmazingPaperGraceClubKit

Sunday, June 24, 2018

True Friend Blessings Card


Sponsored:  As a designer on the Amazing Paper Grace Creative Team,, I am provided with dies to create projects. I'm also a designer for Scrapbook Adhesives by 3L and receive product from them.

Happy Day!  Here's a True Friend Blessings Card made with beautiful dies from Amazing Paper Grace.  Love the detailed swirly background on this die from S5-364 Corner Cotillion! It includes the 2 flowers, a leaf, oval, edge die and the swirly background.  I've used the oval from S5-365 Sweetheart Swirl for the verse.  It's a perfect fit!


The die set S5-364 Corner Cotillion is part of the Card Creator line from Spellbinders, A2 card size.  My card measures 4.75 x 6 inches.  I used the edge die, design swirl die and the oval die to cut the gray part. It's fastened to cornflower blue mat cut just a little bigger for a narrow reveal at the edge.  The pieces are fastened together using E-Z Runner® Micro Refillable Dispenser which has a narrow adhesive strip. Both are fastened to a white card base.
The verse oval is cut with oval from S5-365 Sweetheart Swirl.  I like how it coordinates with the oval from Corner Cotillion!  I stamped the verse with Versafine Clair Morning Mist which is a gray ink. The stamp is from Penny Black.  The oval is popped up slightly with Thin 3D Foam Squares White Mix.  

I cut the flowers and leaves from white cardstock.  They are colored with Distress Oxide inks.  The flower centers are filled with Nuvo Crystal Drops "Buttermilk" and sprinkled with glitter when it was wet.  Flowers are fastened with Adhesive Dots Medium and leaves are kept a bit dimensional with 3D Foam Squares – White Mix. I added a bow of seam binding below the flowers held in place with Adhesive Dots Medium.


Thank you so much for visiting!

Judy

Supplies:

Amazing Paper Grace Dies by Becca Feeken:


Other Supplies:  Ranger Distress Oxide Inks: Peeled Paint, Bundled Sage, Shaded Lilac, Wilted Violet; Worldwin® Colormates® Slate Paper; Imagine Crafts/Tsukineko Versafine Clair Morning Mist Ink; Penny Black “friendship” Stamp Set; Nuvo® Crystal Drops Buttermilk; Glitter; Cornflower Blue cardstock; White cardstock; White Seam Binding

Thursday, January 1, 2015

Seasons Givings 2014 Blog Hop - Judy Hayes

Happy New Year blog friends!!!

Today, I'm joining the Seasons Givings Blog Hop. 


A big Thank YOU! to Latisha Yoast for starting this blog hop!  What a wonderful way to thank all of you blog readers!  There are lots of designers and companies participating in this hop!!!  Lots of gorgeous inspiration to bring in the New Year!  I believe every blog is giving away at least one prize!!!  So be sure to comment to have a chance for the prizes!  I'll be giving away 3 surprise bundles that will include Spellbinders dies plus other goodies! The winners will be announced on Sunday.

To celebrate this Seasons Givings Blog Hop and bring in the New Year, I've created a pretty tag.

 
This is an inspiration for myself as well as you.  It's a little reminder as I start 2015 to never stop dreaming and to reach for and work for those dreams! 
 
Supplies:

Directions:

1. Cut one each 3¾ x 7¼ʺ black and grey cardstock
 
2. Use Labels 28 #6 (#1 being smallest) to cut tag ends.  For top: align black paper in die so sides are between cut edges and top is at top of paper. Use low tack tape to hold in place.  Place die on cutting plate.  Cover only area to cut tag top with base mat (mats are offset). Pass through Grand Calibur machine. For other end: align paper in die with straight edge of paper even with notches on die (curved end will not cut).  Again place die on cutting mat and cover only part to cut with base mat.  Pass through Grand Calibur machine.  Repeat for grey cardstock making it just a tiny bit longer.
 
3. Emboss black tag in Ocean Dreams folder.
 
4. Apply Adhesive Sheet to back of black card stock.  Cut/emboss Enchanted Labels 28 #2 from it.
 
5. Rub Metallic Lustre Brilliant Turquoise over it.   Buff with crumpled paper towel.  Fasten to embossed tag.

6. Stamp verse on grey cardstock. Align Labels 28 #3 around verse and tape in place.  Cut and emboss.   Rub Black soot ink along edges.  Fasten to tag with Crafty Power Tape.

7. Rub Black Shimmer around edges of black tag. Add a light touch of Brilliant Turquoise.  Buff with paper towel

8. Apply Bling at each end of tag.

9. Cut 3 Bitty Blossoms from Adhesive back Fabric.  For each one:  Sprinkle with Ice Rink embossing powder.  Starting at small end roll into flower shape (quilling tool works well for this) Glue to base.  Use heat gun to melt embossing powder on flowers.  Fasten flowers to tag with glue.

10. Cut 2 leaves and twig from grey cardstock.  Rub with Black Soot ink.  Glue around flowers.

11.  Fasten black tag to grey tag.  Rub Black Soot ink along edges.

12. Punch hole

13. Rub Black Soot ink randomly over piece of white seam binding.  Rub Brilliant Turquoise Lustre randomly over seam binding.  Mist well with water.  Crumple and roll in hands to distribute color.  Repeat misting and crumpling as needed.  Apply more color if needed.  Dry with heat gun.

14. Loop seam binding, black cord and silver cord through tag hole. 
 
 
Wishing you a prosperous, healthy New Year!  A year to make your dreams come true!
Happy Creating!
Judy

The next blog on the list is Kim Watson

Here's the complete list:
Scrapbook Adhesives by 3L Lawn Fawn Spellbinders Paper Arts Reverse Confetti Clearsnap Ice Resin My Favorite Things Technique Tuesday Paper Smooches Sweet & Sassy Stamps Stamp Simply Ribbon Store Avocado Arts A Jillian Vance Design Latina Crafter Die-Versions Unity Stamp Company Splitcoaststampers Verve Stamps Latisha Yoast AJ Otto Vera Yates Julia Stainton Judy Hayes Kim Watson Yana Smakula Chari Moss Taheerah Atchia Shemaine Smith Emily Spahn Kimberly Crawford Lee Murphy Lovely Linda Laura Williams Lori Tecler Chaitali Narla Darsie Bruno Lydia Fiedler Giovana Smith Teri Anderson Beth Pingry Dina Kowal Daniela Dobson Lisa Adametz Piali Biswas Kelli Green Keri Lee Sereika Jocelyn Olson Julee Tilman Michelle Woerner Lori McAree Theresa Momber Anita Autore Melody Rupple Sean Fetterman Bunny Vance Tricia Traxler Lisa Arana Lorena Cantó Amy Tsuruta Jodi Collins Tenia Nelson Kelly Klapstein Jill Cornell Emily Leiphart Becky Williams Margie Higuchi Lee Ann Barrett Lisa Hoel Heather Campbell Lisa Henke Sheri Holt Michele Kovack Ashley Harris Sharon Harnist Lori Craig Nicole Nowosad Laurel Beard Michele Boyer Christiana Reuling Laurie Schmidlin Jennifer Priest Stacey Schafer Heidi Blankenship Heather Pulvirenti Anita Madden Gloria Stengel Sarah Gough Rachel Kleinman Natalie Dever Lorine Mason Loretta Lock Meihsia Liu Sarah Martina Parker Angeline Choo Christine Emberson Karen Hightower Sabrina Alery Debbie Seyer Dana Joy Cat Tidwell Deborah Saaranen Ceal Pritchett Lisa Lara Colleen Schaan Anabelle O'Malley Megan Hoeppner Monika Davis Marisa Ritzen Wanda Guess Jenny Peterson Annette Allen Gracie Chavez Christina Griffiths Niki G. Kristi Schurr Jennifer Ingle Karolyn Loncon Camille Robinson Lindsey M-P Kathy Clement Maria Levine Savitri Wilder Savannah O'Gwynn Teresa Horner Laurel Seabrook Libby Hickson Yvonne Van de Grijp Leigh Penner Lisa Lee Tina McDonald Nina Yang Angel Johns

Saturday, April 26, 2014

Burlap Flower Card on Spellbinders Blog

My Burlap Flower Card is on the Spellbinders blog today!  
Check out all the details and directions here:

http://www.spellbinderspaperarts.com/Community/Blog/Post/14-04-26/CAS_Burlap_Flower_Card.aspx?Page=1&Blogs=Post

Last week was CAS - Clean and Simple - cards week.  Lots of CAS cards for inspiration!

Happy Creating!

Judy


Tuesday, December 17, 2013

Seuss Falls Scrapbook Page

Hello blog friends! 

I decided to take a few minutes to post something!  I've got oodles of things to do but this seemed like a good choice for my time right now!!!

This is a scrapbook page I created as a Spellbinders project back in July.  In August, I moved to the Mixed Media DT and haven't done a scrapbook layout since.  I never thought I'd say this but I do miss doing layouts just a little bit!!!  (I should qualify that!  I can still do layouts on the MM DT but it's not a requirement now.)

 
The photos are of my grandson Logan.  Last spring, we visited a Dr. Seuss exhibit in Sioux Falls, SD hence the title "Seuss Falls".  Logan had fun posing next to the bronze statues. 
 
I used several Spellbinders Die D-Lites on this page.  The corner scroll pieces: Corner Flourish; the piece that looks like a sign on the side: Mirror, Mirror; and the small frames layered over the photos and framing the small photo: ATC
 
The color combination is what I like best on this page! The red just pops against the blue!   Besides the photos of Logan, of course!
 
You can see this in the Spellbinders Idea Gallery HERE.

Supplies:

Thanks for visiting!!! 
Stay tuned for a post on the 20th for sure.  I have a project on the Quietfire Design Blog as a guest designer.  I'll post a sneak peek here and link the their post.

Happy Creating!
Judy

Wednesday, July 10, 2013

Spellbinders Sneak Peek

Are you ready for the Spellbinders Sneak Peek and Giveaway? 


It starts July 11th!
You can click on the button on my sidebar to take you to the Spellbinders Blog!  From there you can go to the designers blogs to see what's new!

Check back here on Friday, July 12th for my Sneak Peek!!!  It's awesome!!! See you then!

Until then here's some advice on a quick card.....

 
Happy Creating!
Judy
 
 
Supplies:

Monday, April 22, 2013

Heart Sing Card

Good Morning!!! 

I have a card to share today.  I actually stamped over the weekend!  It's been awhile.  I bought a set of Derwent Inktense pencils last week so I wanted to try them out!   It would be too easy to stamp on paper!!!  LOL!  I stamped on fabric and colored with the Inktense pencils!  It worked really well!!!

 
The fabric is a tightly woven muslin.  It stamped very well. The stamp is "field of poppies" from Penny Black.  After I lightly colored the images, I used a water pen to activate the Inktense color and fill in the images.  It didn't take much pencil color to get this much color after it was wet.  The verse is from the set "eloquence" by Penny Black.  It's stamped on a piece of muslin, too.  I added a wash of color over it.  To get the diluted color, I scribbled on a scrap of paper as a palette.  I diluted it with the water pen before brushing it over the verse.
 
To make the card, I sewed each stamped fabric piece to cotton batting.  I also sewed on the rickrack. Then I glued each piece to red paper with Beacon Fabri-Tac glue.  It's a great glue for fabric!
 
The yellow paper is stamped with Penny Black "indian wheel" with Tsukineko Toffee Crunch Memento ink.  The paper was a little bigger than the stamp.  I stamped it in the center and then stamped along all the edges to continue the pattern.  The 5 x 6 1/2" card base is a dark Kraft paper.  I added more of the rickrack above the verse.  The buttons are threaded with floss and fastened with Elmer's Glue Spots. 

I hope this gets my mojo going again.  I didn't create anything last week.  Sometimes the creative juices just don't work!!!

Have a creative day!
-judy


Friday, March 1, 2013

Discovering Laura Ingalls Wilder Museum Scrapbook Page

It's been crunch week for me!  Time to get my February Spellbinders projects finished and submitted.  Much as I work on them all month, it seems to always come down to the last day to finish the last project.  So........no time to create anything special for my blog!  But I do have a scrapbook page to share!
In August, my daughter and I took my grandchildren to the Laura Ingalls Wilder Museum in Walnut Grove, Minnesota.  It's not far from my home.  For those who may not know, I'm the postmaster in Walnut Grove so I'm there every week day.  The museum is just a block away from the post office.  As close as it is, I hadn't actually went through the museum until last August! 
The kids loved it. There are lots of hands-on displays.  There are several buildings to explore including a church, school, farm house, dug out and museum. They especially enjoyed the general store with play food, pots, pans, cash register, etc.  There's even a post office in that building!

This is the scrapbook page I created with photos of the kids in the covered wagon. 

I chose Kraft paper for the background because I wanted the page to have an old feel.  There are numerous hexagons cut from Graphic 45 Kraft Reflections paper across the page.  Many of them blend into the page.  Around the hexagons, I stamped the same design as the black floral die cuts.  To do that, I simply cut a piece of sticky back craft foam with Fantastic Flourish One die template.  I stuck the foam die cut to an acrylic block and used it as a stamp! 
The titles under the photos are written on old ledger paper that I coated with ICE Resin. The ICE Resin seals the paper, adds a little shine and makes it somewhat translucent.  Really cool effects on paper.  And it's waterproof!
I added a lilttle texture to the corners of the page.  To do that, I placed the paper fully into the Bricks and Bark folder.  I placed the folder between the Spellbinder Base plate and Raspberry plate at an angle.  I started rolling the plates through the Grand Calibur machine.  They didn't go far before the paper(because it's too wide to go through) touched the machine. That's as far as I went!  I backed the plates out.  The corner is all the got embossed. I repeated that for each corner. I rubbed ink over the embossed area to accent it. 
I cut 4 of the Fantastic Flourish One from black card stock.  I used one complete flourish along with pieces cut apart on each side of the photos.
The title is made with sticker letters from Cosmo Cricket.  The letters for "Past" were a different color.  I colored them with a black permanent marker to work for my page.

I've listed the supplies below with links.

Thanks so much for visiting!!!! If anyone wants more information about the Laura Ingalls Wilder Museum, feel free to email me.  Here's a link to their website: Laura Ingalls Wilder Museum

Thanks so much for visiting!!!

Happy Creating!
Judy

 
Supplies:
 
Graphic 45 – Kraft Reflections Paper: Straight to the Point, Express Yourself, Bed of Roses, Bits and Pieces
Worldwin Papers® - Treasures Oatmeal, Black; Kraft card stock
Xyron Mega Runner adhesive
Cosmo Cricket – Tiny Type alphabet stickers
Fancy Pants Designs Inc – Beach Bum Alpha (letter stickers)
Distress Inks: Walnut Stain, Vintage Photo
Adhesive Craft Foam
Old journal graph paper
Black marker to color Fancy Pants letters
Craft Glue

Friday, June 22, 2012

Sneak Peek: Spellbinders Summer Spectacular!

Welcome to Day 3 of Sneak Peek: Spellbinders™ Summer Spectacular!!!!

 Isn’t this exciting?!!  I’m always amazed by all the incredible new Spellbinders products!  This release is no exception…….Awesome new stuff!!!
If you missed the first two days, I’ve listed the links later in my post.    You’ll want to check them out!  I just know you don't want to miss any of the new Spellbinders products! 
Today, I have the honor of revealing one of the new background die templates called Botanical Swirls and a very practical set of tags, Back to Basics Tags!   Spellbinders new background die templates are amazing!!!  The tag set is all the basics! A must have set!  I especially like the tiny tags!
For my project, I embellished a photo frame with Botanical Swirls and one of the tags from Back to Basics Tags!
Isn’t this pattern incredible?  Botanical Swirls die template is designed to be cut multiple times so the pattern continues.  It’s pretty amazing!!!  I chose to piece the pattern under the tags.  The upper portion and lower portion are each all one piece. 
Supply List:
·         Spellbinders GC-001
·         Spellbinders S5-154 Botanical Swirls - MSRP $24.99
·         Spellbinders S4-367 Back to Basics Tags - MSRP $24.99
·         Worldwin® Gold Twist Cardstock
·         Worldwin® Black Cardstock
·         Creative Impressions Black Micro Paper Fasteners
·         Tattered Angels Saffron Glimmer Glaze
·         Tattered Angels Pinecone Glimmer Mist
·         SCRAPBOOK ADHESIVES by 3L Adhesive Sheet
·         Scor-Pal® Scor-Tape – ½”
·         Frame
·         Black Acrylic Paint

Let’s get to the details:
I started with a frame that’s 8 ¼ x 10 ¼" with an opening for a 4 x 6" photo.  I found this frame at a dollar store.  Any flat frame will work.
First, I painted the frame edges black with acrylic paint.

Next, I applied SCRAPBOOK ADHESIVES by 3L Adhesive Sheet to the back of a piece of Worldwin® Gold Twist paper the size of the frame.  I traced the frame and opening on the back of the paper for the size.  I cut the edges to fit the frame and rough cut the photo opening. 

I brushed on Tattered Angels Saffron Glimmer Glaze over the gold paper.  To make the color a bit darker, I rubbed on Tattered Angels Pinecone Glimmer Mist with a sponge and dabbed off any excess with a paper towel.   I’m always too impatient to let it air dry!  I dried it with my heat gun. 
You can see a piece of the original color Twist paper showing through the opening.
I removed the adhesive backing and applied the paper to the frame.  Then I cut the photo opening with a craft knife.  I used a permanent black marker to color the cut paper edges.

The next step is to cut the Spellbinders™ Botanical Swirls from black cardstock.  I applied SCRAPBOOK ADHESIVES by 3L Adhesive Sheet to the back of 2 – 8 ½ x 6 ¼" pieces of black cardstock.   
The cut pattern from Botanical Swirls is 4 x 6".  Since my frame is 8 ¼" wide, I needed two and part of a third repeat of the pattern. With the paper cut the same width as the length of the die template, it was easy to align the Botanical Swirls template with the edges of the paper to keep the pattern straight.  I’ve used removable tape to hold the die template in place while cutting. Photo 1 in the collage below.

Because there is so much detail to cut with Botanical Swirls, multiple passes through the Grand Calibur® machine are usually necessary.   A shim of cardstock is usually necessary in the center of the die template for the 2nd and 3rd passes.  Photo 2 above.

After each tag was adhered over the seam, I trimmed the end on the photo opening side with a craft knife.
Here’s the completed frame ready for a photo.........
.........and with a photo!

To get the black edge around my photo, I cut the photo 3 ¼ x 5 ¼" and mounted it on 4 x 6" black cardstock. That leaves a 1/8" black reveal around the photo. Not necessary, but I thought it set off the photo better.
*   *   *   *   *   *   *
The Botanical Swirls die template also makes a great embossed pattern!        


For this card, I’ve simply embossed the Botanical Swirls pattern to use as a background.  Simple!  And it adds an interesting pattern!   
I used an oval tag with a verse.  I used the negative opening from a long tag to reveal the red dot paper.
*  *  *  *  *  *  * 
The Sneak Peek: Spellbinders™ Summer Spectacular! Begins on June 21st and will end on June 28th, 2012. It consists of 24 individual prizes and one grand prize drawing.  Enter the Sneak Peek: Spellbinders™ Summer Spectacular! by visiting the participating blogs each day.
At the end of each blog post, click on the "Enter HERE" to open the entry form. You may only enter once from each blog each day.
Spellbinders™ will randomly draw one winner from each participating blog to receive that blog’s newly revealed dies. The Grand Prize Winner will be randomly drawn from the pool of entrants who sent entry forms from each and every participating blog during the 48 hours each blog was open. For the full list of official rules please click RULES.
Day Three of this contest is now closed.  Please visit SpellbindersPaperArts.com for more inspiration.

**Enter the contest by clicking HERE**
Be sure to check out all the other blogs participating in the Blog Frenzy so you don’t miss any of the new Spellbinders die templates being released!  Here’s a list of the previous days and blog links:
June 21
                Becca Feeken
                Kazan Clark
                Julie Overby
June 22
                Cindy Echtinaw
                Beate Johns
                Sherry Cheever
June 23
                Judy Hayes - you are here!
                Deb Seyer
                Nina Bracket
Questions?  Please email ContestQuestions@Spellbinders.us No entries will be accepted at this email address.
 

By lapping the template edge ¼" over the edge mark (impression left by edge of template after cutting) from the previous cut, the pattern matches perfectly!  Photo 3 above.I’ve used blue pencil marks on the paper to show the lap.  I added some arrows to help you see where the edge of the Botanical Swirls needs to be in order for the pattern to cut properly.  The tiny line indicates the impression from the die template after the first cut.
To get enough of the pattern for my frame, there was just a little at the edge for the final cut.  Photo 4 above. 
When I cut the second piece for the top of the frame, I started the pattern in the center of the 6 ¼ x 8 ½" paper.  Then I repeated the cut on each side of the first cut.  That way the pattern at the top of the frame isn’t an exact duplicate of the lower pattern.
Here, you can see the Botanical Swirls pattern repeated twice plus part of a third pattern cut out of the black cardstock.  You can see the slight impression line from the edge of the die template where the pattern repeats.   A few of the pieces remained in the template when I removed it.  I removed all the excess pieces and used a scissors and a craft knife to cut along the edges of the top and bottom.  Botanical Swirls die template cuts the pattern but not the edges of the pieces along sides.  Those need to be cut with a scissors or craft knife.

This photo shows the two pieces of cardstock cut with Spellbinders™ Botanical Swirls; all pieces removed and ready to adhere to the frame.  The adhesive backing is the white showing through the pattern.  Some of it didn’t cut when I cut the pattern.  It’s much easier to remove that way!
I used the complete pattern across the lower portion of the frame.  After it was adhered, I trimmed the excess along the frame edges and photo opening.  I added the other piece at the top of the frame and trimmed the excess also.
This photo shows the Botanical Swirls on the frame with edges trimmed.  You can see where the two pieces meet.  
I used two tags to cover the seam.  I cut/embossed 2 from black cardstock and 2 from gold Twist paper that I had colored the same as the frame.  I marked, made holes and inserted micro brads in the gold piece.  I placed one brad in one end of each tag (the other end will be cut off).  I applied ½" Scor-Tape® to the back of the black tag.  Then I placed the gold piece in place.