Showing posts with label Want2Scrap. Show all posts

Monday, September 17, 2018

Noel Ornament Holiday Card

Today, I'm showcasing a new die from Amazing Paper Grace,  Charming Round Tag, on this Noel Ornament Holiday Card.  I've also used Grand Dome 3D  dies.


When I finished this card, I wasn't really fond of it...… I'm liking it much better now!  It often helps me to walk away from a project for awhile, maybe even a day, and then look at it.  Sometimes I see something that needs to be changed, other times I see how good it looks. This card takes me out of my "box" a bit as it more glitzy than I usually make. A good thing to step out of my box!!!

I made the ornament first and designed the card around it.  I cut a round tag of teal cardstock for the base using the tag die from Charming Round Tag.  Then I cut gold foil paper with the same die with Noel insert at top and scroll design piece at the bottom.  The inserts for this die set are half round pieces and interchangeable. I also cut the ornament top piece from gold.  I used E-Z Runner® Micro Refillable Dispenser along the edges to fasten the gold to teal.  Across the center I added a piece of teal ribbon and 2 pieces of gold braid and wrapped the ends to the back. I used E-Z Runner® Ultra Refillable Dispenser to fasten ribbon and all ends in back and the  E-Z Runner® Micro Refillable Dispenser to fasten the braid. I then set it aside to make the card.

The basic shape of the card was cut with Grand Dome 3D Card out of cream color cardstock.  To do that, I placed a folded piece of cardstock (slightly bigger than Grand Dome 3D outer die) against but not over the cutting edge of die so the fold edge would not be cut.  I taped it place and cut the shaped card.  I cut off the tabs.  Next I cut teal cardstock with outer, scroll insert and inner circle dies from Grand Dome 3D Card.  After that I decided to put script stamping behind the ornament so I cut a mask using Grand Dome 3D Card outer die and circle.  I laid that over the card front and stamped over it with Penny Black Script stamp and Versafine Clair Twilight ink that was stamped off once.  Voila, the script is only in the circle area.  I sponged on a little color around the edges with Distress Peacock Feathers ink and also rubbed some over the scroll area.  
Then I got the idea to rub the same ink over the ornament.  I really didn't like the look of the white edges on the gold paper on Noel and scroll design so I sponged ink over and rubbed it in well.  Yes, the gold part got ink on it!  I simply wiped it off with a paper towel after misting it lightly with water. The ink didn't stick to the gold paper as it has such a shiny finish.


The ornament is fastened to the card with Thin 3D Foam Squares White Mix.  I fastened a bow of teal and gold ribbon on top with Adhesive Dots Medium. The final touch is a few gold rhinestones on ornament and card. 


Thank you so much for visiting! I hope you've found some inspiration here!

Judy

Materials Used:

Amazing Paper Grace Dies by Becca Feeken:
Charming Round Tag S4-962


Other Supplies: Imagine Crafts/Tsukineko Versafine Clair Twilight ink, Distress Ink Peacock Feathers, Penny Black Script stamp, Want2Scrap Gold Rhinestones,Teal Cardstock, Cream Cardstock, Gold Foil Cardstock, Ribbon, Gold Braid,

Sunday, May 27, 2018

Graceful Swirl Booklet

Sponsored:  As a designer on the Amazing Paper Grace Creative Team, I am provided with dies to create projects. I'm also a designer for Scrapbook Adhesives by 3L and receive product from them.

It's Sunday with an Amazing Paper Grace project!  I made a little booklet that I call Graceful Swirl Booklet. It's made with S5-368  Graceful Doily for the center medallion and S5-366 Swirl Background to cut design to cover front.  Both of these dies are so intricate and beautiful! I also used S5-363 Swirl Booklet Insert to frame a verse inside front cover.


Graceful Swirl Booklet is 5 x 6 inches.  The cover is 100 lb. Kraft cardstock.  Pages are ivory paper that's heavier than printer paper but not quite cardstock weight.  I cut 5 pages 6 x 9¾.  Each one was scored and folded. I nested them together to make a signature.  Five evenly spaced holes were made with needle tool in the fold.  I trimmed the outer edges of the pages even when they were nested together.  I recommend waiting to sew the pages to the cover until it's finished.  Otherwise, the pages could easily get ink on them. 

To decorate the cover, I cut 2 of S5-366 Swirl Background from black cardstock to which Adhesive Sheets 6 x 12 inch was applied on the back. I must admit this intricate background cut the cardstock but didn't quite cut through the adhesive backing after 2 passes through die cut machine.  That made it a bit challenging to take all the pieces out of it.  I cut two so I could layer them together to be thicker.  I fastened it to the booklet cover by peeling adhesive backing and pressing in place.  I used my heat gun to warm the adhesive  for a better hold.  (photo shows cords at center....I redid that for the finished booklet)


My next step was to rub Distress Concord Grape ink over the entire cover.  I used Black Soot to darken the edges a little.


The medallion from bottom up is a black cardstock circle base cut with Spellbinders Standard Circles SM #6 die. Next is a circle of black cut with circle from S5-368  Graceful Doily.  Layered over it is a "donut" circle cut with both circles and outer pattern dies form S5-368  Graceful Doily.  Cardstock had Adhesive Sheets on back which made it easy to fasten to the black circle.  I rubbed Metallic Lustre Iced Espresso over it so it looks metallic.  In the center is circle cut from black cardstock.  It's fastened with E-Z Runner® Ultra Refillable Dispenser , my favorite adhesive dispenser when using Distress inks.  The resins in the inks make it hard to get adhesive to stick.  The E-Z Runner Ultra works!  The last piece for the medallion is 2 of the decorative circle cut from black cardstock with Adhesive Sheets applied to back.  I layered the 2 pieces together for more dimension. It's also rubbed with Iced Espresso Metallic Lustre.  I added a bit more adhesive to the center with E-Z Runner Ultra  for extra hold when I fastened it in place.  Finally, a purple rhinestone is fastened in the center.


The last step is to sew the signature and cover together.  I started at the top because I wanted the cord ends to dangle from there. I stitched through cover and pages to bottom and then stitched back to top.  After knotting the cords together, I added some beads to the ends.
Inside the cover, I added an insert with verse on the first page in the booklet.  It was cut with 
S5-363 Swirl Booklet Insert from black cardstock.  Verse is stamped on same paper as pages with Versafine Clair Monarch ink.  


Thanks for visiting!

Judy

Supplies: 
Amazing Paper Grace Dies by Becca Feeken:
S5-366 Swirl Background
S5-368  Graceful Doily
S5-363 Swirl Booklet Insert

Adhesive Sheets 6 x 12 inch
E-Z Runner® Ultra Refillable Dispenser


Other Supplies:  Spellbinders S4-116 Standard Circles SM; DecoArt® Metallic Lustre: Iced Espresso, Gold Rush; Distress Inks: Concord Grape, Black Soot;  Imagine Crafts/Tsukineko Versafine Clair Monarch; Want2Scrap Rhinestones;  100 lb. Kraft Cardstock; Black Cardstock; Ivory Heavy Text Paper; Black Pearl Cotton, Verse Stamp

Sunday, March 25, 2018

Rosette Fan Birthday Card made with Tiered Rosettes Die

Today, I have a Rosette Fan Birthday Card to share.  This card features Tiered Rosettes – Elegant 3D Vignettes designed by Becca Feeken.  I've also used Oh Happy Day – Elegant 3D Vignettes, Hemstitch Ovals, Ornamental Crest, and Cascading Grace .


When I made the fan, I had a simple card in mind.  Well, so much for that!  It simply needed a layered ornate background! 

Here are a step outs for making the fan....

First, die cut one of Tiered Rosettes – Elegant 3D Vignettes.  I started with ivory cardstock with lace edge.  Here's how I laid it out to cut.


Once cut, I snipped the paper between lace edge and rosette base. The lace edge die can be placed right next to the rosette part.   I chose to leave a little space when I cut it.


Next, cut one rosette of 3 other patterned papers.  I used scalloped edge on 2 pieces and pointed edge on one.  Here are the pieces folded.  I also cut 2 ivory strips that are .5 x 3.5 inches, scored and folded to .25 inch wide.  Two rosette centers are cut from black and patterned paper.  I used a gold vintage button and added a gem to the center.


Each layer is fastened with adhesive at the bottom edge. It's hard to see in photo but I've applied adhesive with E-Z Runner® Ultra Refillable Dispenser. This adhesive has a very strong hold.

Each layer was fastened with different amounts of reveal.  Here's what the back looks like.  
Strips have gold paper fastened to one side which will show on fan edges.


I used a darning needle and pearl cotton to thread through holes of rosette. Photo shows thread through outer hole.  I pulled it out and skipped outer holes on each end. 


First hole was skipped so edges can be fastened over it.  Cord was knotted to hold rosette shape. 


Extreme Double-Sided Tape ¼ in was applied to strips.  This adhesive has a very strong hold to keep edge in place over layers.  Each side piece was slipped over outer edge of rosette, ends extending at bottom. 
At this point I stopped taking step out photos....sad face.

The ends of strips are lapped and stapled to hold them in place.  Button was fastened to patterned paper and black circles with Adhesive Dots Medium. An Adhesive Dots 3D was used to fasten button and gold cord to fan.  Beads are added to cord ends.

Card:

Working up from card base (5 x 7.25 inches) which is ivory cardstock with inked edges.
Next, a layer of patterned paper over black cardstock fastened with E-Z Dots® Permanent Refillable Dispenser and E-Z Runner® Ultra Refillable Dispenser I like to use the Ultra adhesive on the corners for a strong hold and the E-Z Dots along the edges. Don't fasten to card at this point.
Next layer is black cardstock cut with outer die from Cascading Grace.  DecoArt Metallic Lustre Gold Rush was rubbed at corners. Over that is black cardstock cut with Ornamental Crest also rubbed with Gold Rush Metallic Lustre. 
Next is two Hemstitch Ovals, one of turquoise paper cut with holes and behind it a solid oval of gold linen paper. I stamped Penny Black Script with Tea Stain Distress Ink.  All fastened with  E-Z Runner® Ultra Refillable Dispenser.
A black label was cut with die from Oh Happy Day – Elegant 3D Vignettes.  Happy Birthday was stamped with Versamark and heat embossed with gold.  I used Metallic Lustre Gold Rush around the edges.  It's fastened with 3D Foam Squares – Black Mix.  Gold cord is tied to a brad at each end. Ends are tucked and fastened behind background paper. 
Fan is fastened with 3D Foam Squares – Black Mix, one under the button and a few spaced behind fan and edges.
Small tag was cut from ivory cardstock using die from Cascading Grace It was inked, stamped with small verse and tucked behind button. 
Finally, fasten all to card base.


I hope you've enjoyed my tutorial.  There are so many ways to use Tiered Rosettes die! For more inspiration, check out Amazing Paper Grace blog on March 27 when Becca will show a project and projects from other members of her Creative Team.

Happy Creating!

Judy

Supplies:

Amazing Paper Grace Dies by Becca Feeken:

Extreme Double-Sided Tape ¼ in

Other Supplies:  DecoArt® Metallic Lustre (Gold Rush), Graphic 45 8x8 Pads (Olde Curiosity Shoppe, Mystical Masterpiece), Penny Black (Script stamp),Tsukineko/Imagine Crafts (Versamark, Versafine Clair Pinecone), Distress Inks ( Vintage Photo, Hickory Smoke), Ranger Embossing Powder (Gold), Want2Scrap Gem, Cardstock (Ivory, Black), Gold Linen Paper, Gold cord, Beads, Stamp, Brads


Thursday, January 1, 2015

Seasons Givings 2014 Blog Hop - Judy Hayes

Happy New Year blog friends!!!

Today, I'm joining the Seasons Givings Blog Hop. 


A big Thank YOU! to Latisha Yoast for starting this blog hop!  What a wonderful way to thank all of you blog readers!  There are lots of designers and companies participating in this hop!!!  Lots of gorgeous inspiration to bring in the New Year!  I believe every blog is giving away at least one prize!!!  So be sure to comment to have a chance for the prizes!  I'll be giving away 3 surprise bundles that will include Spellbinders dies plus other goodies! The winners will be announced on Sunday.

To celebrate this Seasons Givings Blog Hop and bring in the New Year, I've created a pretty tag.

 
This is an inspiration for myself as well as you.  It's a little reminder as I start 2015 to never stop dreaming and to reach for and work for those dreams! 
 
Supplies:

Directions:

1. Cut one each 3¾ x 7¼ʺ black and grey cardstock
 
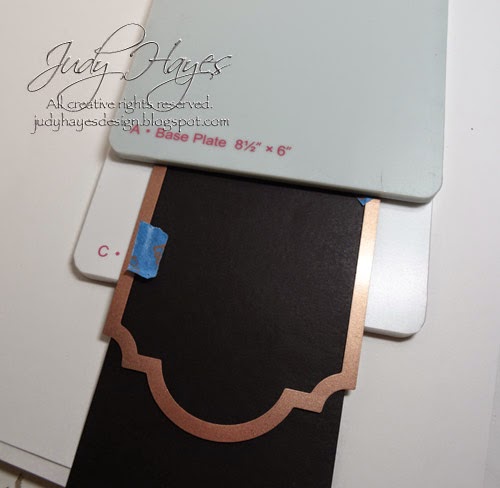
2. Use Labels 28 #6 (#1 being smallest) to cut tag ends.  For top: align black paper in die so sides are between cut edges and top is at top of paper. Use low tack tape to hold in place.  Place die on cutting plate.  Cover only area to cut tag top with base mat (mats are offset). Pass through Grand Calibur machine. For other end: align paper in die with straight edge of paper even with notches on die (curved end will not cut).  Again place die on cutting mat and cover only part to cut with base mat.  Pass through Grand Calibur machine.  Repeat for grey cardstock making it just a tiny bit longer.
 
3. Emboss black tag in Ocean Dreams folder.
 
4. Apply Adhesive Sheet to back of black card stock.  Cut/emboss Enchanted Labels 28 #2 from it.
 
5. Rub Metallic Lustre Brilliant Turquoise over it.   Buff with crumpled paper towel.  Fasten to embossed tag.

6. Stamp verse on grey cardstock. Align Labels 28 #3 around verse and tape in place.  Cut and emboss.   Rub Black soot ink along edges.  Fasten to tag with Crafty Power Tape.

7. Rub Black Shimmer around edges of black tag. Add a light touch of Brilliant Turquoise.  Buff with paper towel

8. Apply Bling at each end of tag.

9. Cut 3 Bitty Blossoms from Adhesive back Fabric.  For each one:  Sprinkle with Ice Rink embossing powder.  Starting at small end roll into flower shape (quilling tool works well for this) Glue to base.  Use heat gun to melt embossing powder on flowers.  Fasten flowers to tag with glue.

10. Cut 2 leaves and twig from grey cardstock.  Rub with Black Soot ink.  Glue around flowers.

11.  Fasten black tag to grey tag.  Rub Black Soot ink along edges.

12. Punch hole

13. Rub Black Soot ink randomly over piece of white seam binding.  Rub Brilliant Turquoise Lustre randomly over seam binding.  Mist well with water.  Crumple and roll in hands to distribute color.  Repeat misting and crumpling as needed.  Apply more color if needed.  Dry with heat gun.

14. Loop seam binding, black cord and silver cord through tag hole. 
 
 
Wishing you a prosperous, healthy New Year!  A year to make your dreams come true!
Happy Creating!
Judy

The next blog on the list is Kim Watson

Here's the complete list:
Scrapbook Adhesives by 3L Lawn Fawn Spellbinders Paper Arts Reverse Confetti Clearsnap Ice Resin My Favorite Things Technique Tuesday Paper Smooches Sweet & Sassy Stamps Stamp Simply Ribbon Store Avocado Arts A Jillian Vance Design Latina Crafter Die-Versions Unity Stamp Company Splitcoaststampers Verve Stamps Latisha Yoast AJ Otto Vera Yates Julia Stainton Judy Hayes Kim Watson Yana Smakula Chari Moss Taheerah Atchia Shemaine Smith Emily Spahn Kimberly Crawford Lee Murphy Lovely Linda Laura Williams Lori Tecler Chaitali Narla Darsie Bruno Lydia Fiedler Giovana Smith Teri Anderson Beth Pingry Dina Kowal Daniela Dobson Lisa Adametz Piali Biswas Kelli Green Keri Lee Sereika Jocelyn Olson Julee Tilman Michelle Woerner Lori McAree Theresa Momber Anita Autore Melody Rupple Sean Fetterman Bunny Vance Tricia Traxler Lisa Arana Lorena Cantó Amy Tsuruta Jodi Collins Tenia Nelson Kelly Klapstein Jill Cornell Emily Leiphart Becky Williams Margie Higuchi Lee Ann Barrett Lisa Hoel Heather Campbell Lisa Henke Sheri Holt Michele Kovack Ashley Harris Sharon Harnist Lori Craig Nicole Nowosad Laurel Beard Michele Boyer Christiana Reuling Laurie Schmidlin Jennifer Priest Stacey Schafer Heidi Blankenship Heather Pulvirenti Anita Madden Gloria Stengel Sarah Gough Rachel Kleinman Natalie Dever Lorine Mason Loretta Lock Meihsia Liu Sarah Martina Parker Angeline Choo Christine Emberson Karen Hightower Sabrina Alery Debbie Seyer Dana Joy Cat Tidwell Deborah Saaranen Ceal Pritchett Lisa Lara Colleen Schaan Anabelle O'Malley Megan Hoeppner Monika Davis Marisa Ritzen Wanda Guess Jenny Peterson Annette Allen Gracie Chavez Christina Griffiths Niki G. Kristi Schurr Jennifer Ingle Karolyn Loncon Camille Robinson Lindsey M-P Kathy Clement Maria Levine Savitri Wilder Savannah O'Gwynn Teresa Horner Laurel Seabrook Libby Hickson Yvonne Van de Grijp Leigh Penner Lisa Lee Tina McDonald Nina Yang Angel Johns

Wednesday, November 20, 2013

Pretty in Pink Poinsettia Card

 Today, I have a pretty Christmas card to share. 


Blog_Badge1
This card uses products from several of the product partners participating in the Spellbinders Platinum Party Blog Hop and giveaway.  Click HERE to hop on over to their blog to get all the details! 
THANK YOU to these companies for their product partnership with Spellbinders!
 Fun Stampers Journey    Imagine Crafts    Want2Scrap  
JustRite    Heartfelt Creations   The Stamp Doctor


 Now to my card........

I’ve used JustRite’s Festive Poinsettia stamp set to add the pattern to the poinsettia petals and leaves. The verse is also from that set. I cut the poinsettias first.  Then I rubbed on Pixie Dust ink and heat set it.  I stamped the design with Toffee Crunch ink. I sprayed the flowers with Sparkle Shimmer Mist. I used the biggest poinsettia from Layered Poinsettias for my leaves.  There is a leaf die in the set but I preferred a smaller size for this card.  I simply cut the petals apart after stamping. 
The frame was cut from gold craft foil adhered to paper.  I almost always add a paper backing to foil when I make frames.  It makes the foil a little stiffer so it holds the shape better.  I use my Xyron to add adhesive to the foil and apply it to light cardstock or printer paper.  To create this frame, I first cut Decorative Labels Twenty-Eight #3 (#1 being the smallest) from the gold foil.  I kept the foil in the die and added Decorative Labels Twenty-Eight #2 die. I taped it in place with low tack tape. Then I embossed only with both dies in place.  I placed Decorative Labels Twenty-Eight #1 in the center and cut only.  I applied a thin coat of  black acrylic paint to the frame, allowed the paint to dry slightly and then wiped off the excess. The paint in the cracks and crevices really defines the embossing and adds an aged look.   The verse is stamped on cream cardstock cut with Decorative Labels Twenty-Eight #2.  I rubbed some the Pixie Dust ink around the edges after stamping the verse with Onyx Black ink. Be sure to heat set the black ink before rubbing too close!
The back ground mat is Kraft cardstock cut with 5 x 7 Matting Basics  #5.  Then I embossed it with Harlequin M-Bossabilities folder.  I rubbed Pixie Dust over it direct to paper.  I hand cut a narrow cream mat to fit behind it. 
I cut the cream card base with 5 x 7 Matting Basics  #6 .  To do this, I folded a 9 x 6 1/2” piece of cream card stock in half.  I placed the fold edge of the cardstock to the inside of one long cutting edge on the die.  I used low tack tape to hold the die in place while running it through the Grand Calibur Machine.  The card is the perfect size to match the mat!  I inked the edges with Pixie Dust ink to match the flowers.  It would have been a lot quicker to use pink card stock for the card but I didn’t have the right  color!
I sprayed the whole card with a light mist of Sparkle Shimmer Mist.
The bow is tied through the hole in the edge of the frame.


Thank you so much for stopping!  I hope I've inspired you in some way with this Pretty in Pink card!

Happy Creating!
Judy

Supplies: