Showing posts with label JustRite. Show all posts

Thursday, February 6, 2014

Special Birthday Wishes

Today, I have a card to share........ 


Wow!  It's been a long time since I sat down to make a card!  I've been using cards from my stash. 
I put this card together for my daughter.  Today is her birthday.   Happy birthday, Jenny! 

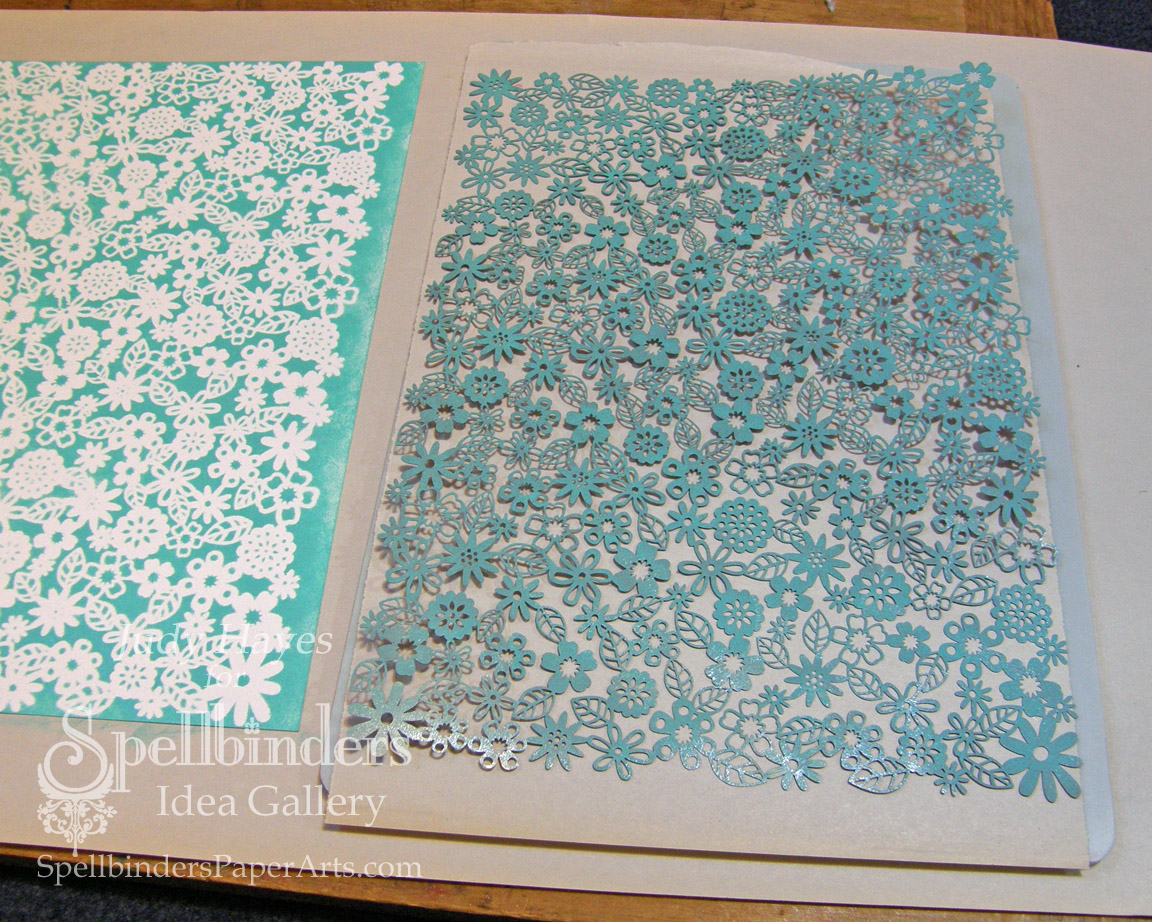
My card base is 5 x 7" cream card stock.  All patterned papers are by Melissa Frances including the rose sticker.  I used a new Spellbinders die, Romantic Rectangles Two, to cut the lacey edge rectangles.  The edges were inked with Distress Antique Linen and Vintage Photo. I also stamped faint script around the edges of the background paper.  I stamped "you are so special" on a narrow strip of sticker to add to the rose piece.  The embossed foil was cut and embossed with a new Spellbinders Gilded Life die, Petite Lace.  Love the lacey look!  The foil is gold.  I sanded it lightly to reveal some of the silver color.  Then I sponged Spa Blue paint over it and wiped off the paint on the embossed areas.  My card actually started with this piece!  It was an experimental piece that I really like so I found papers to go with it.  The seam binding was misted and crinkles to look old and tied into a loose bow.  I've tucked a small stick pin with a bead into the bow.

Happy creating!
-judy

Supplies:
Spellbinders S5-211 Romantic Rectangles Two
Spellbinders GLLD-004 Petite Lace
Spellbinders Gold Foil
Melissa Frances Papers
Cream Card Stock
JustRite Grand Sentiments
Seam Binding
Tsukineko Versafine Onyx Black
Distress Inks - Antique Linen, Vintage Photo
DecoArt Spa Blue Paint
3D Foam Squares
Stick Pin

Wednesday, November 20, 2013

Pretty in Pink Poinsettia Card

 Today, I have a pretty Christmas card to share. 


Blog_Badge1
This card uses products from several of the product partners participating in the Spellbinders Platinum Party Blog Hop and giveaway.  Click HERE to hop on over to their blog to get all the details! 
THANK YOU to these companies for their product partnership with Spellbinders!
 Fun Stampers Journey    Imagine Crafts    Want2Scrap  
JustRite    Heartfelt Creations   The Stamp Doctor


 Now to my card........

I’ve used JustRite’s Festive Poinsettia stamp set to add the pattern to the poinsettia petals and leaves. The verse is also from that set. I cut the poinsettias first.  Then I rubbed on Pixie Dust ink and heat set it.  I stamped the design with Toffee Crunch ink. I sprayed the flowers with Sparkle Shimmer Mist. I used the biggest poinsettia from Layered Poinsettias for my leaves.  There is a leaf die in the set but I preferred a smaller size for this card.  I simply cut the petals apart after stamping. 
The frame was cut from gold craft foil adhered to paper.  I almost always add a paper backing to foil when I make frames.  It makes the foil a little stiffer so it holds the shape better.  I use my Xyron to add adhesive to the foil and apply it to light cardstock or printer paper.  To create this frame, I first cut Decorative Labels Twenty-Eight #3 (#1 being the smallest) from the gold foil.  I kept the foil in the die and added Decorative Labels Twenty-Eight #2 die. I taped it in place with low tack tape. Then I embossed only with both dies in place.  I placed Decorative Labels Twenty-Eight #1 in the center and cut only.  I applied a thin coat of  black acrylic paint to the frame, allowed the paint to dry slightly and then wiped off the excess. The paint in the cracks and crevices really defines the embossing and adds an aged look.   The verse is stamped on cream cardstock cut with Decorative Labels Twenty-Eight #2.  I rubbed some the Pixie Dust ink around the edges after stamping the verse with Onyx Black ink. Be sure to heat set the black ink before rubbing too close!
The back ground mat is Kraft cardstock cut with 5 x 7 Matting Basics  #5.  Then I embossed it with Harlequin M-Bossabilities folder.  I rubbed Pixie Dust over it direct to paper.  I hand cut a narrow cream mat to fit behind it. 
I cut the cream card base with 5 x 7 Matting Basics  #6 .  To do this, I folded a 9 x 6 1/2” piece of cream card stock in half.  I placed the fold edge of the cardstock to the inside of one long cutting edge on the die.  I used low tack tape to hold the die in place while running it through the Grand Calibur Machine.  The card is the perfect size to match the mat!  I inked the edges with Pixie Dust ink to match the flowers.  It would have been a lot quicker to use pink card stock for the card but I didn’t have the right  color!
I sprayed the whole card with a light mist of Sparkle Shimmer Mist.
The bow is tied through the hole in the edge of the frame.


Thank you so much for stopping!  I hope I've inspired you in some way with this Pretty in Pink card!

Happy Creating!
Judy

Supplies:

Saturday, May 11, 2013

Bright Flowers Card

Today, I have a bright flowers card on Juliana Hudgins Positively Me blog

I sort of stepped out of my box for this card!  I usually don't create with such bright colors!  I love the contrast against the black card stock!


I've listed all the supplies and a brief description of how I made it on Julianna's blog.  You check it out there.

Happy Mother's Day to all mothers!

Judy

Monday, March 11, 2013

I'm JustRite Guest Designer this week!

I'm excited to announce that I'm Guest Designer on JustRite Papercraft blog this week!  I'm so honored to be asked! 

Here's a sneak peak of one of my cards.....


Be sure to stop over to JustRite to see all the details!  I have 3 days as Guest Designer!
 
Thanks for stopping!
-judy

Thursday, March 7, 2013

A Mini Book on Positively Me blog

I posted an inspirational mini book on Julianna Hudgins Positively Me blog today! 
Check it out here!

Here's a peak of the pages:


You can see the book cover on Julianna"s blog!

Happy creating!
Judy

Tuesday, November 27, 2012

A Love Wedding Card

Today, I shared this soft shimmer love card on Julianna Hudgins' Positively Me Blog


This card features flowers from Spellbinders Jewel Flowers and Flourishes and Jewel Framed Sentiments.  I've used pearlescent off-white card stock for the frame and flowers.  The pearlescent paper is one of my favorites becasue it cuts so well, comes out of the dies easily and the best: has a beautiful shimmer!
 
You can find more details on my post on Julianna's Positively Me Blog.
 
Supplies:


Thursday, August 9, 2012

Quick Black, White and Kraft Cards

Today, I shared two quick cards on Julianna Hudgins's Positively Me blog


These two cards are the quickest project I've made in a long time! I love how they turned out! Very clean, classic elegance in Kraft, black and white! Simple, too!

Both cards use two of the same flowers as I used on my Bright Jewel Flowers box!  Yet, these flowers are a complete contrast to the bright flowers!


Each card is an A2 size. I embossed the front of each one with Spellbinders™ EG-002 Dainty Dots M-Bossabilities Grand embossing folder which has single dots on one side and a pattern of 4 dots on the other side. 

The Kraft and black mats were cut with  Spellbinders™ S5-131 A2 Matting Basics A #4 (#1 being the smallest) and Spellbinders™ S5-132 A2 Matting Basics B #5.  These die sets make cutting mats so easy!  And always the same size!!!  Perfect for A2 size cards!

I used two different flowers from Spellbinders™ S5-143 Jewel Flowers and Flourishes on each card. I added a button center to each one from Buttons Galore and More Natural Grab Bag.   The flourish becomes the stem on the first card. On the second card, I used the stem from the set.

A little verse from JustRite "You Inspire Me" stamped in black ink and clear heat embossed finishes each card.

Quick and easy!

Thanks for visiting!

-judy


Thursday, May 31, 2012

A Sympathy Card

Finally..........something to post!

I'm working on lots of project for lots of deadlines right now........no spare creative time. 

I happened upon a photo of this card while I was looking for something else.  I don't beleive I ever posted it.  I've listed the supplies below.  No time to write any directions.  Send me an email if you have questions!


Supplies:

Spellbinders LF-347Grand Labels Twenty-Three
Spellbinders S5-071 Twisted Metal Tags and Accents
Spellbinders S5-072 Blossom Tags and Accents
JustRite Thinking of You
GCD Paris Nights paper
Tsukineko Versafine Onyx Black
Colorbox Gray Pigment ink
Want2Scrap Black Pearls

Happy Creating!
-judy

Thursday, May 17, 2012

Fabulous Birthday Card

This is a birthday card I created for Spellbinders.....it seems I never get anything created just for my blog!!! Lots of creating but it can't be shown just yet!


Here's a link to Spellbinders page with all the supplies listed:

It's too hard to list them from my phone!!!
Enjoy!
-Judy

Monday, April 30, 2012

Spellbinders™ Spring Blog Hop and Giveaway Day 2

Greetings blog friends!  Happy May Day!
This contest is now closed. Please visit the Spellbinders Blog to see the remaining open contests! Thank you!
Welcome to DAY 2 of Spellbinders Spring Blog Hop and Giveaway!

Since today is May Day, I have some little May baskets to share with you!


I created the patterned paper for each basket using a Letter Press technique with Spellbinders™ Grand Impressabilities. The baskets were cut with the Square Petal Top Box die template only I curled the petals open. I added a handle and a cute tag. Believe it or not, these are quite easy!

Supply List:

       Clearsnap Colorbox Inks – pink, mint, heliotrope
       JustRite You Inspire Me
       Scor-Pal Scor-Tape – ½”
       Buttons Galore & More – white, pink buttons
       Xyron Permanent Adhesive
       Ribbon – mint, pink, purple
       Pearl cotton – white
       Purple Buttons
       Glue Dots
       White cardstock and text paper
       Black ink
       Yellow tissue Paper
       Magnet sheets
       Viola plants or candy

First of all, I’ll show you how to make the letter press paper that I used for each of the baskets. I chose to do 3 colors and mix and match the handles, tags and base of my baskets. Each basket, including base box, handle and tag require just one 8 ½ x 11” piece of cardstock and a sheet of text or printer paper which is optional.


We’ll start with Grand Impressabilities Flower Delight, 2 magnet sheets, Colorbox Petal Point Enchantment ink and re-inkers for the pink, heliotrope, and mint plus white cardstock and text weight paper (printer paper).


I cover my work surface with plain newsprint. On that I place the 2 magnet sheets one on top of the other face up. These will hold the Grand Impressabilities in place while I ink it. I discovered 2 magnets are much stronger than one and really hold my paper and Grand Impressabilities together tightly! Next, I place a piece of cardstock (or text weight paper ) on top of the magnet. The Flower Delight Grand Impressabilities lies on top of the paper.


The magnet holds the Grand Impressabilities tightly in place so the paper under it will have a stenciled pattern of the Flower Delight. I dab the ink over the Grand Impressabilities using one of the Colorbox Petal Point inks. I use a twisting motion as well to work the ink into the small spaces of the flower centers. The goal is to ink the Grand Impressabilities! The stenciled sheet is a bonus!


In this photo, you can see the inked Flower Delight Impressabilities as well as the stenciled paper that was under it. A bonus sheet for another project! After it’s all inked, I place it on the Grand Calibur base plate with a sheet of newsprint over my base plate (under the Impressabilities) to catch any excess ink and keep my base plate clean. Next step is to carefully lay a piece of white cardstock over the Impressabilities. Once it’s in place, I hold it in place with one hand while I lay the embossing mat over it. Place the pink embossing plate on top. Hold the sandwich snuggly together and run it through the Grand Calibur™ machine.


The letter pressed sheet! The inked pattern is crisp and embossed! The actual inking of the Grand Impressabilities takes a little time, but the whole letter press process is really quite easy! Because I used a pigment ink, the Grand Impressabilities still has enough ink for a second generation print. The second time I use text weight paper which is on the inside of my baskets. Repeat the sandwich layers - base plate, newsprint, Grand Impressabilities, text weight paper, embossing mat and pink plate. Run it through the Grand Calibur machine.


The result will be a very pastel letter press sheet. I used my Xyron with Permanent adhesive to fasten the text weight paper to the back of the letter press cardstock sheet. I was able to easily cut both layers with the Petal Top Box die template and the Grand Calibur machine for my baskets.

Now we’re ready to make a basket!


These are the die templates for the basket and tag: Square Petal Top Box & Dahlia

 First, cut the Petal Top Box on the dark side of the letter press paper with text paper backing.

(I forgot to take a photo of this step earlier so this photo shows a stencil pattern paper rather than the letter press paper.)
By laying the Petal Top Box die template very close to one end, there will be enough paper leftover for the handles and tag. Cut but do not emboss the Petal Top Box!


I chose not to emboss the box template with the Grand Calibur machine because I didn’t want the emboss line across the petals. Instead, I scored the lines for folding with my Scor-Pal and stylus. No score lines across the petals!


Make all the folds. Before assembly, curl the petal edges by rolling the paper over a round pencil. Use 1/2” Scor-Tape to fasten the box together.


Cut 2 – 1 x 7 ½” strips from the leftover paper to make the handle. I used ½” Scor-Tape™ to fasten the ends together with about a 2” lap to form a 1 x 13” strip. I added 2 strips of Scor-Tape at each end of the handle to fasten it inside the basket.


For the tag, cut Dahlia #2 out of the letter press leftovers. Stamp the verse on a scrap of white cardstock with black ink. Then align the Dahlia #1 die template around the verse, tape in place, and cut. Fasten them together and punch a 1/8” hole at the top. Use Pearl Cotton to tie tag to the basket handle.


Tie a ribbon bow around the basket handle near the tag.

Thread pearl cotton in 4 buttons. Fasten one to each side of basket edges.


Voila! A basket!!

The finishing touch is tissue cut with a scalloped edge. I used Spellbinders Grand Scalloped Squares #6 to cut 6 pieces at the same time! I used 2 sheets in each basket.


These baskets can easily be filled with candies, a tiny gift or a tiny plant. I chose tiny Violas to fill each of my baskets. I tucked 2 plants into a Styrofoam cup that I had trimmed short. The tissue paper hides the cups. The little flowers are so cute peaking around the tags and handles!!!


The Spellbinders™ Spring Blog Hop will begin April 30th, and will end on May 5th, 2012. It consists of 16 individual and one grand prize drawings.  Enter the Spellbinders™ Spring Blog Hop by visiting the participating blogs each day.
From each Blog Hop post, click on the Blog Hop "Enter HERE" at the end of each blog to open the entry form. You may only enter once from each blog each day.
Spellbinders™ will randomly draw one winner from each participating blog to receive all of that day’s products. The Grand Prize Winner will be randomly drawn from the pool of entrants that sent entry forms from each and every participating blog during the 48 hours each blog was open. For the full list of official rules please click RULES.
**Enter the Contest by Clicking Here**


I hope you enjoyed your visit today!  Why not give this Letter Press technique a try!!!  This technique can be used on all the Impressabilities.   Feel free to contact me with any questions.
For even more inspiration, hop over to Iwona’s blog .  I know she’ll have something wonderful to share!
Here’s a list of all the participating designers and their blog links:

Monday, April 30th
Tuesday, May 1st
Judy Hayes You are here!
Wednesday, May 2nd
Thursday, May 3rd
Friday, May 4th
Saturday, May 5th
 
No entries will be accepted at this email address.

Wednesday, April 25, 2012

Prayer Circles Card

Here's another card featuring Spellbinder Splendid Circles!


This one is just a little bit more work but not much! 

Again, I've cut and embossed the Splendid Circles all at one time.  This time I've used all the die templates.  Then I sanded each piece to reveal the core color of the Echo Park paper.  It accents the embossed areas of the Splendid Circles! 

I threaded a narrow satin ribbon in the biggest circle.  It's not real obvious against the light colored card background.  If you look close you can see it.

I added some tiny pearls around the edges of the small center circle and placed a large pearl in the center.  All the Splendid circles are fastened to the card front nested together.

I embossed this card front with Spellbinders M-Bossabilities Valor.

The last thing I added is the circle verse from JustRite.  (These stamps have been discontinued but hey may still be available in some stamp stores or online.Or maybe you have some in your stash!)  I stamped the verse first and then cut the circles.  I usually do that.  For me, it's easier to align the die templates around the stamped verse.  I mounted it with 3D Foam Squares.

Not so hard, really!!!  The sanding adds a lot of detail especially on the center two circles.

Are you wanting this set of Spellbinders Splendid Circles?  It's a great set! 


Tomorrow, I'll have a more involved card again created with Splendid Circles. Please stop back!
Have a great day!
-judy

Spellbinders Supplies:

S4-114 Standard Circles LG
S4-116 Standard Circles SM
S4-354 Splendid Circles
ES-003 Valor
Spellbinders™ Grand Calibur® Machine
JustRite Stampers, Kaleidoscope Stamps
Want2Scrap, White Pearl Bling
SCRAPBOOK ADHESIVES BY 3L, 3D Foam Squares
Glue Dots, Mini Glue DotsIvory Cardstock; Cobalt Paper; Blue Alcohol Ink; Beige Marker; Ivory ⅛" Satin Ribbon

Sunday, February 19, 2012

A Soft Blush Sympathy Card

I finally took some time to stamp for myself!  Hooray I have a card to share!

On Friday, after work, I stopped at my favorite stamp store and picked up a new set of JustRite stamps.  I hoped some new stamps would get me inspired to stamp!  I've been doing a lot of creating but mostly paper crafting or mixed media without stamping.  It's time I got back to it!
This card went together fairly quickly once I decided on papers and ink.  (I wish the project I worked on all yesterday afternoon had gone as well.....) 


When I bought the new stamps I also picked up a few 6 x 6" papers by Authentique.  Love these new papers created just for card makers......all small prints, all 6 x 6" 2-sided papers.  These 2 soft peachy papers seemed perfect for a sympathy card.  Unfortunately, I've needed a number of those lately.


Supplies:
Authentique Papers - Series One "Blush"
Want2Scrap - Baby Le Creme Pearls
Bazzill Card Base
Ranger Slate ink
Copic E04
White Cardstock

I stamped the frame first with Slate ink.  I was surprised how well this color coordinated with the papers!  Next, I aligned  Spellbinders Label Eighteen #5 around the stamped frame and taped it in place.  Then I placed the Classic Ovals #3 over the opening in the stamped frame, again taping it place.  I cut and embossed it.  I sanded the edges lightly to reveal the white core of the paper.
I stamped the verse on a scrap of white cardstock using Slate ink.  I simply trimmed the edges with a scissors to fit behind the frame and adhered it in place.
Next I cut the background printed paper with Spellbinders Labels Twenty-Five #5.  This is a new set from Spellbinders just released at CHA!  I like how well it layers with Labels Eighteen!  Again, I sanded the edges.  The white edge really adds interest and dimension!  It needed a little something at the top and bottom so I stamped the scrolls. I really like that JustRite included this scroll with a matching reverse image!  To get the placement I wanted, I laid the stamps on the frame just how I wanted them to stamp.  Then I carefully pressed an acrylic block onto the stamps.  Voila!!!  The stamps are aligned and ready to stamp.  I just needed to get them straight when I stamped them.  That's easy to do with clear stamps!  I added a few Want2Scrap pearls to the scrolls.  These I colored with Copic E04 to coordinate with the papers.

The card base is 3 1/2 x 6 1/4".  I stamped the same scrolls at each corner only aligned differetly.  I also stamped them off once before stamping on the card for a very soft color.

The verse with frame is mounted with foam tape.  I added pearls to the corners and on the sides. I stamped one of the verses from this same set on the inside. 

I think I'll make a few more of these out of different colors.  Then I'll have some on hand. 

Thank you for visiting!

Happy Creating!
-judy

Tuesday, December 20, 2011

Cookies for Friends

I went to a gathering of friends from Fond Memories todqy after work. What fun to chat, laugh and eat. Lots of good food!

I put together some bags of Spritz cookies to share. These were quick! Well, the cookies took some time to bake! The tags were quick!


I used small manilla tags as my base. I stamped small poinsettias (from a Penny Black set) with Antique Linen ink on the tag. Then I added the verse (from JustRite's Sparky the Snowman stamp set). I cut poinettias using Spellbinders S5-055 Layered Poinsettia. The veins are inked with Aged Mahogany ink. The center is Craftworkscards Candi. Some bakers twine fastens them to the cookie bags.


Posted by Judy using BlogPress

Tuesday, November 8, 2011

Christmas Tree Card

Today, I have an easy Christmas card to share! 

All you need is some Christmas background paper ( I used Cosmo Cricket Thumpity Thump Thump), a 3 5/8" x 8 1/2" card base, 3 shades of green cardstock ( I used Bazzill), a scrap of brown and a scrap of white cardstock, a verse stamp (I used erry Christmas from JustRite Christmas Mini Sentiments Set), a button, red and white bakers twine and Spellbinders™ S5-028 Nested Pennants and E8-003 Classic Triple Scallop!  Oh, and I've used a little Antique Linen Distress ink around the edges of the card!

First, I cut the DP and adhered it to the card base.  I rubbed Distress Antique Linen ink around the edges.

 Next, I cut the tree pieces.  The trunk is cut with the long narrow banner from Spellbinders Nested Pennants.  You can see it adhered to my card base in the photo.

 For the tree, I cut one of each of the pennants from 3 shades of green card stock.  So easy to do with Spellbinders Grand Calibur machine because all 3 can be cut at one time! Then I used the Spellbinders Classic Triple Scallop Edgeabilities™ to cut the edge of each pennant. Two can be cut at the same time aligning the pennants next to each other and then taping the Edgeabilities in place over both. Such a great edge for a pine tree!

To assemble the tree, I added Scrapbook Adhesives by 3L - 3D Foam Squares along the bottom edge and regular adhesive at the top.   I placed the trunk and then added each layer using 3D Foam Squares on each one.


I cut another banner for the verse from white cardstock and stamped the verse in red. I trimmed the banner to fit the verse.  I added it to the top of the tree and placed a button with bakers twie over it.   I added the bakers twine garland to the tree after assembly.  It would be much easier to add it to each layer!

To make this card more mailable, simple cut a small circle of card stock to replace the button.  That will be much flatter.  The thickness of the button makes the card non -machinable and requires more postage! 

Happy Creating!!!
-judy