Showing posts with label Journal. Show all posts

Sunday, February 28, 2021

A Mini Journal from Upcycled Packaging

 I posted a Mini Journal on Scrapbook Adhesives by 3L blog today. Lots of details and step out photos there.

It's an upcycle/recycle project using packaging materials.  I recently received a package in the mail in a bright pink bubble mailer.  Inside, the contents were in a bright blue plastic mailer bag.  My mind immediately started to think of how I could upcycle the mailers. They make a fun journal!


 Whenever I get Kraft paper packing in a box, I have a hard time throwing it away!  Recently, I ironed several pieces to use some day.  Well, I used them for pages in this mini journal.


I'm really please with how it turned out!  It's a small journal filled with 36 Kraft and yellow notebook pages.  A very flexible little book! A fun notebook!


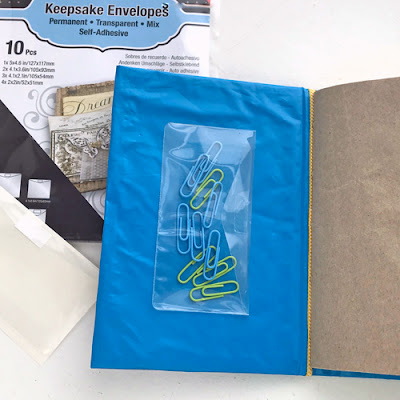
 And inside the front cover, I added this Keepsake Envelope to hold paper clips or whatever.

You'll find all the details for making it on Scrapbook Adhesives blog post.

Thanks for visiting!

Judy


Thursday, May 9, 2013

Flowers Feed the Soul Journal

No jewelry in this post but I did use more Spellbinders Media Mixage™ products!
 
This is a project I did for Spellbinders.  You can find it on their website here.  There's even a link to download the instructions.
 
My inspiration was to make a garden journal.  A place for notes about  anything gardening!  Since I made the journal with my Bind-It-All machine, I added envelopes as dividers between the pages. A spot to tuck in a seed packet or info about a new plant.  
 

The aqua flower inside the dark blue flower is a Spellbinders blank from MB6-004 Flowers One.  There's another one peaking out from under the pink flower. The blanks are gold color.  I used ink to color it with clear embossing powder over it.  The other flowers are paper, inked and clear heat embossed.  I used MD2-004 Flowers One matching set of dies to cut
those.
The label was cut with another Media Mixage die, MD2-001 Frames One.  I inked through the die and then stamped the verse.

The butterfly is the larger blank from MB6-008 Butterflies One.  I used the matching die set, MD2-008 Butterflies One to cut the paper for the wings.  The paper is white cardstock colored with pigment inks and clear heat embossed. There's a touch of gold embossing powder sprinkled over top and heated into the clear.  I hand cut a piece of paper to make the "body" of the butterfly and glued it to the blank.

For more info and the full directions, you can find the download here.

Happy Crafting!
-judy

 Supplies:

Thursday, March 21, 2013

Nesties Besties Blog Hop

Good Morning!!!! 

Today, I have a special treat for you!  Some of the Spellbinders Design Team are hosting a blog hop - The Nesties Besties Blog Hop!  We are each showcasing one of our Spellbinders projects from the Idea Gallery.  You'll find lots of inspiration!  Lots of Spellbinders products, too!!!!   Even some blog candy!!!! 

Here are links to the other design team members who are participating:


I chose my Flowers Feed the Soul Journal to show today! 

This journal features some of the Media Mixage blanks and matching die templates.  You can find downloadable directions for this book on Spellbinders website here.  I'm not going to repeat all the directions since they are available to download.


The butterfly is a metal blank from SPellbinders Butterflies One blank set.  It has paper pieces glued to the wings.  I  cut the paper with the Sellbinders die template:   Spellbinders™ Butterflies One which matches the blank set.  To add color,  I've applied pigment ink and heat embossed it with clear.  I sprinkled a touch of gold embossing powder over top and heated it.
 
 
The little paper flowers were cut with Spellbinders™ Flowers One die template set.  Two of the flowers are metal blanks: one is peaking out from under the pink flower and the other is the center aqua flower on the big blue flower.  It's colored with ink and heat embossed with clear.  These are part of the set Spellbinders™ Flowers One blanks set. 
 
I've also used a Media Mixage die template set for the verse label - Spellbinders Frames One.  I inked through the die to add the shading around the edges.  The verse is from Flourishes stamp set "From the Garden".
 
 The background rectangle and frame were cut with Spellbinders™ S5-171 A2 Round Corner Basics A.  I used 2 dies nested together to cut the frame.  The frame has been embossed with
M-Bossabilities So Trendy.   I stamped a branch from Penny Black's "A Wish for Peace" clear set with black ink, and then added nail polish to the dots on the branches.   I stamped the same branch on the book cover.
 
The journal itself has chipboard covers covered with light Kraft packing paper and designer paper on the inside. I added My Mind's Eye paper to the outside of the covers.  Inside, there are pages for notes and sketches as well as envleopes that divide the paper sections and add a place to tuck seeds and garden notes.   


Blog Candy GIVEAWAY!!!
 
I have a set of Spellbinders™ S5-171 A2 Round Corner Basics A (without packaging) to give away!!!!  Just leave a comment for a chance to win.
I'll use Random Number Generator to choose a winner a week from today.  Please leave your email address so I can contact you or check back next week!  Good luck!
 
 
If you have any questions, feel free to email me. 
 
Thanks so much for stopping!  Have a creative day!!!
-judy
 
 
Supplies:
Spellbinders™ GC-001 Grand Calibur® Machine


Penny Black® Inc – 30-136 A Wish for Peace
Flourishes – 88 “From the Garden”
Clearsnap – Colorbox Dye Archival Wicked Black, Watermark Ink, Colorbox Pigment Ink Queue -
Deep Sea, Night Sky
Bazzill Basics Paper® - Velvet
Basic Grey “Plumeria” – Cleopatra, Moonstone, Yellow Wallpaper
Xyron 900 and permanent Adhesive
Scor-Pal® Scoring Board
Scor-Pal® - Scor-Tape ¼”, ½”
Sparkle N Sprinkle Clear Embossing Powder
SCRAPBOOK ADHESIVES by 3L – 3D Foam Squares ¼” white
Elmers Glue Spots – Small thin
Creative Impressions Sheer Ribbons – purple, yellow, pink
Zutter Bind-It-All and 1” Bronze O-Wire
Card stock – white, dark purple
Text weight paper
Kraft envelopes – 3 - 5 x 7”
Purple marker
Ranger Distress Milled Lavender
Ranger Adirondack Lights – Wild Raspberry
Lightweight Chipboard
Lightweight Kraft paper sack
White Craft Glue 

Thursday, July 9, 2009

An Altered Journal

I found this great journal in a dollar store........where everything was not a dollar but multiples of a dollar. I bought several......the quality was great & so was the price. I added them to my stash......some day I would alter them.
A few weeks ago, that some day became reality. I was thinking of writing a journal again.....something I've done off & on since a college writing class....so I pulled this pink one out of my stash.
It would never do like this! Definitely not me!
It had a classic art print glued to the area that's not pink. I peeled it off. I'll add a stamped image or maybe some embossed metal.

........so I started adding color with Aged Mahogany Distress ink...

I started applying it with a piece of Cut n Dry foam from the ink pad. Way too slow........I wasn't getting anywhere. The paper on the cover was so absorbent. Then I used the ink right from the re-inker applied to the Cut N Dry foam. That worked.....lots of color but a little too bright!


I wanted it to be darker so I added Walnut Stain. I mixed it with water in a Mini Mister & sprayed on a light mist. I also applied Walnut Stain & Antique Linen with the foam until I liked the color.


I wasn't going to color the paper on the inside of the cover.........well inky fingers left a few smudges. An incentive for creativity.........how to cover up the smudges. I took the coil & journal pages out.


Then I started stamping........I used this stamp set by Tim Holtz called Slight Alterations. First I stamped the dotted image in the corners using Anitque Linen. Next, I stamped the more solid image using Distress Aged Mahogany to cover the whole inside. Lastly, I stamped the scratches with Walnut Stain. I misted it all with Anitque Linen mixed with water in a Mini Mister to set the ink into the paper, add color & blur the stamping.
It's beginning to look pretty old, don't you think? Exactly what I want!

Next.........a title for the cover out of embossed metal.


First, I cut a cardboard frame to size to fit the blank space on the cover. I laid out my title using Grungeboard letters over some drywall mending mesh all stuck to lightweight chipboard.
Then, I ran it through my Wizard with craft metal.......it embossed beautifully!
I used some of my metal tools to refine the edges around the letters.
I used lightweight spackle to fill in the back of the letters so they won't dent or crush easily. I didn't leave the Grungeboard letters in place. I have those to use on another project.......they just served as a mold.

I folded the metal under to finish all the edges. The embossed title was great but not the color.......way too bright for my vintage looking journal.


Time for black acrylic paint, alcohol inks.......and many applications of color. What a change, huh?

Now it looks more aged........ I added a clear satin spray to protect the color from rubbing off. (Caution: solvent based sprays can change the alcohol inks.) I also sprayed the journal with the same clear finish to protect it.
I added a piece of cotton twill for a marker......it was red until I added Walnut Stain & Aged Mahogany to change the color. Not a permanent color.....water will make it bleed........okay for my journal as long it doesn't get wet. The "listen" charm is from Tim Holtz Ideaology as well as the tiny pins & chain with fastener. I fastened the marker to the coil behind the paper pages.

......the finished journal.......
Whew! That was a long project!

Almost too nice to write in it!!!

Smiles.........