Showing posts with label Copic markers. Show all posts

Sunday, February 19, 2012

A Soft Blush Sympathy Card

I finally took some time to stamp for myself!  Hooray I have a card to share!

On Friday, after work, I stopped at my favorite stamp store and picked up a new set of JustRite stamps.  I hoped some new stamps would get me inspired to stamp!  I've been doing a lot of creating but mostly paper crafting or mixed media without stamping.  It's time I got back to it!
This card went together fairly quickly once I decided on papers and ink.  (I wish the project I worked on all yesterday afternoon had gone as well.....) 


When I bought the new stamps I also picked up a few 6 x 6" papers by Authentique.  Love these new papers created just for card makers......all small prints, all 6 x 6" 2-sided papers.  These 2 soft peachy papers seemed perfect for a sympathy card.  Unfortunately, I've needed a number of those lately.


Supplies:
Authentique Papers - Series One "Blush"
Want2Scrap - Baby Le Creme Pearls
Bazzill Card Base
Ranger Slate ink
Copic E04
White Cardstock

I stamped the frame first with Slate ink.  I was surprised how well this color coordinated with the papers!  Next, I aligned  Spellbinders Label Eighteen #5 around the stamped frame and taped it in place.  Then I placed the Classic Ovals #3 over the opening in the stamped frame, again taping it place.  I cut and embossed it.  I sanded the edges lightly to reveal the white core of the paper.
I stamped the verse on a scrap of white cardstock using Slate ink.  I simply trimmed the edges with a scissors to fit behind the frame and adhered it in place.
Next I cut the background printed paper with Spellbinders Labels Twenty-Five #5.  This is a new set from Spellbinders just released at CHA!  I like how well it layers with Labels Eighteen!  Again, I sanded the edges.  The white edge really adds interest and dimension!  It needed a little something at the top and bottom so I stamped the scrolls. I really like that JustRite included this scroll with a matching reverse image!  To get the placement I wanted, I laid the stamps on the frame just how I wanted them to stamp.  Then I carefully pressed an acrylic block onto the stamps.  Voila!!!  The stamps are aligned and ready to stamp.  I just needed to get them straight when I stamped them.  That's easy to do with clear stamps!  I added a few Want2Scrap pearls to the scrolls.  These I colored with Copic E04 to coordinate with the papers.

The card base is 3 1/2 x 6 1/4".  I stamped the same scrolls at each corner only aligned differetly.  I also stamped them off once before stamping on the card for a very soft color.

The verse with frame is mounted with foam tape.  I added pearls to the corners and on the sides. I stamped one of the verses from this same set on the inside. 

I think I'll make a few more of these out of different colors.  Then I'll have some on hand. 

Thank you for visiting!

Happy Creating!
-judy

Monday, December 13, 2010

For Someone so Special

Here's another Spellbinders project to share! 
Wish I had time to make something just for the blog..........too many other commitments right now! 

-judy

Thursday, November 18, 2010

Spellbinders™ Paper Arts Holiday Hoppin’ Blog Hop - Day One!


Welcome to the first day of the Spellbinders™ Paper Arts Holiday Hoppin’ Blog Hop!  Spellbinders, along with Spellbinders cross promotional companies are showcasing their newest products just in time for your Holiday crafting and gift giving.  Lots of creative ideas are in store, as well as prizes galore!  Each participating company has generously donated towards the prize package listed on the Spellbinders Blog.  A total of two identical prize packages, one for each day, November 18 and 19 will be given away!  To enter, just leave a comment on a participating blog!  Comments in the first 48 hours of the post are eligible.  One commenter each day will be randomly selected as the winner.  Winners will be announced on November 22, on the Spellbinders Blog!

Here are today’s Holiday Hoppin’ blogs:

Latisha Yoast
Judy Hayes - you are here!
Kazan Clark
Ashley Cannon Newell
Holly Simoni
Debbie Olson
Heidi Blankenship
Sherry Cheever
Linda Duke
Laurie Schmidlin
Cheryl Marie Walker
Jill Jacobsen
Jennifer Priest
Christina Klauer
Jodi Sanford
Leslie Miller
Mimi Leinbach
Robyn O'Crowley
Sharon Harnist
Liz Hicks
Sarah Hamer
Christie Bryant
Wendy Sue Anderson
Anary Baumgarth
Jenifer Dove
Gina Krupsky

Today,  I am using Spellbinders S4-305 Eyelet Squares die template plus several other Spellbinders die templates along with products from JustRite, Graphic 45, Worldwin, Scrapbook Adhesives by 3L, Creative Impressions and Copic.    Eyelet Squares is a set of 4 squares with an eyelet edge, all for $24.99.  That's only $6.25/die template!  Think of all the possibilities with 4 sizes!

Now let's see how fun these Eyelet Squares can be for creating some Holiday magic!

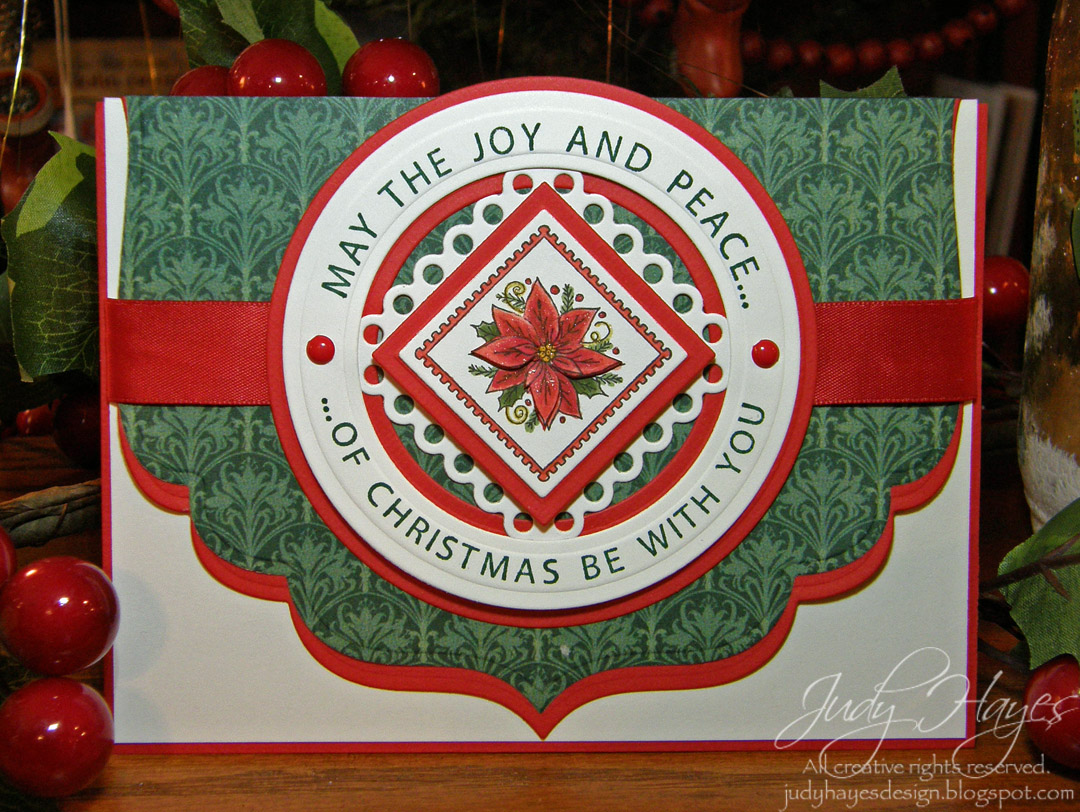
Can you find the Eyelet Square on this card? 
It makes a great edge around my poinsettia center from JustRite Hearts Come Home set. The poinsettia is stamped with Memento Black Tuxedo and colored with Copic markers (see photo below for colors).  I stamped a 2nd poinsettia and cut out some of the petals to add to the base poinsettia for dimension.  I added a touch of glitter with Spica markers.  I cut out the poinsettia image with  S4-128 Classic Squares SM #3.  The red mat is cut with S4-126 Classic Squares LG #3.  I layered them over a white Eyelet Squares #2.   I've tucked the corners under the circle verse, JustRite Christmas Treasures.  I stamped the verse with Ranger Bottle ink and clear embossed it.  I cut it out with S4-114 Standard Circles LG #4 and #6. The red circle was cut with S4-116 Standard Circles SM # 4 and #7.  I added 2 shiny red brads between the verse sections.  The stamp had a star there that I masked so not to stamp it.
I cut LF-190 Grand Labels Four #5 out of Graphic 45 Steampunk Debutante and Worldwin Red Cardinal papers for the background.  I staggered the paper layers to show the red border. 
The white card is 4 1/8 x 5 3/8" with a red mat tucked inside to show on 3 edges.  The card is a touch smaller than A2 so the verse circle can extend beyond the top of the card and still fit in an A2 envelope. 

Before I even finished the card, I had an idea for a gift bag!  Using the same papers and die templates, I made this bag topper.

It's the same on both sides except for the bow.  There's a slot at the top to just slip over the handles and hang on the top of the bag.  Easily reuseable!  I used the biggest Grand Labels Four for the base.  The verse and circles are the same as the card.  I left the center open and tucked an Eyelet Squares #3 under the Labels Four point.  It fits so well!  I love how it looks!  I added a shiny red brad from Creative Impressions and tied on a jingle bell with baker's cord.  I added some baker's cord and a jingle bell to the big red bow which is permanently attached.  I found the bag at a Dollar Tree store, 2/$1.00!  

Well, I didn't stop there.....I was on a roll with these Eyelet Squares!


I made some tags!  I stamped several images from JustRite Merry Little Christmas plus the poinsettia again.  I cut them out with Eyelet Squares #1 and colored them with Copic markers.  The markers shown were used on the card  and tags except for YR24, Y26 and Y28 which were only used on the jingle bells tag.  I added touches of Spica glitter, too.  To assemble add a red mat to frame the image (cut with Classic Squares SM #3) and a white "tag" cut with Eyelet Squares #2, "to" and "from" on the back and bakers cord ties.  Voila!  Cute tags ready for Christmas gifts!


Spellbinders:
Grand Calibur and mats
S4-305 Eyelet Squares
LF-190 Grand Labels Four
S4-126 Standard Squares LG
S4-128 Standard Squares SM
S4-114 Standard Circles LG
S4-116 Standard Circles SM
JustRite Hearts Come Home
JustRite Christmas Treasures
JustRite A Merry Little Christmas
Copic – G94,G99, R24, R27, R29, Y38, Y26, Y28, YR 24
Spica pens – clear, orange, gold, lipstick red
Creative Impressions brads
Scrapbook Adhesives by 3L
Ranger Bottle Ink
Tsukineko Memento Tuxedo Black
Graphic 45 Steampunk Debutante
Worldwin Red Cardinal paper
Cougar Smooth White paper

To be eligible to win the Spellbinders Holiday Hoppin’ Prize Package, just leave a comment.  Remember just one comment per blog!

Be sure to see all of tomorrow’s Holiday Hoppin’ blogs for inspiring projects and another chance to win!  Lots of eye candy!!!  .

If you have a chance, stop by again tomorrow.  I have another Eyelet Squares card to share! I told you I was on a roll!  When the mojo flows, you gotta use it!

Thanks so much for visiting!
-judy

Saturday, October 2, 2010

World Card Making Day

Morning All!
Happy World Card Making Day!


I hope you get a chance to make some cards today....or....at least browse some blogs to get inspired!  I'm happy that you stopped here!


I found some time to "play" the last 2 nights.  I started with Christmas Star by Penny Black and this is the card that I created.....


This flowercaptured my heart as soon as I saw it!  I love the uniqueness of it! 

I started by stamping it twice with Memento Tuxedo Black on white cardstock.  I colored it with the Copic markers shown. 


I cut out one complete flower and the top petals from the other flower.  These I glued over the matching petals for dimension.  I also cut out another center and popped it up with a Foam Square.

Then I stamped the script, Letter Background from Penny Black, with Memento Rich Cocoa ink on cream cardstock.  I aged it with Distress Antique Linen, Vintage Photo and a touch of Spun Sugar.  I added a brown frame cut with Spellbinders S4-301 Labels Sixteen #6 and S4-291 Labels Fifteen #4.  I embossed it with Floral and Stone Impressabilities.  With the Impressabilities still in place, I spritzed it with Copper Sheer Shimmer by Tsukineko. That led me to spritz the flower, too, with both Copper and Sparkle.  I layered a copper pearlesent mat with a salmon colored Bazzill paper spritzed it with Copper Shimmer, too.

The brown piece next to the card front was embossed with Floral & Stone Impressabilities also and spritzed with Copper Shimmer. 
I rubbed Spun Sugar and Vintage Photo along the edges of my cream card.
"Merry Christmas" (also Penny Black) was stamped with Rich Cocoa on cream cardstock and heat embossed with clear EP.  I used the longest tag from Spellbinders S4-081Tags Five to cut around it.  Then I rubbed on Spun Sugar and added Antique Linen and Vintage Photo along the edges.
 The "ribbon" is actually beige seam binding that I colored with Copic refills.  I used 2-3 drops of E07, 1 drop of R29 and many drops of 0 in a little plastic bag.  I added the seam binding and worked it around until the color was even.  A shot with my heat gun dried it quickly.
The last little detail are some pearls on the frame.  These are from AMuse, color Latte to which I added a touch of Copic R24.

I really enjoyed putting this card together!  I hope you've enjoyed it, too!

Happy Creating!
-judy

Saturday, April 24, 2010

Coloring Exercise

Can you believe it? I haven't done any stamping since I got back from the Spellbinders Retreat last Sunday night!  I think I have "stampers block"!  I'm hoping to get over it this weekend........hasn't happened yet but I still have tonight and Sunday to go!
In the meantime, I have a coloring exercise to share that I did at the Spellbinders Retreat last week. We were privileged to have Marianne Walker from Copic speak to us on Saturday.  She is a very talented artist as well as a Copic instructor. 
When she suggested this coloring exercise, she asked if we could each stamp something to color.  Well, this was Saturday afternoon.  We were all leaving early on Sunday.  We had all packed our stuff!  No one had any stamps or ink.  So with just a little encouragement from all of us, she sat down and drew a sunflower for us to color.  After a quick trip to the hotel business center to make copies, we were set to color.
.....this photo shows the sunflower taking shape.....
We each had 2 sunflowers to color and we were each given 2 letters of the alphabet.  We were to choose a word starting with one of the letters showing feeling or emotion, write it down and tuck it away.  Then, out came the Copics.  We were free to color one sunflower any way we liked.  The 2nd flower was to be colored depicting the word we had written down.


......here Marianne puts the finishing touches on her creation with her signature and a title.....
Everyone was so quiet once we started coloring. How relaxing it was!


Here's my first sunflower.  I chose to make it more orange than a traditional yellow sunflower.


This is my 2nd flower.  I chose a word starting with "R" to influence my color scheme.  Can you guess what the word was? What kind of emtion does this color portray versus the color of my first flower?

My word was "restful".  I chose softer pastel colors to portray that emotion.  Do you think it seems more restful than the orange one?

It was so interesting to see what the rest of the DT did with their sunflowers.  I wish I'd taken a photo of all of them on the table.........but I didn't.  Marianne laid them all out on a table and talked about each set of flowers commenting on techniques and colors used to portray each word.  There was a very wide variety of colors and styles.  Each one unique!
Here you can compare them side by side.....

It was a fun exercise.  Color does make a difference in the emotion or mood portrayed.


Margie just sent me this photo of all the DT sunflowers!!! Thanks, Margie! ...so you get to see all the flowers after all!
Margie is on the Spellbinders Blog Team. We met at the Retreat.  She's so fun!  And as you can see, she always had her camera!
                                         (added April 25, 2010)

Hope you enjoyed this little exercise!

Happy coloring!
-judy

Sunday, April 11, 2010

Simple Pleasure

As the verse on this card says, "nothing compares to the simple pleasure of a bike ride". 

The girl and bicycle are 2 images from Artistic Outpost's Lovely Day set.  I combined them for this card.  I first stamped the girl with flowers.  I stamped her again on Eclipse tape to make a mask.  I cut it out including the space in the handle of the basket and placed it over the stamped girl. I then stamped the bicycle with basket.  I really like how the 2 images fit together!
I used Copic markers to color the girl and bicycle. See photo for all the Copic colors.   I added Antique Linen around the edges for shading.
The punched edge was cut with a Martha Stewart punch.  The DP is from Basic Grey.

Take time to enjoy simple pleasures!

Have a great day!

Monday, March 1, 2010

Snow Happiness

Yes, I know today is March 1st! 

There's still lots of snow where I live!  I keep hearing predictions that March will bring 30-40" more!  I sure hope that's wrong.  March snow is usually wet and perfect for snowmen! 

So that's my excuse for a snow card to share.  This fun group of friends is a stamp by Penny Black called "snow squad".  I stamped it with Memento Tuxedo Black on Solar White card stock.  I used the Copic markers shown below to color all these fun critters.  I added a little Crystal glitter (Art Institute) to the snow man and snowflakes.  "Happiness" is a portion of a Penny Black verse called "the journey".

The card front is stamped with "sunburst" by Penny Black using Versamark and embossed with Polysparkle EP.  I added a few dots of Crystal glitter between the "sunbursts".   The paper is from We R Memory Keepers new Hippity Hoppity Cardstock pad......fun spring colors.  See I am thinking spring....lol

I cut out the verse with the smallest die from Spellbinders S3-147 Labels Trio.  I left it in the die to emboss it and then applied a hint of color with Copic B0000.  I added a little glue & Crystal glitter to the tiny brads.  The red mat was freehand cut.

Enjoy!
-judy


Friday, October 23, 2009

A Little Book for Copics

Hello everyone! Can you believe I'm posting again so soon?

I had forgotten about these photos. When I loaded the ornament photos I saw them. Aha! Something to put on the blog!


This is a little notebook and gift card that I made for a special friend.

She took the Copic Certification class this month. This little book is for coloring with her Copics so she can keep notes about which colors work well together, maybe some technique notes, too. Most of the pages are Neenah Classic Crest Solar White card stock......a great paper for Copic coloring. I included a few sheets of vellum, acetate and Avon Brilliant white card stock. The cover is cut out of USArtQuest mat board. I stamped it with my JustRite Brayton alphabet using Ranger Paint Dabbers. I misted the paint lightly before stamping which is why the letters have a tie-dyed look. Once the paint was dry, I sprayed a glossy clear coat over it so the paint wouldn't rub off. It's not really apparent in the photo but the covers have a nice shiny finish.

Inside the covers is paper from Basic Grey's Lemonade 6x6 paper pad. I used the Bind-It-All to cut the holes in the covers and pages and then attach the wire coil. The ribbon bookmark is tied to the top coil.

Out of my practice stamping for the title, I cut the word "color" to put on a little gift card. I used scraps of BG Lemonade DP and bits of ribbon......a very quick card. The envelope is a library card sleeve with the top edge turned down for a flap. Elizabeth's name is another practice scrap. I stamped her name on the back cover again using JustRite Brayton. The scrap was perfect to add to the envelope.


Just a little bit about Elizabeth.......she's a very talented stamper and paper crafter. We met at Summer CHA a few years ago. She was helping in the Penny Black booth. We each felt an instant bond yet never exchanged information so we could keep in touch. A couple months later, I emailed Penny Black to ask if they could give her my email address hoping she would respond. She did and we've been friends ever since!

Watch for Elizabeth's name in stamping magazines like Scrap & Stamp and Crafts'n'Things. She has stamped cards in both December issues. In fact, she has articles in both magazines! The article in Scrap & Stamp (Dec'09) about water coloring with dye inks is really good. She also designs for Penny Black. Some of her work is on their web page and product packaging.

Elizabeth, you're the best! Smiles to you....

I'll be sure to email her so she doesn't get too surprised by my post......

Have a super Saturday!

Wednesday, October 14, 2009

Holiday UnWrap!

Isn't this cat in the wrapping paper so cute?
So fun to color!

The cat is from Penny Black's "the Wonder" transparent stamp set. He's stamped with Memento Tuxedo Black ink and colored with Copic Sketch markers.

I often choose my markers to match a paper. Not this time! I colored the cat and then went searching for papers.

I found this paper from My Mind's Eye Just Dreaming 2. A perfect match! Both prints are from the same double sided sheet.
I added a touch of red in the mat and the ribbon. This ribbon has just the right texture and mat finish! I'm not sure who makes it......I found it at Fond Memories.
I wrote the tiny "Merry Christmas" on the tag with a fine tip marker.


I used these Copic colors: BG10, BG72, E35, E37, E42, R20, R29, W1,W3, E33, YG03, Yg67


Supplies:
Penny Black "the Wonder"
Copics: BG10, BG72, E33, E35, E37, E42, R20, R29, W1, W3, YG03, YG67
Papers: My Mind's Eye Just Dreaming 2, Neenah Classic Crest Solar White, Bazzill
Memento Tuxedo Black ink
Red Ribbon

Saturday, October 3, 2009

Hollyday Cardinal


Today is World Cardmaking Day!

There are lots of blogs and websites sharing card ideas! What fun to get inspired! I could spend all day surfing the web........

I have a Christmas card to share that I made using JustRite's Christmas Treasures stamp set.

I've taken photos to show some of the steps to create this card.


I stamped the cardinal and border with Memento Black Tuxedo ink.

Next, I cut the circle shape with a Spellbinders' die.
I used removable tape to keep the die in place while cutting.

I used Copic markers to color the image. Here you see just one color on each part: Cardinal-R29; Beak-YR04; Birdhouse-E42; Holly-YG03

This photo shows more dimension because I've shaded all the parts with the markers shown.

The next step is to add the border created with Distress Antique Linen ink.
I've placed a circle mask (Eclipse tape with packing tape over it, cut with Spellbinder's circle die)
over the center. Working on a craft mat, I then rubbed the Antique Linen over the border until the color is even.

This is the result.......a nice crisp border and so easy!


To assemble the card, I layered the cardinal onto a Bazzill Red circle mat, then onto a rectangle of plaid Graphic 45 paper also matted with red, and finally onto holly paper and then onto a white card. A green bow is the finishing touch.

Supplies:
JustRite Christmas Treasures
Memento Tuxedo Black Ink
Distress Antique Linen Ink
Copic markers: R29, YR04, W3, E42, E35, E37, YG03, YG63
Graphic 45 papers - Christmas Past Collection
Classic Crest Solar White Neenah paper
Green Ribbon

I hope you get a chance to create a card today!

Afterall, it is World Cardmaking Day!

Take time to stamp, paper craft, blog hop, or create something!
Enjoy!
judy

Sunday, September 13, 2009

From the Pumpkin Patch


I created this card with the pumkins from the JustRite Autumn Blessings set. It's such a versatile set!

The pumkins were stamped with Memento Black Tuxedo ink on Classic Crest Solar White paper, then colored with Copic markers: C3, E35, E37, Y38, YR04, O

I shaped the pumkins for dimension by rubbing a paper stump on the back of each one. One advantage of Copics is that some of the color seeps through to the back......that's how I could tell where to shape the paper. Anyone coming to the Fond Memories Workshop on Sept 26 will get to try this technique.

The greeting is stamped in black and clear embossed on Kraft paper, then cut with a scalloped oval Spellbinders die. I cut another dark brown oval to layer behind it. The pumpkins are mounted with foam tape.


All printed papers are from My Mind's Eye: Boo to You Spooky Stripes (front & back) and Candy Dots. I rubbed a little Distress Antique Linen around all the edges of the card.

A few buttons, orange twill tape and a little scallop border finish the card.

This was a FUN card to put together. Even the coloring with Copics is easy with just a few colors.
Have a great day!
Smiles...
judy

Friday, September 4, 2009

Joy


Greetings Blogger Friends!


Today, I'm sharing a card I made for Penny Black also posted on the Penny Black Blog. The stamp is "hand-mailed", one of a collection of stamps featuring this cute bear.

They are so fun to color with Copic markers!

I chose to color it in blues rather than traditional holiday greens and reds. Afterall, a U.S. mail box is blue! (Those of you who know where I work will understand!)


I started with my image stamped with Memento Tuxedo Black ink on natural card stock. I used lots of Copic colors....

0, 100, C1, C3, C5, C7, B02, B05, B24, B26, B95, B97, B99, BG10, BG34, BG49, E31, E33, E35, E37, E42, R20, R29, R37, W3, W5
.......all in the photo below.

I added glue and glitter along the snow edges on the mail box and on the ground as well as on the snowflakes. There's Fun Flock on the cuff of the bear's cap & pompom. I layered it on a red mat with narrow edge to set off the little red heart on the envelope.

Next, I cut the blue mat and stamped "snow scroll" along all the edges using Adirondack Lights Aqua ink. I added spots and swirls of glitter with a glitter pen.


The blue card front also has "snow scroll" stamped repeatedly over it but no glitter.


I stamped "joy" (from "holly day critters" stamp set) with Memento Rhubarb Stalk ink on natural card stock. I used a Spellbinders Classic Oval for the shape.


For assembly, I fastened the aqua paper on a bit darker blue paper leaving just a narrow edge showing. That was glued to the darker blue. I tied a bow in silk ribbon and fastened it in place across the mats. The ribbon ends are fastened to the back. All of this is fastened to a natural card - 4 1/4"x 6 1/4". The main image with red mat is fastened over the ribbon. The little "joy" is fastened with a foam square.


Supplies:

4014K – hand-mailed
3892K – snow scroll
30-017 – holly day critters
Memento Tuxedo Black, Rhubarb Stalk ink (Tsukineko)
Adirondack Lights Aqua ink (Ranger)
Markers (Copic 0, 100, C1,3,5,7, W1,3,5, E31,33,35,37,42, R20,29,37, B02,05,24,26,95,97,99, BG10,34,49)
Paper: natural (Classic Crest), red, blues (Bazzill)
Silk Ribbon (Creative Impressions)
Glitter (Art Institute Ultra Fine Crystal)
Classic Oval Small (Spellbinders)
White Fun Flock
Glue


Sending you JOY!
-judy

Monday, August 17, 2009

Autumn Blessings

I'm on a roll with my JustRite Autumn Blessings set......


The apple basket is another center image in the set. I chose the "Autumn Blessings" border. There are 6 centers & 6 different borders to mix & match. The watercan from yesterday's post & the apple basket are perfect for coloring with Copic markers. Lots of detail but not too big. Easy & quick to color!

I stamped the apples & border with Memento Tuxedo Black ink on white paper. I colored the apples & basket with the Copic markers shown below. I also colored the border.....tan around the "Autumn Blessings". I used a Spellbinders Classic Oval to cut it out. You can see that the cut edge came very close to the words yet fits nicely. I cut another tan oval for a mat. I added black Hero Arts Gemstones over the acorns on the border.


0, W1, E31, E33, E37, E42, G21, G24
R22, R27, R29, R32, R35, W1


For the card front, I chose a sand colored Bazzill paper (I don't know the name). I centered & cut a large oval opening using a Petite Oval Spellbinders die. I cut a 1/8" smaller oval out of red paper to create the border. That's when I decided it was too plain so I debossed the tan paper with a Spellbinders Impressabilities......debossed means my Impressabilities was on top of my paper so the pattern was pushed down into the paper. That's why the pattern shows paper color after I rubbed Antique Linen Distress ink over the raised areas. It really adds a nice look to the card. Much better than plain! Then I glued the red oval in place behind the tan.
I searched my paper stash for something to put behind the apple oval.....couldn't find just the right thing! So I inked the Impressabilities with Antique Linen & pressed it onto a piece of cream card stock. The ink didn't stick very well to the metal.....beaded up a lot....but I still like the subtle pattern it created....just enough. You may need to click on one of the photos to be able to see it.
The final step was assembling all the parts. I knotted the red ribbon, positioned it & glued the ribbon ends to the back. I always cut my ribbon rather than wrap it all around the card.....it's easier to tie & saves a little ribbon.
Then I glued the whole thing to a cream 4 1/4 x 5 1/2" card front. I used foam tape to fasten the apples oval and placed it a little offset......for intesest & so the ribbon ends wouldn't cover too much. I added 5 little Hero Arts black Pearls on the background oval.
This is not at all how I envisioned using the apple basket once I had colored it......I certainly love how it turned out! Sometimes my beginning idea has to be tweaked.........or maybe it's more like going with the creative flow! I was on a roll........
* * *
I'm having trouble with Blogger & my paragraphs.......they look great in my draft but don't publish the same.........sorry if it all runs together.
* * *
Supplies:
JustRite Autumn Blessings Set
Spellbinders Classic Ovals & Petite Ovals
Spellbinders Impressabilities Flowers
Copic Markers: 0,E31,E33,E37,E42,G21,G24,R22,R27,R29,R32,R35,W1
Distress Anitque Linen ink
Memento Tuxedo Black ink
Red Ribbon
Hero Arts Gemstones & Pearls - black


If you checked this blog yesterday.......you know this post changed. I can't believe I didn't see that the greeting border was upside down!!! :( Duh!!
So I fixed it tonight by stamping a new border, cutting out an oval center so my apples could show through, & glueing the new border in place. A much easier fix than coloring the apples again. Of course that meant new photos...... I think it looks much better now!
* * * * *
Smiles to all my blogger friends! I'm so thrilled to have visitors from many foreign countries: Japan, Norway, Sweden, UK, Canada, Mexico to name a few .
Welcome! I hope you enjoy your visit!

Smiles to all!
-judy