Join Spellbinders™ Paper Arts and Crafters Home
as we celebrate a Fall Sneak Peek!
Spellbinders and
participating stores in the Crafters Home Buying Group are excited to introduce three new die template sets
sold exclusively through Crafters Home stores through January! You’ll have to wait until February to find these die template designs in non-member stores.
These new dies are in stock! Get yours now at a participating Crafters Home store! See the Spellbinders Blog for the list of participating stores
Visit the
Spellbinders Blog November 14 - 16 to see a new Spellbinders die template revealed each day! Visit designer blogs to enter the daily contests and see inspiring projects using the new releases. Comments on Designers Blogs and the Spellbinders Blog count as entries into daily drawings. Daily winners receive all three of the new designs!
Today's new die template is S4-341 Wavy Rectangles
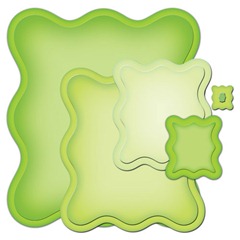 Dimensions:
1: 3/8 x ½”
2: 1 1/8 x 1 ¼”
3: 1 7/8 x 2 1/8”
4: 2 ¾ x 3 1/8”
5. 3 5/8 x 4 ¼”
Now, that you’ve seen the new Wavy Rectangles die templates, you want to see the project, right?!!
I created a double photo frame perfect for wallet size photos! Great for school photos. This frame could easily be adapted with more frames for any number of photos. A simple and easy gift for grandparents, aunts and uncles, friends!
Each individual frame consists of 2 – S4-341 Wavy Rectangles #5 (#1 being the smallest) cut from red stripe Echo Park Dots and Stripes paper, 1 – Wavy Rectangles #3 nested in #5 cut from teal stripe, and 1 piece of adhesive backed white fun foam cut with Wavy Rectangles #5. The Fun Foam adds thickness and is easily cut with Spellbinders die templates. I like the white edge, too!
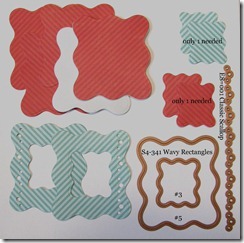 This photo shows all the cut pieces as well as the die templates used for the double frame. Only 1 of each of the small pieces is needed. I realized that when it was too late to take another photo!!!
I cut the frame by nesting Wavy Rectangles #3 inside #5.
Here’s a tip I use for centering 2 die templates to cut a frame.
I use another die template, in this case Wavy Rectangles #4 to help me center my smaller die template. Yes, I use a ruler sometimes, too, but usually I just visually center it. It’s easier to see the alignment on a small distance. For this frame, I taped Wavy Rectangles #5 to the paper. I nested both #3 and #4 Wavy Rectangles inside #5. Then I aligned Wavy Rectangles #4 evenly spaced and centered. I aligned #3 evenly spaced and centered in #4 and taped it in place. I carefully removed #4 before cutting the frame.
After cutting the frame, I cut the row of holes with E8-001 Classic Scallop Edgeabilities™ which just fits the Wavy Rectangle to cut the holes within the frame. Once the holes were cut, I placed the frame back into Wavy Rectangles #5 and #3 to emboss. The embossed edges would have been flattened when I cut the holes had I embossed it earlier.
This photo shows all the cut pieces as well as the die templates used for the double frame. Only 1 of each of the small pieces is needed. I realized that when it was too late to take another photo!!!
I cut the frame by nesting Wavy Rectangles #3 inside #5.
Here’s a tip I use for centering 2 die templates to cut a frame.
I use another die template, in this case Wavy Rectangles #4 to help me center my smaller die template. Yes, I use a ruler sometimes, too, but usually I just visually center it. It’s easier to see the alignment on a small distance. For this frame, I taped Wavy Rectangles #5 to the paper. I nested both #3 and #4 Wavy Rectangles inside #5. Then I aligned Wavy Rectangles #4 evenly spaced and centered. I aligned #3 evenly spaced and centered in #4 and taped it in place. I carefully removed #4 before cutting the frame.
After cutting the frame, I cut the row of holes with E8-001 Classic Scallop Edgeabilities™ which just fits the Wavy Rectangle to cut the holes within the frame. Once the holes were cut, I placed the frame back into Wavy Rectangles #5 and #3 to emboss. The embossed edges would have been flattened when I cut the holes had I embossed it earlier.
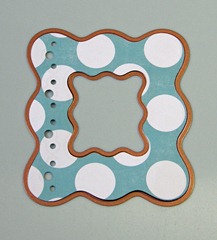 Here you see the frame with Wavy Rectangles #5 and #3 in place ready to run through my Grand Calibur™ machine to emboss the edges.
I sanded all the edges of the frame front and back as well as the connecting Wavy Rectangle.
To assemble, I adhered 1 red Wavy Rectangle (not sanded as it won’t show) to the adhesive side of the Fun Foam. I applied adhesive to another red Wavy Rectangle (sanded) with my Xyron and applied it to the other side of the Fun Foam. It’s amazing how much the paper stiffens the Fun Foam! (Tip: After applying adhesive with the Xyron and before removing the clear sheet and backing, run it through the Grand Calibur™ machine with embossing mat. The adhesive is pressed onto the paper and won’t be left in the holes or along the edges!)
To apply the frame to the front, I needed to leave a pocket for the photo. I decided the easiest way to get adhesive along all the wavy edges and around the holes was to use my Xyron again. I cut a scrap piece of cardstock about 1/8” wider than the photo and long enough to extend beyond the top where the photo will be inserted as well as below the frame opening..
Here you see the frame with Wavy Rectangles #5 and #3 in place ready to run through my Grand Calibur™ machine to emboss the edges.
I sanded all the edges of the frame front and back as well as the connecting Wavy Rectangle.
To assemble, I adhered 1 red Wavy Rectangle (not sanded as it won’t show) to the adhesive side of the Fun Foam. I applied adhesive to another red Wavy Rectangle (sanded) with my Xyron and applied it to the other side of the Fun Foam. It’s amazing how much the paper stiffens the Fun Foam! (Tip: After applying adhesive with the Xyron and before removing the clear sheet and backing, run it through the Grand Calibur™ machine with embossing mat. The adhesive is pressed onto the paper and won’t be left in the holes or along the edges!)
To apply the frame to the front, I needed to leave a pocket for the photo. I decided the easiest way to get adhesive along all the wavy edges and around the holes was to use my Xyron again. I cut a scrap piece of cardstock about 1/8” wider than the photo and long enough to extend beyond the top where the photo will be inserted as well as below the frame opening..
 The scrap white cardstock is centered on the back of frame covering the opening.
I applied adhesive to this side with my Xyron. Then I peeled off the clear cover and discarded it. I gently lifted the frame at the top edge from the non stick backing. I didn’t take it off completely. I slid out the scrap cardstock and discarded it. I pressed the frame back onto the non stick backing. I placed it on my base plate with a piece of text paper over it and the embossing mat and plate. I ran it through my Grand Calibur™ machine. Any extra adhesive on the edges stuck to the text paper as well as the adhesive in the holes!
I removed the frame fromt he backing and placed it on the front of my Fun Foam sandwiched with red paper.
For the double frame, I made 2 frames.
To make the connection, I used one of the cutouts from a teal frame and cut another one from red paper(Wavy Rectangles #3). I adhered them together with teal on one side and red on the other. I used my Scor-Pal to make 2 score lines 1/8” from center, then folded each one. I used Scor-Tape to adhere it to the back of the 2 frames butting each frame just to a fold line. The frame can be easily folded to mail or give as a gift!
The scrap white cardstock is centered on the back of frame covering the opening.
I applied adhesive to this side with my Xyron. Then I peeled off the clear cover and discarded it. I gently lifted the frame at the top edge from the non stick backing. I didn’t take it off completely. I slid out the scrap cardstock and discarded it. I pressed the frame back onto the non stick backing. I placed it on my base plate with a piece of text paper over it and the embossing mat and plate. I ran it through my Grand Calibur™ machine. Any extra adhesive on the edges stuck to the text paper as well as the adhesive in the holes!
I removed the frame fromt he backing and placed it on the front of my Fun Foam sandwiched with red paper.
For the double frame, I made 2 frames.
To make the connection, I used one of the cutouts from a teal frame and cut another one from red paper(Wavy Rectangles #3). I adhered them together with teal on one side and red on the other. I used my Scor-Pal to make 2 score lines 1/8” from center, then folded each one. I used Scor-Tape to adhere it to the back of the 2 frames butting each frame just to a fold line. The frame can be easily folded to mail or give as a gift!


I added 3 little buttons with Glue Dots to each frame.
I hope you’ve enjoyed this project!
Be sure to check out all the other fabulous projects using S4-341 Wavy Rectangles!
Visit these Designers Today!
Tonya Dirk
Heidi Blankenship
Shanna Vineyard
AJ Otto
Judy Hayes – You are here!
Contest Details
Participants wishing to be included in the daily drawing for the Spellbinders Fall Sneak Peek contest must adhere to all of the following rules.
- The Fall Sneak Peek starts November 14, and ends November 16, 2011. It consists of three individual contests, one each day.
- Each Fall Sneak Peek Bog will accept comments as entries from 12:00 am until 11:59 pm Eastern Standard Time, on its scheduled day.
- Each comment counts as one entry. One entry per person, per blog please.
- One winner each day will receive the three new die templates available exclusively at Crafters Home stores.
- All three winners will be announced on the Spellbinders Blog on November 17. The winners will have 48 hours to respond to the email address on the winning post to claim their prize. If a winner fails to respond within 48 hours, a new winner will be drawn.
- By entering, you allow Spellbinders to publish your first name, city, state, and country of residence and a quote from you, on the Spellbinders Blog, website, and in promotional materials.
- Spellbinders Designers, contractors, employees and immediate family members are not eligible to win.
- The invitation to the Fall Sneak Peek Blog Hop is extended to all, we are happy to ship prizes worldwide.
Any questions regarding this contest should be sent to
ContestQuestions@Spellbinders.us
Thank you for visiting!
-judy


