At first glance, it looks like a background die; it is anything but a background die. It was designed so that each of the flowers can be snipped out to create a panel, frame or element. Whether you want the 4 x 4 frame, the 3 x 4 frame, a one layer border, a two-layer border or a corner, all you have to do is "snip". Each one of us has taken the die and spun it into a creation - we hope to inspire!!
When I first cut Snip It Flowers, I was reminded of a crocheted doily or a granny square afghan. That's what inspired me for my first card. It's quite easy to snip out sections and flowers to make different sizes. I really like that there are small flower dies to use as accents or even on their own! I used them to layer over the top of the larger Snip It Flowers.
When I first cut Snip It Flowers, I was reminded of a crocheted doily or a granny square afghan. That's what inspired me for my first card. It's quite easy to snip out sections and flowers to make different sizes. I really like that there are small flower dies to use as accents or even on their own! I used them to layer over the top of the larger Snip It Flowers.
My Project Today:
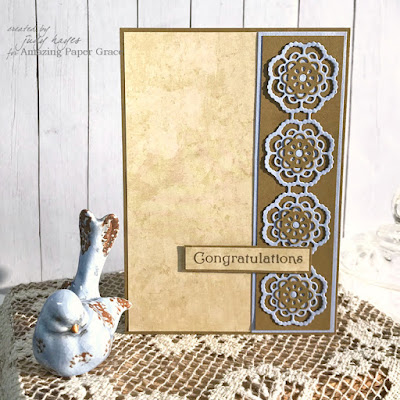
For my first card, I chose to snip the large Snip It Flowers to 4 x 3 flowers. I also snipped out 2 flowers in the center. I wanted the verse piece to lay flat against the card so the tiny added flowers would also lay flat. (One could get almost the same look by leaving the 2 center flowers in place.) The flower panel is layered onto olive paper cut big enough to show through the flower centers. I layered small white flowers over the blue. I like how the olive paper shows through the centers. Once the verse was in place, I added tiny flowers around it. I made the flower centers with a hole punch. The flower panel is layered over patterned paper with a subtle design and then onto a white card. The card is 4.75 x 6 inches.
Supply List:
Stamps: Penny Black "special sentiments"
Paper: Cardstock: Blue, Olive, White; Digital Printed Pattern Paper
Ink: Versafine Clair Fallen Leaves
Accessories: Hole Punch
Adhesives: E-Z Runner® Micro Refillable Dispenser, E-Z Dots® Permanent Refillable Dispenser,
Adhesive Dots Micro
I made a second card with the strip of 4 flowers that I cut off for the first card. You can see how different the flowers look with different paper colors. I layered the flower strip over olive strip. I added small flowers cut from olive paper. For the centers, I found the tiny dots of blue and put them back in the flower centers. A patterned paper with texture design covers the front with a narrow olive border. I popped up the verse with Thin 3D Foam Squares. I love the simple elegance and rich earthy colors of this card!
If you want to find out more about the Club - prices, how you sign up and what's included, please look -------- HERE.
If you missed the introduction and want to know more about what inspired the Die of the Month Club, look -------HERE.
If you missed the introduction and want to know more about what inspired the Die of the Month Club, look -------HERE.
More inspiration is just a click away. Stop by with each Creative Team Member to see how they manipulated this die to come up with a unique project for you to try!
Visit Kate - craft2owls.blogspot.com
Visit Joanna – joannakrog.blogspot.com
Visit Teresa – victorianpaperqueen.blogspot.com
Visit Ewelina - elinaart.blogspot.co.uk
Visit Melissa – keepsakesbymelissa.blogspot.com
Visit Becca – amazingpapergrace.com/blog
Visit Joanna – joannakrog.blogspot.com
Visit Teresa – victorianpaperqueen.blogspot.com
Visit Ewelina - elinaart.blogspot.co.uk
Visit Melissa – keepsakesbymelissa.blogspot.com
Visit Becca – amazingpapergrace.com/blog
We can’t wait to see what you make with these exclusive dies – be sure to post your creation on the Amazing Paper Grace Die of the Month page ------- HERE or on Instagram using the hashtag #AmazingPaperGraceClubKit


4 comments:
Both of your projects are just stunning and i love how you layered the pieces in different subtle colors. These are going to be so welcomed by someone in the mail.... they are truly beautiful :)
BEAUTIFULLY DONE, Judy!!! LOVE the way you used this creative die--leaving a window on your card, & as an accent piece on your other card!!! SUCH A DELICATE Die! ;) QUITE BEAUTIFUL!!!! ;)<3
Lovely cards so many ways to use this die thanks for the inspiration
Absolutely beautiful!!!
Hugs
Becca
Post a Comment