Showing posts with label Girlie Grunge Gauze. Show all posts

Friday, July 22, 2016

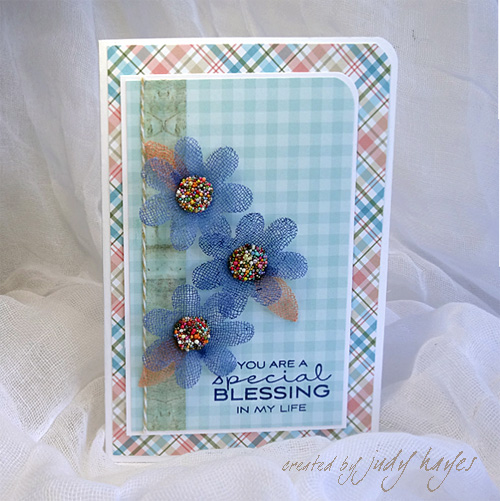
Die Cut Gauze Flowers on a Card

 
Hello Blog Friends! 

I hope you've stopped for the Scrapbook Adhesives by 3L and My Favorite Things blog hop! A great combination of super adhesives and fun stamps and papers!  To showcase some of the products, I've created a card with die cut gauze flowers.  These were cut from Girlie Grunge Gauze stiffened with Girlie Grunge Art Medium.  The gauze would simply fall apart when die cut without something to bind the fibers together.  The Girlie Grunge Art Medium does that.  It works super well! 
 
Here’s what I did:
First, I misted a piece of Girlie Grunge Gauze with water.  Then I wadded it into a ball to disperse the water evenly.  Next, I added a few globs of Girlie Grunge Art Medium on the gauze.  Again, I wadded it into a ball and squeezed it to spread the Art Medium. (It's a bit messy but washed off easily). I repeated that step once more.  Then I spread the gauze on a craft mat to dry.  I don’t have a lot of patience waiting for stuff to dry!  I used a heat gun to speed it up.  Be careful though, as it will scorch quite easily! 
To add color to the gauze, I sponged on MFT Hybrid Inks, Blueberry for the flowers and Coral Crush for the leaves.  I let it dry a few minutes.  I used MFT Die-namics Prima Donna Petals dies to cut flowers and leaves.  The gauze cuts so easy! 

I used a dot of Girlie Grunge Art Medium (this product is so versatile!) to glue the flower together. 


To make the flower center, I placed a DODZ™ 3D on flower front.  Then I placed a DODZ™ Medium on the back and left the plastic in place.  I poured some Prills over DODZ™ 3D, pressed them in place and removed excess. 
 
To place on card, I simply removed protective plastic from DODZ Medium on flower back and pressed in place. 
My card is 4¼ x 6⅛ʺ.  I used a white card base with one corner cut with ½ʺ rounder.  I added a layer of paper from MFT Subtle Plaids Paper Pack fastened with E-Z Runner Dots Permanent.  The verse from MFT Cheerful Blessings is stamped with Blueberry ink on MFT Homespun Gingham paper.  I rounded the corner and layered it on white cardstock.  I added a strip of Girlie Grunge Oak Tissue Tape.  Next to it, I fastened a piece of Girlie Grunge Twine glued in place with Girlie Grunge Art Medium.  I used E-Z Runner Dots Permanent (my favorite tape runner!) to fasten to card.  The final step is to fasten the flowers! 
 
 
Thank you for stopping! 
Happy Creating!
 
Judy
For more inspiration, go to Scrapbook Adhesives by 3L blog or My Favorite Things Blog
Supplies:
White card stock

Tuesday, April 19, 2016

Bright Daisy Frame

Hello friends! Today, I’m sharing a Bright Daisy Frame for a blog hop sponsored by Stampendous®! and Scrapbook Adhesives by 3L™! What fun! Favorite stamping products and favorite adhesives!
You can find all the details for Day 2 here. And there are prizes!  

For my Bright Daisy Frame, I used Stampendous! Cling Daisy Mix stamp set and matching Daisy Mix die set with Spring Micro Glitter and Scrapbook Adhesives by 3L Girlie Grunge Gauze, 3D Foam Squares and Dodz Mini.

To make this frame, I started with a wood craft frame and painted it soft yellow.  For some texture and a little bit of shabby chic look, I glued Girlie Grunge Gauze to it.  I used Dual Tip Glue Pen to spread a thin coat of glue over frame.  Then I pressed and smoothed a piece of Girlie Grunge Gauze over it.  I trimmed gauze along edges and opening.
Next, I created the flowers.  I used stamps from Stampendous® Cling Daisy Mix set with black ink on white card stock. I colored them with Distress Crayons and blended the colors with water.  Photo shows upper flower and leaf colored with crayons and bottom flower and leaf colored and blended with water. 
 It’s so easy to cut these out with matching Stampendous® Daisy Mix Die Cut Set!  Simply match the inner edges of die with stamped image, tape in place and pass through die cut machine.  Perfect cut!   I shaped the flower petals at this point while they were still a little damp.
Next, I used Scrapbook Adhesives by 3L™ Dual Tip Glue Pen to apply glue over pink areas and applied Pink glitter from Stampendous Spring Micro Glitter Set.  Then I added glue over the yellow areas and sprinkled with Sunflower glitter.  For leaves, I used Lime glitter along veins, then added glue along edges and sprinkled with Sunflower glitter.  Upper flower and leaf in photo have one color glitter; lower leaf and flower have 2 colors.

For the flower centers, I applied glue with Dual Tip Glue Pen (so easy to use!) and covered with Stampendous Chunky Metallic Seasonings Embossing Enamel.  I did not heat it. I simply used it as a nice textured flower center!
 After flowers dried completely, I applied Scrapbook Adhesives by 3L 3D Foam Squares under center of each flower.  On leaves, I used a small 3D Foam Square near center of leaf and Dodz Mini at base end. 


 I left the backing on the adhesives while I arranged flowers on the frame.  It was easy then to remove adhesive backing and press each flower or leaf in place!

Thanks so much for visiting!  I hope you’ve enjoyed this Bright Daisy Frame! 
Judy

Sunday, April 17, 2016

Scrapbook Adhesives by 3L DT

Hey blog friends!

Well it has been a very long time.......  Somehow it doesn't seem like its been 5 months since I posted!   Today is a start to get back to sharing here!

I'm happy to announce that I'm now on the Scrapbook Adhesives by 3L Design Team!  Their adhesives are awesome! So that means I'll be posting a project on their blog 2 times a month.  My days are 7th and 28th of each month.  I plan to post something here but all the details will be on Scrapbook
Adhesives blog here.

Here's a Burlap Gift Box Topper I shared earlier this month.  You'll find all the details here!


Thanks so much for stopping by! 

Happy creating!
judy