Friday, December 29, 2023

Love and Happiness Card with Heart Dangles

 Hello Friends!

Another project for Scrapbook Adhesives by 3L!  


This pretty card features touches of metallic foil on a stamped and heat embossed background.  After warming the embossing, I placed foil on it and it stuck to the melted embossing powder.  I again heated it after foil was stuck which melted foil into the embossed design.  It's a bit challenging to do to get the right amount of heat to just re-melt the powder but not too much to make it too soft.  The dangle hearts are made from 3D Foam Hearts stuck together, covered with embossing powder, heated to melt it and then re-heated to add foil.  It's a great technique to used foil that has been used for other projects and still has areas of color.  I like the randomness of the foil on the background. 

All the details with step out photos are HERE on Scrapbook Adhesives by 3L blog.

Thanks for visiting!

Judy


Supplies:

Materials Needed:
Scrapbook Adhesives by 3L®

E-Z Runner® Ultra Strong Refillable Dispenser

3D Foam Squares White Regular

3D Foam Hearts

Adhesive Dots Mini

Metallic Transfer Foil Sheets Pastel Colors

Other: Stamp: Penny Black (Beautiful Heart), Stampers Anonymous Tim Holtz(Vines and Roses); Ink: Imagine Crafts/Tsukineko (Versamark); Embossing Powder: Ranger Ink (White Embossing Powder); Craft Dies: Spellbinders, Taylored Expressions (Bead Board Embossing Folder); Dusty Aqua, Navy+ White Cardstock; White Pearl Cotton


Wednesday, December 13, 2023

Christmas Cookie Bag Topper

 Hello friends!

Do you make cookies to give as gifts during the holidays?  I like to give some to a few family friends. This year I decided to make a Cookie Bag Topper to make them festive.


I've posted all the details with instructions and photos showing how I made this on Scrapbook Adhesives by 3L blog today.  You can click HERE to the the post

It's an easy project that can be done in steps to fit into a busy schedule.


Once the "cookies" are die cut and assembled, putting the topper together goes quickly.  

Of course, baking the cookies to put in the bag take more time!  But oh so good!

Thanks for visiting!

Judy


Materials Needed:
Scrapbook Adhesives by 3L®


Thin 3D Foam Squares White Mix

Home Hobby by 3L®

Premium Double-Sided Tape 1/2in.

Other: Papers, Stickers + Ephemera: Photo Play Paper Co (For the Joy of Winter -Through the Woods); Stamp: Stampers Anonymous (Tim Holtz Christmas Cartoons) ; Ink: Imagine Crafts/Tsukineko (Versamark), Ranger Ink (Distress Vintage Photo); Embossing Powder: Ranger White Embossing Powder; Craft Dies: Sizzix (Tim Holtz Fresh Baked #1, Gift Tags); Kraft, Red, Aqua + White Cardstock; Red and White Bakers Twine; Clear Treat Bag

Sunday, December 10, 2023

Christmas Gift Card Holder

 Hello friends!

I've put together an easy to make Christmas Gift Card Holder so share today.


It's a card with a pocket that holds a gift card and there's space to add a verse or greeting.  A decorated sleeve band slides around the card to hold it closed and gift card secure. 


All the directions and step out photos can be found on Scrapbook Adhesives by 3L blog.  Click HERE to see the post.

Thanks so much for visiting!

Judy


Supplies

Materials Needed:
Scrapbook Adhesives by 3L®

E-Z Runner® Ultra Strong Refillable Dispenser

Thin 3D Foam Squares White Mix


Home Hobby by 3L®

Premium Double-Sided Tape 1/4in.

Other: Papers, Stickers + Ephemera: PhotoPlay Christmas Memories (Poinsettia, Nutcracker, Die Cut Tags); Stamp: Rubber Soul (Merry Christmas); Ink: Ranger Ink (Distress Vintage Photo), Imagine Crafts/Tsukineko (Versafine Onyx Black Ink); Balsa Cardstock, Red Pearl Cotton


Friday, October 13, 2023

Jack-o'-lantern Shaker Card


Happy Friday! 


Here's a fun Jack-o'-lantern Shaker Card for Halloween.  It makes me smile to see that pumpkin face with sequins, glass glitter and micro beads shining though it's face.  The bats are covered with shiny black foil.  Clouds and background have pearlescent Distress Crayon rubbed over them.

You can find all the directions for this card on Scrapbook Adhesive by 3L Blog today.  All the details for making a pumpkin into a shaker are there with step out photos.  It's really easy with 3D Foam Strips and Adhesive Sheets.  Check it out HERE.


Thanks for stopping by!

Judy


Materials Needed:

E-Z Runner® Ultra Strong Refillable Dispenser

3D Foam Squares Black Regular, Thin 3D Foam Squares Black Mix, 3D Foam Squares Micro Black

3D Foam Strips

Adhesives Sheets 4 x 6in.

Metallic Transfer Foil Sheets Nature Colors

Other: Crayons: Ranger Ink (Tim Holtz Distress Crayons (Phantom Mist, Unravelled); Stamp: Stampers Anonymous Tim Holtz (Simple Sayings); Ink: Ranger Ink (Distress Vintage Photo), Imagine Crafts/Tsukineko (Versafine Onyx Black); Craft Dies: Sizzix (Tim Holtz Edison, Colorize, Moonlight); Yellow, Orange, Rust, Black, Light Gray, Olive Green, Tan Cardstock; Clear Acetate; Shaker Fill (Sequins (Yellow, Holographic), Gold Micro Beads, Stampendous Glass Glitter (Champagne)

Friday, September 29, 2023

BOO! Halloween Card

 Happy Fall everyone! 

Where I live in Minnesota, the air has a chill to it and October is just a day away.  With October comes Halloween!  


Today, I posted this fun BOO! Happy Halloween Card on Scrapbook Adhesives by 3L Blog.  There are step out photos and directions showing how to make it as well as supply list.  

It features foil from Metallic Transfer Foil Sheets Nature Colors on word BOO!.  It has a nice shine which isn't quite visible in my photo. 


The word BOO! is cut from black cardstock with Adhesives Sheets 4 x 6in. applied to front and then die cut.


After peeling adhesive liner, metallic foil is place over word, rubbed and foil then peeled away.  It's a fun technique and I like the metallic color and sheen. 


Hop over to Scrapbook Adhesives by 3L Blog to see all the details!  Click HERE

Thanks for visiting!

Judy


Materials Needed:
Scrapbook Adhesives by 3L®

Adhesives Sheets 4 x 6in.

Metallic Transfer Foil Sheets Nature Colors

E-Z Dots® Permanent Refillable Dispenser

Crafty Foam Tape Black 108ft.

Adhesive Dots Micro

Other: Stamp: Stampers Anonymous (Tim Holtz Unraveled); Ink: Ranger Ink (Distress Picket Fence, Distress Embossing Ink); Embossing Powder: Ranger Ink (White Embossing Powder); Craft Dies: Sizzix (Tim Holtz Big Frights); Black, Kraft + White Cardstock. White Uni-Ball Signo Pen


Wednesday, September 13, 2023

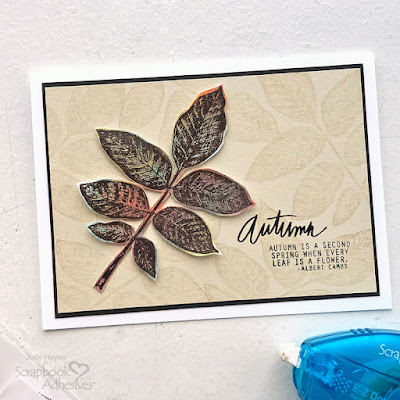
Autumn Leaf Card

 Hello Friends!


I posted this card on Scrapbook Adhesives by 3L Blog today.  This card makes a bold statement and is easy to make.  
The leaf is stamped with Distress Archival Ground Expresso, clear heat embossed and then colors of Distress inks sponged over it. 


I stamped the same leaf stamp with Distress Antique Linen ink to make the background. 


"Autumn" and verse are stamped with Versafine Black Onyx ink. For the verse, I stamped off the ink on scrap paper once before stamping on card to make it slightly less bold. 

Card size is 4.25 x 5.75 inches

You can see more details with step out photos and directions HERE.

Happy Crafting!

Judy


Materials Needed:
Scrapbook Adhesives by 3L®

E-Z Dots® Permanent Refillable Dispenser

Thin 3D Foam Squares White Mix

Other: Stamp: Heidi Swapp (October Quotes), Stampers Anonymous (Tim Holtz Sketchy Leaves); Ink: Ranger Ink (Distress Archival Ground Espresso, Distress Abandoned Coral, Antique Linen, Carved Pumpkin, Broken China, Twisted Citron, Clear Embossing Powder); Imagine Crafts/Tsukineko (Versafine Onyx Black); White, Dark Brown, Saw Grass Cardstock

Tuesday, August 29, 2023

Embossed Panel Card with Lined Envelope


Today, I'm sharing a card with embossed panel and coordinating lined envelope. The card features photo corners as a design element.  Both are easy to make!


Paper for the embossed panel was first inked with Distress Peacock Feathers ink direct to paper, allowed to dry and then embossed.  


Then Distress Oxide Uncharted Mariner ink was rubbed over the raised embossed design to add contrast color.  Envelope liner is made from printer paper also inked direct to paper with Distress Peacock Feathers ink and allowed to dry.  


Directions with step out photos are posted on Scrapbook Adhesives by 3L Blog.  Simply click on that link to go there. 

Thanks for visiting!

Happy crafting!

Judy


Materials Needed:
Scrapbook Adhesives by 3L®

E-Z Runner® Petite Permanent Dots Refillable Dispenser

Creative Photo Corners White

Thin 3D Foam Squares White Mix

Other: Stamp: Penny Black (Love Big); Ink: Ranger Ink (Distress Oxide Uncharted Mariner, Distress Peacock Feathers); Imagine Crafts/Tsukineko (Versafine Onyx Black); Embossing Folder: Sizzix (Tim Holtz Tapestry); White Cardstock; White Printer Paper, White Envelope with Square Flap

Sunday, August 13, 2023

Easy Tag with Collage Background

 I made this quick tag with supplies from my stash.  


The collage background is very easy to do and requires no glue.  Therefor no sticky fingers! 


To make the collage, place piece of cardstock on Adhesives Sheets 4 x 6in, rub well to transfer adhesive and peel it off Adhesive Sheet.  Place it adhesive side up on work surface. Tear small pieces of various papers and fasten over adhesive.  Tear away excess on edges.  Rub Distress Vintage Photo ink along edges and over collage.  Scribble some writing across it with a pencil.  Easy!

All the details and more directions and posted on Scrapbook Adhesives by 3L blog today.  Click HERE to see all the step out photos.  

Thanks for visiting!

Judy


Materials Needed:
Scrapbook Adhesives by 3L®

3D Foam Circles Wh

3D Foam Strips Large

Adhesive Dots Mini

Adhesives Sheets 4 x 6in

Other: Papers: (Assorted Scraps of Old Book Pages, Printed Papers, Music, etc.); Stamp: Taylored Expressions (Building Blocks - Be Bright Set); Ink: Imagine Crafts/Tsukineko (Versafine Onyx Black), Ranger (Distress Vintage Photo); Craft Dies: Sizzix (Tim Holtz Artsy Stems), Taylored Expressions (Building Blocks Die); White Cardstock; #8 Manilla Tag; Lace Scrap

Saturday, July 29, 2023

Foiled Banner Happy Birthday Card

 Today, I'm sharing a Happy Birthday Card with metallic foil accents and banners over a collage background.


It may appear difficutl to make but each step is not hard. I've posted detailed instructions with step out photos on Scrapbook Adhesives by 3L blog HERE .

The collage background is easy! 


Start with a piece 6 x 12 inch piece of white cardstock and apply Adhesives Sheets 6 x 12in. to it.  Then tear assorted patterned papers and fasten them to adhesive on cardstock leaving a gap between each one.  Once it's covered with paper, place a pink metallic foil from Metallic Transfer Foil Sheets Pastel Colors over it, press foil into spaces between paper and lift away foil. The collaged sheet can be used for several projects. Here are two other projects:  Collage Tag with Metallic Transfer Foil and Joy Collage Frame Canvas


The banners are made with
3D Foam Pennants.  I placed die cut letters on each one and then applied foil over them.  An easy technique with such a pretty metallic sheen! 

For all the details and directions, click HERE

Thanks so much for visiting!

Happy crafting

Judy


Materials Needed:
Scrapbook Adhesives by 3L®

Home Hobby by 3L®
Other: Papers: Assorted Patterned Papers for collage; Stamp: Company Name (Name Stamp Set); Ink: Ranger Ink (Distress Oxide in COLOR); Embossing Powder: ; Craft Dies: Sizzix (Tim Holtz Alphanumeric Tiny Type Upper); White, Off White & Black Cardstock; String or Crochet Thread


Thursday, July 13, 2023

Collect Beautiful Moments Card

 Hi friends!

I created this card with some botanical stamped images from Tim Holtz.  I'm really pleased with how it turned out. 


Find all the details and instructions with photos on Scrapbook Adhesives by 3L Blog today....click HERE

Thanks for stopping!

Judy


Materials Needed:
Scrapbook Adhesives by 3L®

E-Z Runner® Ultra Strong Refillable Dispenser

Crafty Foam Tape Black 108ft.

Other: Stamp: Stampers Anonymous Tim Holtz (Field Notes, Botanic Collage, Noteworthy); Ink: Ranger Ink (Distress Vintage Photo, Archival Distress Black Soot), Imagine Crafts/Tsukineko (Versafine Onyx Black); Embossing Powder: Ranger Ink (Clear); Craft Dies: Sizzix (Tim Holtz Specimen); Markers: Copic; White, Black + Kraft Cardstock

Thursday, June 29, 2023

Happy 4th of July Tag

 Hi friends! 

Today, I posted this Happy 4th of July Tag on Scrapbook Adhesives by 3L Blog.  There are directions with lots of step photos.  Click HERE to see all the details.


Applying metallic foil over 3D Foam Stars makes such shiny bright stars!  And it's easy to do!


The background panel with stars and stripes is made from washi tape on white cardstock with red foil between the tape. Easy technique!

This was a fun tag to make with lots of details and techniques.  To see how to make it, click HERE.

Thanks for visiting!

Judy


Materials Needed:
Scrapbook Adhesives by 3L®

E-Z Runner® Ultra Strong Refillable Dispenser, E-Z Runner® Stars Refillable DispenserThin 3D Foam Squares White Mix3D Foam StarsAdhesives Sheets 4 x 6in.Metallic Transfer Foil Sheets Celebrate Colors

Other: Heidi Swapp. (Land of Liberty Stamp Set, Stars and Stripes Washi Set); Ink: Imagine Crafts/Tsukineko (Versafine Clair Medieval Blue); Ranger Ink (Dina Wakley Media White Tag #8); White, Navy Blue Cardstock, White Seam Binding, Navy Cord, Silver String, Red Silk Ribbon

Friday, June 16, 2023

Cards with Mixed Media Painted Strips

 Make these easy cards with mixed media painted strips.  It's like your own one of kind faux washi tape!  


I've posted directions for making the painted paper and cards HERE on Scrapbook Adhesives Blog today.

I applied Distress Paints using an old credit card and then added stenciling and stamping with black and white Distress Paints.  Once the paper was dry, I applied Adhesive Sheets 6x12 inch to back and cut paper into various width strips.  The strips are like stickers with adhesive on the back.  Simple pell away the liner and fasten to a card.  Add a simple greeting popped up with Thin 3D Foam Squares White Mix to finish each card.  So easy!  

I made a several sheets of painted paper to have on hand for a quick card.  Plus it's so fun to make!

Check out more details at Scrapbook Adhesives Blog today.

Thanks for stopping

Judy


Materials Needed:
Scrapbook Adhesives by 3L®


Other: Ink: Imagine Crafts/Tsukineko (Versafine Onyx Black); Stamp and Craft Dies: Hero Arts (Message Strips Stamp & Cut XL); Stamp: Stampers Anonymous (Tim Holtz Grunged); Paint: Ranger Ink (Distress Paints - Shaded Lilac, Lumberjack Plaid, Uncharted Mariner, Carved Pumpkin, Kitsch Flamingo, Saltwater Taffy, Black Soot, Picket Fence); Stencils: Stampers Anonymous Tim Holtz(Mini Stencils from Set 1,8,13) White Cardstock; White Drawing Paper or Cardstock

Monday, May 29, 2023

Collage Tag with Metallic Transfer Foil

 Today, I'm sharing a tag that I put together with a collage sheet made with paper scraps, Adhesive Sheets 6 x 12 in. and Metallic Transfer Foil Sheets Pastel Colors. The collage technique is easy and can be adapted to other projects. I previously posted a home decor piece called Joy Collage Frame Canvas made with same collage sheet. You can see it HERE


The collage technique is easy and can be made with any assortment of papers. There are multiple colors of foil that can be used.  So many ways to use it on a card, tag, scrapbook page or even home decor frame. 

More details and directions to make it are on Scrapbook Adhesives Blog today.

I hope you've found some inspiration here!

Thanks for visiting!

Judy


Materials Needed:
Scrapbook Adhesives by 3L®

Adhesives Sheets 6 x 12in.

Metallic Transfer Foil Sheets Pastel Colors

Thin 3D Foam Squares White Mix

E-Z Runner® Ultra Strong Refillable Dispenser

HomeHobby by 3L®

Premium Double-Sided Tape 1/8in

Other: Papers, Stickers + Ephemera: Assorted Patterned Papers; Ink: Ranger (Distress Inks to coordiate with collage); White Heavy Cardstock; Dies: Sizzix Tim Holtz Framed Tags; White Seam Binding; Gold Floss; Computer Printed Greeting on White Cardstock