
Isn’t this exciting?!! I’m always amazed by all the incredible new Spellbinders products! This release is no exception…….Awesome new stuff!!!
If you missed the first two days, I’ve listed the links later in my post. You’ll want to check them out! I just know you don't want to miss any of the new Spellbinders products!
Today, I have the honor of revealing one of the new background die templates called Botanical Swirls and a very practical set of tags, Back to Basics Tags! Spellbinders new background die templates are amazing!!! The tag set is all the basics! A must have set! I especially like the tiny tags!
For my project, I embellished a photo frame with Botanical Swirls and one of the tags from Back to Basics Tags!

Isn’t this pattern incredible? Botanical Swirls die template is designed to be cut multiple times so the pattern continues. It’s pretty amazing!!! I chose to piece the pattern under the tags. The upper portion and lower portion are each all one piece.
Supply List:
· Frame
· Black Acrylic Paint
Let’s get to the details:
I started with a frame that’s 8 ¼ x 10 ¼" with an opening for a 4 x 6" photo. I found this frame at a dollar store. Any flat frame will work.
First, I painted the frame edges black with acrylic paint.

Next, I applied SCRAPBOOK ADHESIVES by 3L™ Adhesive Sheet to the back of a piece of Worldwin® Gold Twist paper the size of the frame. I traced the frame and opening on the back of the paper for the size. I cut the edges to fit the frame and rough cut the photo opening.
I brushed on Tattered Angels Saffron Glimmer Glaze over the gold paper. To make the color a bit darker, I rubbed on Tattered Angels Pinecone Glimmer Mist with a sponge and dabbed off any excess with a paper towel. I’m always too impatient to let it air dry! I dried it with my heat gun.

You can see a piece of the original color Twist paper showing through the opening.
I removed the adhesive backing and applied the paper to the frame. Then I cut the photo opening with a craft knife. I used a permanent black marker to color the cut paper edges.

The next step is to cut the Spellbinders™ Botanical Swirls from black cardstock. I applied SCRAPBOOK ADHESIVES by 3L™ Adhesive Sheet to the back of 2 – 8 ½ x 6 ¼" pieces of black cardstock.
The cut pattern from Botanical Swirls is 4 x 6". Since my frame is 8 ¼" wide, I needed two and part of a third repeat of the pattern. With the paper cut the same width as the length of the die template, it was easy to align the Botanical Swirls template with the edges of the paper to keep the pattern straight. I’ve used removable tape to hold the die template in place while cutting. Photo 1 in the collage below.

Because there is so much detail to cut with Botanical Swirls, multiple passes through the Grand Calibur® machine are usually necessary. A shim of cardstock is usually necessary in the center of the die template for the 2nd and 3rd passes. Photo 2 above.
After each tag was adhered over the seam, I trimmed the end on the photo opening side with a craft knife.
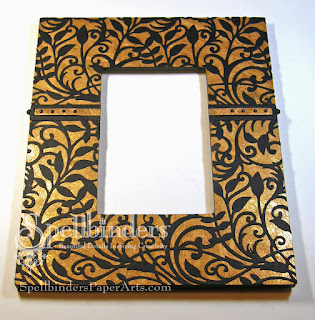
Here’s the completed frame ready for a photo.........

.........and with a photo!
To get the black edge around my photo, I cut the photo 3 ¼ x 5 ¼" and mounted it on 4 x 6" black cardstock. That leaves a 1/8" black reveal around the photo. Not necessary, but I thought it set off the photo better.
* * * * * * *
The Botanical Swirls die template also makes a great embossed pattern! 
For this card, I’ve simply embossed the Botanical Swirls pattern to use as a background. Simple! And it adds an interesting pattern!
I used an oval tag with a verse. I used the negative opening from a long tag to reveal the red dot paper.
I used an oval tag with a verse. I used the negative opening from a long tag to reveal the red dot paper.
* * * * * * *
The Sneak Peek: Spellbinders™ Summer Spectacular! Begins on June 21st and will end on June 28th, 2012. It consists of 24 individual prizes and one grand prize drawing. Enter the Sneak Peek: Spellbinders™ Summer Spectacular! by visiting the participating blogs each day.
At the end of each blog post, click on the "Enter HERE" to open the entry form. You may only enter once from each blog each day.
Spellbinders™ will randomly draw one winner from each participating blog to receive that blog’s newly revealed dies. The Grand Prize Winner will be randomly drawn from the pool of entrants who sent entry forms from each and every participating blog during the 48 hours each blog was open. For the full list of official rules please click RULES.
Day Three of this contest is now closed. Please visit SpellbindersPaperArts.com for more inspiration.
**Enter the contest by clicking HERE**
**Enter the contest by clicking HERE**
Be sure to check out all the other blogs participating in the Blog Frenzy so you don’t miss any of the new Spellbinders die templates being released! Here’s a list of the previous days and blog links:
June 21
June 22
June 23
Judy Hayes - you are here!
Questions? Please email ContestQuestions@Spellbinders.us No entries will be accepted at this email address.
By lapping the template edge ¼" over the edge mark (impression left by edge of template after cutting) from the previous cut, the pattern matches perfectly! Photo 3 above.I’ve used blue pencil marks on the paper to show the lap. I added some arrows to help you see where the edge of the Botanical Swirls needs to be in order for the pattern to cut properly. The tiny line indicates the impression from the die template after the first cut.
To get enough of the pattern for my frame, there was just a little at the edge for the final cut. Photo 4 above.
When I cut the second piece for the top of the frame, I started the pattern in the center of the 6 ¼ x 8 ½" paper. Then I repeated the cut on each side of the first cut. That way the pattern at the top of the frame isn’t an exact duplicate of the lower pattern.

Here, you can see the Botanical Swirls pattern repeated twice plus part of a third pattern cut out of the black cardstock. You can see the slight impression line from the edge of the die template where the pattern repeats. A few of the pieces remained in the template when I removed it. I removed all the excess pieces and used a scissors and a craft knife to cut along the edges of the top and bottom. Botanical Swirls die template cuts the pattern but not the edges of the pieces along sides. Those need to be cut with a scissors or craft knife.

This photo shows the two pieces of cardstock cut with Spellbinders™ Botanical Swirls; all pieces removed and ready to adhere to the frame. The adhesive backing is the white showing through the pattern. Some of it didn’t cut when I cut the pattern. It’s much easier to remove that way!
I used the complete pattern across the lower portion of the frame. After it was adhered, I trimmed the excess along the frame edges and photo opening. I added the other piece at the top of the frame and trimmed the excess also.

This photo shows the Botanical Swirls on the frame with edges trimmed. You can see where the two pieces meet.
I used two tags to cover the seam. I cut/embossed 2 from black cardstock and 2 from gold Twist paper that I had colored the same as the frame. I marked, made holes and inserted micro brads in the gold piece. I placed one brad in one end of each tag (the other end will be cut off). I applied ½" Scor-Tape® to the back of the black tag. Then I placed the gold piece in place.

141 comments:
Just beautiful, Judy! Love how you used the dies!! That frame is just wonderful
Wow! Such beautiful projects, Judy. That frame is fabulous!!!
Beautiful frame Judy!! The black and gold are so pretty together. Fantastic projects!! Hugs♥
This is beautiful Judy!! You always do a fabulous job on your projects!!
Terrific job Judy! Love the pattern and the colors you used! Thanks for sharing and inspiring.
Your frame is just STUNNING!!!
Beautiful project , the design of that die is so detailed!
I absolutely love your card. It is bright, fresh, and beautiful. Excellent use of the products too!
Brilliant frame, so intricate and elegant :)
The frame is stunning and really sets off the photo. I especially liked the use of just the embossing on white card stock for an elegant look.
Your frame is absolutely stunning hun. Rely great work and thanks so much for the inspiration here.
Thanks for all the details. Lovely frame and card.
Beautiful frame project Judy!
Paper Hugs,
Jan
what a great picture frame and such a pretty card- these dies look amazing
Beautiful and elegant!
Really smart looking frame and fabulous card.
Great projects both of them!
What a beautiful project the frame is. Endless possibilities.
Thanks for the inspiration.
Sheila
Love these expandable dies - and the fact that you can emboss as well as cut!! Cxx
your projects are fabulous. I love that die.
Another great project from great dies.
These new dies are incredible and offer so many new options. Your frame is amazing and shows just what you can do, Love it!
The frame is absolutely stunning - but I even like the elegant card more. Great work, both projects!
The frame looks amazing! Love the embossed version too!
Gorgeous frame and card!! Thanks for sharing how you made the frame!
Kristan
The frame you created perfectly showcases a great photo! I love the regal gold & black colors and those swirls are just heavenly! The card is equally stunning with the soft embossing, and I love how you used the tags in such an innovative way! I'm just loving this new release!
Gorgeous frame! The details you added with the mini-brads and black borders really send it to perfection! Love it!
Such stunning projects and wonderful use of the Spellbinders product. Thank you for sharing. Georgina.
Those look amazing. I love them. Love this pattern. Thanks for sharing, Johanne L.
Wonderful cards...love these new dies
Hugs Sheila xx
Judy, these are amazing! I love the botanical swirls on a photo frame...I can scraplift this right?
Ken
Judy, these are amazing! I love the botanical swirls on a photo frame...I can scraplift this right?
Ken
This looks amazing. That frame is so beautiful.
Wow this die is amazingly intricate. I love your projects and tutorial Judy - very clever use of the die. tfs
Hugs
WOW, Judy! I am just in awe! I absolutely LOVE how that frame turned out! There are so many possibilities with those dies and you hit it out of the park with an awesome home decor piece! I love it! Great job!!!
Stunning work Judy. The detail in the frame is a lot but so worth it for the end product. Thank you for sharing your artwork.
I think this frame is so elegant! Thanks for the step-by-step too. And the die makes a beautifully embossed background too. Great projects!
Great projects and I can see that I now "NEED" these new dies too!
Lynn Wild
Judy great frame but I love the card too, can't wait to play with this beauties. Thanks for sharing, hugs Erika.
The frame is gorgeous and such a lovely background for the photo.
Judy, this is beautiful, as usual! Love it!
Great idea to use the adhesive sheet on the cardstock before you cut it - this die is so intricate! I also love the look you showed us from just embossing. Wonderful projects - OMG I hope I win!
OH my goodness this is gorgeous!!
Hugs, Cathy-Lynn
Love the frame! Great job.....tfs
Beautiful frame! And that card has given me some ideas! Thanks for the inspiration!
Love the photo frame beautiful work.
The frame is stunning!! Wow! And I love the card!
Beautiful!! Just Beautiful!!
Your frame in absolutely amazing!
Smiles~
Marilyn
very very elegant projects.
Luanne
What a gorgeous and elegant project, I love it!!! I can't get over all of the detail in that die!!!
Wow, I am truly in awe over these new dies. Superb and so elegant. Your frame is phenomenal!
:O)
Jessica S
Wonderful projects! Love what you've done with that frame!
Stunning project!
Beautiful projects just stunning. Got to have those Spellbinders.
Wow, the frame is absolutely gorgeous!! Thanks so much for the incredible inspiration :)
Lisa
A Mermaid's Crafts
The repeating nature of these news dies is such a fab idea!
Wow! I'm so impressed with these new dies! You have done an excellent job of showcasing the Botanical Swirls, Judy! The possibilites are amazing! TFS!
Sandie
I just love how you step by step showed what you did to decorate the picture frame! It is very stunning!
Hugs,
Sandy.
What a lovely frame and card...the design is so pretty.
both projects are beautiful. Love the expandable dies.
ABSOLUTELY DO NOT LOVE WORD VERIFICATION
So very cool! What a beautiful frame thanks for inspiring us.
Beautiful frame, this would make a great wedding gift. The new dies are amazing, so many ways to use them.
Beautiful Frame Great colors....Fabulous!
That frame is absolutely stunning. I love how you used that die
Gorgeous frame, love the background and such a pretty card!
So beautiful! Thank you for sharing. I don't know which new items to buy first!
Your presentation has made this a must have die for me. Thank you for sharing your ideas.
Your work is amazing I love that you used saffron to make the die really pop. Thanks for the hop Judy!
Oh Judy, your frame looks AMAZING! So does the embossed card.
Spellbinders does have some awesome new dies in the new release.
Hugs and smiles
OMGoodness I love your picture frame
thanks for sharing.
Linda
Wow! I am super excited about these! Your frame is beyond beautiful!
Love both your frame and card using one of those *new* dies... it's a definite must have! TFS :)
The new dies look amazing!
Beautiful project & card.
LOVE what you did with this die...two totally different looks, same die, beautiful inspiration! Thanks for the great tutorial!
Your frame is so intricate!!! What amazing detail!! Both projects are gorgeous!
Beautiful projects!! The frame is amazing!
What beautiful keepsake for a special day. thanks for the tutorial....hugs
Beautiful cards! My wish list just got longer!
WOW! how amazing and beautiful! your frame is stunning!
Hugs
Judy
Card is beautiful and the frame is stunning.
Wow. That's stunning!
Totally gorgeous! Wow! Love the shimmer!
What lovely projects! I never think about picking up frames that I don't like and turning them into pieces of awesome like this...
The details of your die are fantastic!!!! Your frame turned out beautifully :)
Wow, Beautiful Frame!! Thanks for sharing all of the details, very interesting! Cute card, neat to see the versatility of the die.
Both gorgeous, and I love the botanicals die! TFS!
wow, both of these are gorgeous! thanks for the detailed demo. i love to be able to use them as a reference when i get my goodies and am flabergasted.
Wonderful projects! Love that frame!
This frame is so stunning, love the syle!
Hugs
Elvira
Your projects are so intricate and beautifully done!
Terrific job Judy, love your frame, such wonderful color choices. Thanks for sharing.
Hugs Donna
Gorgeous frame and card.
Gorgeous frame and card.
Lovely so elegant!
Wow, gorgeous frame and Love the card, such a pretty embossed look and the colors are bright and summery :)
Stunning frame and LOVE how you used the dies Judy.
What beautiful creations. I just love the frame. TFS.
Just beautiful! Love your style! Like the way you used the tags to make it look like a border...clever :)
Oh, Miss Judy, I really like your style! Love the picture frame and have dreams of things embossed, so the card is going into my inspiration file as well. Thanks so much for sharing your creativity.
~sissun, 062312
Oh, Miss Judy, I really like your style! Love the picture frame and have dreams of things embossed, so the card is going into my inspiration file as well. Thanks so much for sharing your creativity.
~sissun, 062312
Beautifully done! Love the new background dies!
Beautifully done Judy!
Very beautiful frame, great colors
Great projects Judy!!! Love both of them!
Gorgeous creations Judy!
These are both stunning Judy! I love that frame!!
Just beautiful! I love the frame and card, just lovely! I can't wait to get those dies!
Debbie McKelvey
Just beautiful! I love the frame and card, just lovely! I can't wait to get those dies!
Debbie McKelvey
Love the die and the cards you made. Another new toy for my to die listA
Beautiful inspiration
I am totally blown away! Your frame is gorgeous. Great projects with this new product!
I am totally blown away! Your frame is gorgeous. Great projects with this new product!
I really like the larger die cuts. Cant wait to get them in my hand. Beautiful frame.
the frame is wonderful. i think we all can make one of these...
Stunning. What a fantastic die. Your frame was so gorgeous and you gave a great tutorial. Can't wait to try. Great job.
Holy cow!!! I LOVE this die!!! I really like that it can be used to cut or emboss. Your frame is fabulous too! TFS!
Oh girlfriend, your eye for pattern and details is amazing. You sure made these dies sing! Beautiful!
Judy, this is a beauty! Love how you spliced it to make it larger!
Stunning projects, thanks for sharing them.
Hi
Fab work.eally love the new dies.
Beautiful! Frame is a clever use of the new dies.
How pretty. Love your frame!
Great project!
beautiful project
Fabulous job Judy! Your frame and card are both gorgeous!
Beautiful! Great frame.
All I can say is- WOW!!!
WOW that is such a pretty frame love the use of the new SB TFS.
Gorgeous frame Judy, Never would of thought to do this. TFS!!!
So creative and beautiful. I love that frame!
So beautiful!!!! love this idea....awesome card....tfs
just beautiful Judy. Absolutely stunning
Anne x
Your frame is absolutely gorgeous! Love gold and black. Very nice card too!
Your frame is beautiful. I like how this background die template can be used over a larger area. Pretty card too.
The Botanical Swirls template is gorgeous. Your frame shows it off to perfection. I really appreciated your step-by-step directions!
I had never thought of using the dies just to create an embossed detail. What a wonderful idea. Thanks for sharing your expertise!
WOW, this is gorgeous. just stunning. Thanks so much for the inspiration. Just opens up a whole new way to use the die. Blessing, Linda
Beautiful Judy!! Love your projects and these dies are great! Would love to win one. Thanks for the opportunity. Gloria
Visit my blog. I would love more followers.
http://purpleglocreations.blogspot.com
Wanted to comment on your beautiful creations earlier, but, now, am glad that I didn't! Why? I am the Day 3 winner (thrilled, I never win anything) and you have provided some inspiration for me to spring-board from!
Thank you!
Post a Comment