
Isn’t this exciting?!! I’m always amazed by all the incredible new Spellbinders products! This release is no exception…….Awesome new stuff!!!
If you missed the first two days, I’ve listed the links later in my post. You’ll want to check them out! I just know you don't want to miss any of the new Spellbinders products!
Today, I have the honor of revealing one of the new background die templates called Botanical Swirls and a very practical set of tags, Back to Basics Tags! Spellbinders new background die templates are amazing!!! The tag set is all the basics! A must have set! I especially like the tiny tags!
For my project, I embellished a photo frame with Botanical Swirls and one of the tags from Back to Basics Tags!

Isn’t this pattern incredible? Botanical Swirls die template is designed to be cut multiple times so the pattern continues. It’s pretty amazing!!! I chose to piece the pattern under the tags. The upper portion and lower portion are each all one piece.
Supply List:
· Frame
· Black Acrylic Paint
Let’s get to the details:
I started with a frame that’s 8 ¼ x 10 ¼" with an opening for a 4 x 6" photo. I found this frame at a dollar store. Any flat frame will work.
First, I painted the frame edges black with acrylic paint.

Next, I applied SCRAPBOOK ADHESIVES by 3L™ Adhesive Sheet to the back of a piece of Worldwin® Gold Twist paper the size of the frame. I traced the frame and opening on the back of the paper for the size. I cut the edges to fit the frame and rough cut the photo opening.
I brushed on Tattered Angels Saffron Glimmer Glaze over the gold paper. To make the color a bit darker, I rubbed on Tattered Angels Pinecone Glimmer Mist with a sponge and dabbed off any excess with a paper towel. I’m always too impatient to let it air dry! I dried it with my heat gun.

You can see a piece of the original color Twist paper showing through the opening.
I removed the adhesive backing and applied the paper to the frame. Then I cut the photo opening with a craft knife. I used a permanent black marker to color the cut paper edges.

The next step is to cut the Spellbinders™ Botanical Swirls from black cardstock. I applied SCRAPBOOK ADHESIVES by 3L™ Adhesive Sheet to the back of 2 – 8 ½ x 6 ¼" pieces of black cardstock.
The cut pattern from Botanical Swirls is 4 x 6". Since my frame is 8 ¼" wide, I needed two and part of a third repeat of the pattern. With the paper cut the same width as the length of the die template, it was easy to align the Botanical Swirls template with the edges of the paper to keep the pattern straight. I’ve used removable tape to hold the die template in place while cutting. Photo 1 in the collage below.

Because there is so much detail to cut with Botanical Swirls, multiple passes through the Grand Calibur® machine are usually necessary. A shim of cardstock is usually necessary in the center of the die template for the 2nd and 3rd passes. Photo 2 above.
After each tag was adhered over the seam, I trimmed the end on the photo opening side with a craft knife.
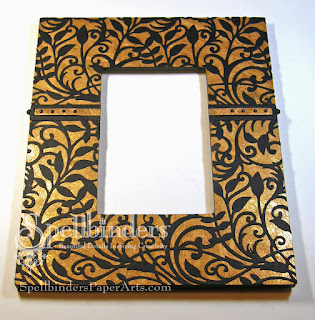
Here’s the completed frame ready for a photo.........

.........and with a photo!
To get the black edge around my photo, I cut the photo 3 ¼ x 5 ¼" and mounted it on 4 x 6" black cardstock. That leaves a 1/8" black reveal around the photo. Not necessary, but I thought it set off the photo better.
* * * * * * *
The Botanical Swirls die template also makes a great embossed pattern! 
For this card, I’ve simply embossed the Botanical Swirls pattern to use as a background. Simple! And it adds an interesting pattern!
I used an oval tag with a verse. I used the negative opening from a long tag to reveal the red dot paper.
I used an oval tag with a verse. I used the negative opening from a long tag to reveal the red dot paper.
* * * * * * *
The Sneak Peek: Spellbinders™ Summer Spectacular! Begins on June 21st and will end on June 28th, 2012. It consists of 24 individual prizes and one grand prize drawing. Enter the Sneak Peek: Spellbinders™ Summer Spectacular! by visiting the participating blogs each day.
At the end of each blog post, click on the "Enter HERE" to open the entry form. You may only enter once from each blog each day.
Spellbinders™ will randomly draw one winner from each participating blog to receive that blog’s newly revealed dies. The Grand Prize Winner will be randomly drawn from the pool of entrants who sent entry forms from each and every participating blog during the 48 hours each blog was open. For the full list of official rules please click RULES.
Day Three of this contest is now closed. Please visit SpellbindersPaperArts.com for more inspiration.
**Enter the contest by clicking HERE**
**Enter the contest by clicking HERE**
Be sure to check out all the other blogs participating in the Blog Frenzy so you don’t miss any of the new Spellbinders die templates being released! Here’s a list of the previous days and blog links:
June 21
June 22
June 23
Judy Hayes - you are here!
Questions? Please email ContestQuestions@Spellbinders.us No entries will be accepted at this email address.
By lapping the template edge ¼" over the edge mark (impression left by edge of template after cutting) from the previous cut, the pattern matches perfectly! Photo 3 above.I’ve used blue pencil marks on the paper to show the lap. I added some arrows to help you see where the edge of the Botanical Swirls needs to be in order for the pattern to cut properly. The tiny line indicates the impression from the die template after the first cut.
To get enough of the pattern for my frame, there was just a little at the edge for the final cut. Photo 4 above.
When I cut the second piece for the top of the frame, I started the pattern in the center of the 6 ¼ x 8 ½" paper. Then I repeated the cut on each side of the first cut. That way the pattern at the top of the frame isn’t an exact duplicate of the lower pattern.

Here, you can see the Botanical Swirls pattern repeated twice plus part of a third pattern cut out of the black cardstock. You can see the slight impression line from the edge of the die template where the pattern repeats. A few of the pieces remained in the template when I removed it. I removed all the excess pieces and used a scissors and a craft knife to cut along the edges of the top and bottom. Botanical Swirls die template cuts the pattern but not the edges of the pieces along sides. Those need to be cut with a scissors or craft knife.

This photo shows the two pieces of cardstock cut with Spellbinders™ Botanical Swirls; all pieces removed and ready to adhere to the frame. The adhesive backing is the white showing through the pattern. Some of it didn’t cut when I cut the pattern. It’s much easier to remove that way!
I used the complete pattern across the lower portion of the frame. After it was adhered, I trimmed the excess along the frame edges and photo opening. I added the other piece at the top of the frame and trimmed the excess also.

This photo shows the Botanical Swirls on the frame with edges trimmed. You can see where the two pieces meet.
I used two tags to cover the seam. I cut/embossed 2 from black cardstock and 2 from gold Twist paper that I had colored the same as the frame. I marked, made holes and inserted micro brads in the gold piece. I placed one brad in one end of each tag (the other end will be cut off). I applied ½" Scor-Tape® to the back of the black tag. Then I placed the gold piece in place.


