Sunday, May 27, 2018

Graceful Swirl Booklet

Sponsored:  As a designer on the Amazing Paper Grace Creative Team, I am provided with dies to create projects. I'm also a designer for Scrapbook Adhesives by 3L and receive product from them.

It's Sunday with an Amazing Paper Grace project!  I made a little booklet that I call Graceful Swirl Booklet. It's made with S5-368  Graceful Doily for the center medallion and S5-366 Swirl Background to cut design to cover front.  Both of these dies are so intricate and beautiful! I also used S5-363 Swirl Booklet Insert to frame a verse inside front cover.


Graceful Swirl Booklet is 5 x 6 inches.  The cover is 100 lb. Kraft cardstock.  Pages are ivory paper that's heavier than printer paper but not quite cardstock weight.  I cut 5 pages 6 x 9¾.  Each one was scored and folded. I nested them together to make a signature.  Five evenly spaced holes were made with needle tool in the fold.  I trimmed the outer edges of the pages even when they were nested together.  I recommend waiting to sew the pages to the cover until it's finished.  Otherwise, the pages could easily get ink on them. 

To decorate the cover, I cut 2 of S5-366 Swirl Background from black cardstock to which Adhesive Sheets 6 x 12 inch was applied on the back. I must admit this intricate background cut the cardstock but didn't quite cut through the adhesive backing after 2 passes through die cut machine.  That made it a bit challenging to take all the pieces out of it.  I cut two so I could layer them together to be thicker.  I fastened it to the booklet cover by peeling adhesive backing and pressing in place.  I used my heat gun to warm the adhesive  for a better hold.  (photo shows cords at center....I redid that for the finished booklet)


My next step was to rub Distress Concord Grape ink over the entire cover.  I used Black Soot to darken the edges a little.


The medallion from bottom up is a black cardstock circle base cut with Spellbinders Standard Circles SM #6 die. Next is a circle of black cut with circle from S5-368  Graceful Doily.  Layered over it is a "donut" circle cut with both circles and outer pattern dies form S5-368  Graceful Doily.  Cardstock had Adhesive Sheets on back which made it easy to fasten to the black circle.  I rubbed Metallic Lustre Iced Espresso over it so it looks metallic.  In the center is circle cut from black cardstock.  It's fastened with E-Z Runner® Ultra Refillable Dispenser , my favorite adhesive dispenser when using Distress inks.  The resins in the inks make it hard to get adhesive to stick.  The E-Z Runner Ultra works!  The last piece for the medallion is 2 of the decorative circle cut from black cardstock with Adhesive Sheets applied to back.  I layered the 2 pieces together for more dimension. It's also rubbed with Iced Espresso Metallic Lustre.  I added a bit more adhesive to the center with E-Z Runner Ultra  for extra hold when I fastened it in place.  Finally, a purple rhinestone is fastened in the center.


The last step is to sew the signature and cover together.  I started at the top because I wanted the cord ends to dangle from there. I stitched through cover and pages to bottom and then stitched back to top.  After knotting the cords together, I added some beads to the ends.
Inside the cover, I added an insert with verse on the first page in the booklet.  It was cut with 
S5-363 Swirl Booklet Insert from black cardstock.  Verse is stamped on same paper as pages with Versafine Clair Monarch ink.  


Thanks for visiting!

Judy

Supplies: 
Amazing Paper Grace Dies by Becca Feeken:
S5-366 Swirl Background
S5-368  Graceful Doily
S5-363 Swirl Booklet Insert

Adhesive Sheets 6 x 12 inch
E-Z Runner® Ultra Refillable Dispenser


Other Supplies:  Spellbinders S4-116 Standard Circles SM; DecoArt® Metallic Lustre: Iced Espresso, Gold Rush; Distress Inks: Concord Grape, Black Soot;  Imagine Crafts/Tsukineko Versafine Clair Monarch; Want2Scrap Rhinestones;  100 lb. Kraft Cardstock; Black Cardstock; Ivory Heavy Text Paper; Black Pearl Cotton, Verse Stamp

Sunday, May 20, 2018

Shaped Daisy Card with Flourished Square

Sponsored:  As a designer on the Amazing Paper Grace Creative Team, I am provided with dies to create projects. I'm also a designer for Scrapbook Adhesives by 3L and receive product from them.

Happy Day everyone!  I'm back with a Shaped Daisy Card created with Amazing Paper Grace Flourished Square  and flowers from Corner Cotillion.


I had no intention of using that floral background when I started putting this card together.  It's the back side of the paper that I chose.  I dropped it on the floor and it landed flower side up.  I liked the floral side so I tried it with Flourished Square over it.  Love how it looks!

To cut the shaped card, I folded cardstock slightly bigger than die.  I placed the die so fold of paper was inside the cutting edge on one side (top of card).  I kept fold a ways below very edge of die.

 
When cut, it looks like this...the straight edge at top is the fold


I cut the floral paper with same die.  I stamped Penny Black verse with Fallen Leaves ink and clear heat embossed it before fastening it to the card with E-Z Dots® Permanent Refillable Dispenser.  I used die to help with placement of verse.

I applied Adhesive Sheets 6 x 12 inch to back of pearlescent cardstock.  I die cut it with Flourished Square using outer cutting die, intricate pattern die and inner cutting die. Photo didn't capture the pearlescent sheen of this paper.


To fasten over floral paper, I peeled adhesive backing and pressed in place.

I cut 3 flowers from off white cardstock using large flower from Corner Cotillion.  I rubbed Spice Marmalade ink from center out and shaped the petals with ball tool.  Centers are Adhesive Dots 3D covered with gold micro beads and then sprinkled with gold embossing powder (not heated) to fill in between beads.  Perfect daisy centers!  Leaves were cut from pail green paper and inked with Peeled Paint Distress ink.  The two outer flowers are held in place with Adhesive Dots Medium.  I used Adhesive Dots 3D under center flower to pop it up.  Leaves are also fastened with Adhesive Dots 3D. A bow tied in gold cord is tucked under the flowers and held in place with Adhesive Dots Medium.
 
 
Thank you so much for stopping! I hope you are inspired to try a shaped card or create daisies!
 
Judy


Amazing Paper Grace Dies by Becca Feeken:

Adhesive Dots 3D
Adhesive Sheets 6 x 12 inch
Adhesive Dots Medium
E-Z Dots® Permanent Refillable Dispenser
 

Other Supplies:  KaiserCraft  Golden Grove Collection; Penny Black Gratitude Stamp Set; Imagine Crafts Versafine Clair Fallen Leaves ink; Clear Embossing Powder; Pearlescent Antique Gold Cardstock; Tan Cardstock; Gold Micro Beads; Gold Embossing Powder; Gold Cord; Ranger Distress Spiced Marmalade and Peeled Paint inks
Monday, May 14, 2018

Introducing Amazing Paper Grace - Romancing the Swirl Collection

Sponsored:  As a designer on the Amazing Paper Grace Creative Team, I am provided with dies to create projects. I'm also a designer for Scrapbook Adhesives by 3L and receive product from them.


Welcome friends, today we are introducing Becca Feeken's new Amazing Paper Grace dies.  Welcome to the Romancing the Swirl Collection - you can take a quick peek of the entire collection - HERE.

About Romancing the Swirl Collection
The Romancing the Swirl Collection by Amazing Paper Grace for Spellbinders is chock full of calligraphic swirls and elegant, classic dreamy motifs that will be in style for years to come.  Meant to be used together across the collection, every die will be in character with another as they are combined.  Well rounded with squares, circles, ovals, and rectangles - each combination provides the ability to create a layering masterpiece adorned by the extra embellishments in the collection.

Each designer of Amazing Paper Grace Creative Team is sharing their creations with two dies from the collection.  Links to each of the other Creative Team members are below so you can see all the inspiration on the hop.  Don't forget, each of us will be giving away an Amazing Paper Grace die pulled from the comments - one from each blog.  The prize details are at the bottom of my post. So, let's see the dies I get to introduce!

My Projects Today:

I enjoyed working with  S5-363 Swirl Booklet Insert.  This set is designed to coordinate with S5-289 Filigree Booklet.  I used that set to make the little booklet. (Directions to assemble booklet are on Spellbinders website with Filigree Booklet)  Pages were cut from lightweight cardstock.  I used the insert die to cut the slits on some of the pages.

I also cut a gray piece to put inside the front cover with a verse.(see photo below) This die from Swirl Booklet Insert cuts slits for tucking in a photo or verse insert as I've done. 
The design on booklet front was cut using Swirl Booklet Insert.  I really like that the insert has a separate outer edge cutting die so it can be cut for layering or cut as an insert.  I cut the insert with the outer cutting edge.  I used the outer cutting edge alone to cut the aqua paper.  I used Adhesive Sheets 4 x 6 inch applied to back of gray paper (same as cover paper) before cutting the insert.  It makes it so easy to fasten this intricate die cut to the paper behind it!  To make it silver, I rubbed DecoArt Metallic Lustre Silver Spark over it before fastening it to aqua paper.  I like the look of antique metal so I didn't try to make it perfectly covered with silver. Little pearls and rhinestones accent the design.  Before adding the Swirl design to the booklet, I fastened ends of crinkled seam binding (colored with Distress Iced Spruce and Evergreen Bough) to booklet edges using adhesive from E-Z Runner® Ultra Refillable Dispenser.  Back of booklet has aqua paper on it as well to cover end of ribbon.   I made tiny flowers using the smallest die from S6-050 Cinch and Go Flowers and cut out of text weight off white paper.  Each tiny flower is 2 layers and has aqua stamens.  These are fastened to a small piece of cardstock with Adhesive Dots Small and Adhesive Dots Mini.  That's fastened to the booklet with Thin 3D Foam Squares White Mix.  I've tucked in a few silver stamens as accent.  The pointed silver pieces were cut  with die that resembles an intricate bow from Swirl Booklet Insert set.  I cut it from gray cardstock, rubbed on silver Metallic Lustre and snipped out the center piece.  It's folded in half and tucked under the flowers.  A tiny little detail but it sure adds a lot!


First project is created with S5-363 Swirl Booklet Insert
  
This die set can easily be used alone or with coordinating with S5-289 Filigree Booklet.

My second project showcases S4-926 Swirl Tags:


Love this set of tags for several reasons!  First the hole die is separate so tag can have a hole or not! Plus each tag has two sizes and can be layered to have border/mat that exactly fits the tag.  And each piece can be used as a separate tag, two sizes!  I've layered the tag on my card with a navy border around verse tag and no hole in tags.  I've accented the ends of the tag with two of the swirly pattern die cuts.  These are so intricate! Tag is fastened to card with Thin 3D Foam Squares White Mix  I used 2 of the swirly accents to make the border pattern along the left edge of the card.  I applied Adhesive Sheets 4 x 6 inch to back of cardstock before cutting.  That makes it easy to apply these intricate die cuts to the border strip.  I really like how it adds to the card!


I've used S6-050 Cinch and Go Flowers to cut the flowers from text weight off white paper (second smallest die)  I colored the flowers with Distress Ink Weathered Wood and Tumbled Glass.  Each one has a center made with Adhesive Dots Small and covered with Distress Antique Linen embossing powder, not heated.  Easy to do!  Flowers are fastened to the card with Adhesive Dots Small and Thin 3D Foam Squares White Mix.  Navy leaves were cut using leaf from S5-364 Cotillion Corner.  I rubbed white pigment ink over them.  I like how the veins really show up now. Leaves were fastened with Thin 3D Foam Squares White Mix.  A bow of seam binding is tucked behind tag and held in place with Adhesive Dots Medium

Availability:
These dies are available right now on the Spellbinders website.  Because there has just been a European launch, I'd encourage you to go ahead and grab those dies that speak to your heart - HERE.

In the meantime, be sure you leave a comment on this post and every Creative Team Members post for a chance to win an Amazing Paper Grace Die from a previous collection (Romancing the Swirl not included).

Prizes:
There are six dies that are being given away.  One name will be randomly picked from comments left on each of our six blogs on the Introducing Amazing Paper Grace - Romancing the Swirl Collection post between May 14 and May 18, 2018, at midnight US Central Time.  We encourage all of our international friends to participate!  The randomly selected names will be announced on the Amazing Paper Grace Blog on May 19th.  (All giveaways for this hop are managed by and the responsibility of Amazing Paper Grace).

Up for grabs is an Amazing Paper Grace die of your choice from the Vintage Elegance Collection, the Graceful Borders Collection, the Venise Lace Collection, the Chantilly Lace Collection, or the 3d Vignettes Collection; there will be a total of six dies and a winner can win once among all six blogs.  If your name is selected, simply claim it within 2 weeks of the announcement by sending your address through the form under the Contact Tab on the Amazing Paper Grace Blog. The dies will be mailed out from Amazing Paper Grace.

Click on the links to each 
member to see more sweet samples from the Romancing the Swirl Collection:

Also, help us welcome new Creative Team Member Alicia Barry!
Visit Joanna
Visit Teresa
Visit Melissa
Visit Judy  - you are here!
Visit Alicia  
Visit Becca

Thanks so much for joining us for Introducing Romancing the Swirl!
Leave a comment - tell us, which of these dies is your fav!!


Supplies:

Amazing Paper Grace Dies by Becca Feeken:
S5-363 Swirl Booklet Insert
S5-289 Filigree Booklet

Other Supplies: Bazzill Papers; DecoArt Metallic Lustre Silver Spark; Photo Play Red White and Blue; Want2Scrap rhinestones and pearls; Distress Inks: Iced Spruce, Evergreen Bough, Weathered Wood, Tumbled Glass; Distress Antique Linen Embossing Powder;  Seam Binding; Off-white text paper

Butterfly Notepads and Cards - Paper House

Sponsored:  As a designer on the Amazing Paper Grace Creative Team, I am provided with dies to create projects. I'm also a designer for Scrapbook Adhesives by 3L and receive product from them.


Hello Everyone!

Today, Scrapbook Adhesives by 3L and Paper House Productions are hosting a Blog Hop!  Check it out on Scrapbook Adhesives Blog!

For the blog hop, I put together some quick cards and little notepads with beautiful papers from Color Washed 12ʺ Double Sided Foil Scrapbook PaperI also used pretty butterflies from Butterflies Faux Enamel Sticker and stickers from Color Washed Cardstock Multi Pack


Covering little notepads like these is one my favorite quick projects!  It's so easy to make them!  I keep a few on hand for a quick gift. 
I found the notepads in a craft store. They are Kraft color with a magnetic closure and made to decorate (or not!).  I cut a strip of Adhesive Sheets 6 x 12 inch 3.25 inches wide and applied to back of piece of Color Washed 12ʺ Double Sided Foil Scrapbook Paper.  I like to used a little wider Adhesive Sheet than I need and trim it.  That way the adhesive is for sure to all the edges.   For the orange one, the pattern paper had 3 x 4 inch sections in a strip that perfectly fit my little notepad!  Paper with Adhesive Sheet backing was cut to 3 x 12 inches.


Before putting paper on the notepad, I used E-Z Runner® Ultra Refillable Dispenser to apply adhesive to end (one hidden by flap) and near folds at bottom.  Ultra adhesive is very sticky and has a strong hold.  I used it at these points where paper would get most stress.

The fun part!  Remove backing from adhesive and apply paper to the notepad.  I started at the straight edge and worked around the notepad.  For the first two folds, I measured the notepad and made score lines on the paper, that makes paper fold easier.  I applied more adhesive with E-Z Runner® Ultra Refillable Dispenser at top folds and along flap edges. These I folded as I applied paper.  The paper was a little longer than notepad.  I simply cut along the notebook flap edge to finish it.


The final touch was to add a pretty butterfly from  Butterflies Faux Enamel Sticker by Paper House Productions.  These are so pretty with gold foil!  I especially like them for the notepads because they are quite thin and aren't likely rub off.

I made a coordinating card with similar papers and a verse cut from one of the papers.  I've used Creative Photo Corners Gold  on the corners.  I've added butterflies from Butterflies Faux Enamel Sticker , one orange and two tiny gold ones. The card is assembled using E-Z Runner® Permanent Strips Refillable Dispenser .


I repeated the same process for the purple notepad.  That paper shades from dark purple to lighter purple.  It's so pretty on the notepad with the lighter flap! A pretty purple butterfly on that one!

On the purple card, I used sticker from Color Washed Cardstock Multi Pack.  These are cardstock thickness.  Very pretty with gold foil!  To make the gold foil frame around "Hello" piece, I cut white cardstock for the size mat I wanted, about 1/8 inch bigger.  I applied Home and Hobby Premium Double-Sided Tape ¼ʺ Permanent to 3 edges. I placed gold foil sheet from 3D Foam Holiday Embellishment Kit over the adhesive and rubbed it well.  Remove the foil sheet to reveal pretty foil edges!  The card is assembled with E-Z Runner® Permanent Strips Refillable Dispenser.  I added pretty purple and tiny gold butterflies. 


I hope you enjoyed your visit!  Thanks for stopping!

Be sure to check out the Scrapbook Adhesives Blog for more inspiration.  The Blog Hop is on all week, May 14-18.  Links to Scrapbook Adhesives blog posts are below (links will only work on the day of post or after)


Day One  May 14 - Judy Hayes + Valerie Ward 

Day Two  May 15 - Shannon Morgan + Tracy McLennon 

Day Three May 16 - Linsey Rickett + Dana Tatar

Day Four May 17 - Shellye McDaniel +Terri Burson

Day Five May 18 - Teri Anderson + Yvonne van de Grijp 


Happy Creating!
Judy


Supplies:
Adhesive Sheets 6 x 12 inch
E-Z Runner® Ultra Refillable Dispenser
E-Z Runner® Permanent Strips Refillable Dispenser
Home and Hobby Premium Double-Sided Tape ¼ʺ Permanent
Creative Photo Corners Gold
3D Foam Holiday Embellishment Kit

Color Washed 12ʺ Double Sided Foil Scrapbook Paper
Butterflies Faux Enamel Sticker
Color Washed Cardstock Multi Pack

Other Supplies:  White Cardstock, Notepads with magnetic closure

Sunday, May 6, 2018

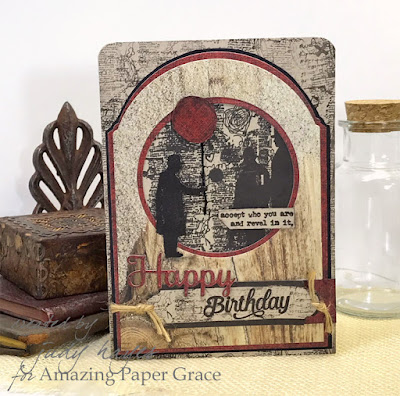
Masculine BIrthday Card with Man and Balloon.

Happy Sunday!  It's another post day for Amazing Paper Grace dies.  Today, I've put together a masculine card with Grand Dome 3D Card – 3D Vignettes ,Oh Happy Day – Elegant 3D Vignettes  and circle die from Layered Happy Birthday – 3D Vignettes.

This is a 5 x 7 card.  I used Grand Dome 3D Card – 3D Vignettes to cut the shape of the wood grain and red papers.  However, it's a bit short for a 5 x 7 card so I cut the curved top and part of sides. To do that, I placed the base plate over the upper part of the die only, the part I wanted to be cut.

 
Then I cut the tabs off and continued to cut the side edges with my paper cutter.  I also cut the bottom to be square with sides.
Next, I cut the circle using circle die from Grand Dome 3D Card – 3D Vignettes.  To align it, I used the decorative die as a placement guide.  I removed it before cutting.


I decided to use a red mat behind the wood grain. I cut the paper as I wanted it along bottom and sides.  Then I placed die from Grand Dome 3D Card – 3D Vignettes at top.  I used wood grain piece that was already cut as a guide. I cut only the very top part, curved edge, by putting base plate over that area only.


Next I aligned the circle.  I discovered the circle die from Spellbinders Layered Happy Birthday – 3D Vignettes was just a little smaller than circle cut in wood grain paper.

I used it to cut circle in red paper which gave me a narrow reveal of red.


I stamped the images on Kraft paper and fastened it behind circle opening.  I fussy cut the man and balloon to pop up with 3D Foam Squares.  I added a string from balloon.  The verse is popped up with Thin 3D Foam Squares.
I hand cut the black matt at the curve/top edge.  Straight edges were cut with paper cutter.
It's fastened with E-Z Runner® Ultra Refillable Dispenser to Kraft card front which was stamped along the edges.
"Birthday" was stamped on Kraft paper label (cut with die from Oh Happy Day – Elegant 3D Vignettes) that had been stamped with text.  I trimmed the edges and fastened it to a black tag.  "Happy" was cut from red paper fastened to black 3D Creative Sheets.  This is a little tricky but I sure like the raised effect! Twine is knotted at tag ends.  A bit of red was added at right edge under tag. 


Oh,  I rounded the top card corners with 1/2 inch corner rounder.
 

Thanks so much for stopping by!
 
Have a creative day!
Judy
 
Supplies:
Amazing Paper Grace Dies by Becca Feeken:
Spellbinders Layered Happy Birthday – 3D Vignettes
Oh Happy Day – Elegant 3D Vignettes
Grand Dome 3D Card – 3D Vignettes
 
Scrapbook Adhesives by 3L®:
Adhesive Sheets 4 x 6 inch
3D Creative Sheets
E-Z Dots® Repositionable Refillable Dispenser
E-Z Dots® Permanent Refillable Dispenser
E-Z Runner® Ultra Refillable Dispenser
Thin 3D Foam Squares  - Black Mix
3D Foam Squares – Black Mix
Adhesive Dots Micro
 
Other Supplies:  Penelope Dee Papers, Black Cardstock, Kraft Cardstock, Versafine Clair Fallen Leaves Ink, Twine, Black Cord, Tim Holtz Stamps