
This blog contest is now closed!
See the list below for other opportunities to win!

Spellbinders Paper Arts "To Die For!!" Winter Release
Blog Frenzy
January 10 – 18, 2011
Welcome to the second day of the Spellbinders Paper Arts "To Die For!!" Winter Release Blog Frenzy!
Spellbinders™ Paper Arts’ has been working hard to bring you another selection of the most innovative and beautiful die templates in the world. The To DIE For!! Winter Release Blog Frenzy allows you a sneak peek of the products we’re introducing at the Craft and Hobby Association trade show later this month. The To DIE For!! Winter Release Blog Frenzy is from January 10 - 18, featuring 16 fabulous Designers and prizes To DIE For!!
• Win today’s new die templates!
• Be eligible to win the Grand Prize by entering each day from each blog!
• One entry per person, per blog please, on the designated days!
• Each contest is open for 48 hours to enter the contest!
• You have until 12:01 a.m. January 13, 2011 Central Standard Time to enter my contest. Be sure to read the Official Rules before entering so that your entry will be valid!
These are the Designers and their contest dates:
January 10
January 11
January 12
January 13
January 14
January 15
January 16
January 17
Daily contest winners are randomly chosen from valid entries, as stated in the Official Rules. The winners will receive an email within 24 hours of the contest’s closing. The winners will have 72 hours to reply to that email to claim the prize. If a winner fails to respond within 72 hours, a new winner will be drawn.
Entrants that send valid contest entry emails to each of the contests will be automatically considered for the Grand Prize. The Grand Prize has a retail value of over $800, and includes Spellbinders CHA Winter 2011 release die templates revealed in the Spellbinders To DIE For!! Winter Release Blog Frenzy and a Grand Calibur™ die cutting/embossing machine!
Thank you, Spellbinders Paper Arts, for sponsoring this contest!
I’m thrilled to share S4-319 Lattice Rectangles, a new Nestabilities® Decorative Elements die template, with you...

I chose to make a Valentine’s card to show off this wonderful new set: S4-319 Lattice Rectangles!
I used 3 of the 4 die templates on my card. Can you pick them out?
Are you wondering how I got a square card with a rectangle die cut?
Let’s see the steps…
These are the die templates I used.

First, cut a white card with LF-161 Grand Labels One. The Grand die templates are great for this! I used a 5 ¼” x 10 ¼” piece of Worldwin White card stock folded in half. I positioned LF-161 Grand Labels One #2 (the smallest being #1) so that part of the fold was inside the cutting edge.

You can see the die template peaking out along the fold….

and ready to be cut with LF-161 Grand Labels One #2 taped in place.
and ready to be cut with LF-161 Grand Labels One #2 taped in place.
The next step is to cut and emboss the pink mat out of 3M Post-It Craft Paper. This color is called Bashful. Use the same LF-161 Grand Labels One #2.

To make the mat about 1/8” smaller all around, carefully cut along the embossed line.

It's easy to follow the embossed line is for cutting.
Then, emboss it again with 12-1009 Flourish Impressabilities™.

It’s a little too big to fit completely on the Flourish Impressabilities so do half at a time.

After embossing the first half, sand it lightly to reveal the white core of the Post-It™ Craft Paper. The color coating is quite thin making it easy to sand. It’s also easy to sand off more than planned so sand gently, especially along the edges.

After sanding, emboss the other half and sand. You’re probably thinking the line down the middle won’t look good on the card! As you can see, the pattern seemed to sand more readily than the edge lines. Only the edges will show on the card.

Here’s a list of the die templates and paper colors to cut:
S4-319 Lattice Rectangles #4 - Cardinal Red Worldwin card stock
S4-136 Classic Heart #2 - Cardinal Red Worldwin card stock
S4-319 Lattice Rectangles #2 – White Worldwin card stock
S4-137 Classic Scalloped Heart #3 – White Worldwin card stock
S4-319 Lattice Rectangles #3 – strip of White Worldwin card stock
S4-136 Classic Heart #3 - Bashful 3M Post-It Craft Paper
S4-137 Classic Scalloped Heart #2 – Bashful 3M Post-It Craft Paper

Next, emboss the red and white Lattice Rectangles. At the same time, emboss the pink and red hearts laid over 12-1009 Flourish Impressabilities. They all fit easily on the mat. Sand both embossed hearts and edges of pink scalloped heart.

Sanding the red heart accents the embossed pattern by slightly changing the color.
Stamp “with Love” on a scrap of Bashful paper with Versafine Black Onyx ink. Heat emboss it with clear embossing powder. Position S4-319 Lattice Rectangles #1 over “with Love” and tape the die template in place for cutting. (It really is stamped with black ink. The shine makes it look metallic in my photo!)

After cutting and embossing it, sand the edges to reveal the embossed pattern.

Here are all the cut pieces.

The next step is to score the white Lattice Rectangle to fold over the pocket on the red Lattice Rectangle. The score line is almost 3/4" from the lattice edge. Score half way through the first edge scallop after the corner.

To make a pocket for the pink heart and change the Lattice Rectangle die cut into a square, score about
1 ¾” from one end. Use the lattice pattern as a guide, scoring between the 2nd and 3rd scallop after the corner scallop. Make another score 1 scallop away (about ½”), turning the paper over to the back to make a score for a valley fold.
1 ¾” from one end. Use the lattice pattern as a guide, scoring between the 2nd and 3rd scallop after the corner scallop. Make another score 1 scallop away (about ½”), turning the paper over to the back to make a score for a valley fold.

You can see the 2 scores here.

Here you see how both pieces folded look after folding. Trim the straight edge of the white piece to about 3/8” from the fold so it will fit into the tiny pocket on the red lattice “square”.
Next, stamp “for You” at the bottom of the red lattice with Versafine Black Onyx and heat emboss it with clear embossing powder.

Here are all the pieces!
To assemble, peel the backing from the pink embossed piece to fasten it to the white card. The white lattice is glued to the fold of the red lattice piece. I used SCRAPBOOK ADHESIVES BY 3L™ Craft and Photo Tape to secure the pocket ends. Then, adhere it to the card front. Layer the pink embossed heart onto the white scalloped heart and tuck it into the pocket. Use SCAPBOOK ADHESIVES BY 3L 3D Foam Squares just at the top to hold it in place. The little red heart is glued to the pink scalloped heart and fastened over the white lattice of the pocket with 3D Foam Squares again just at the top. The “with Love” piece is popped up with Foam Squares, too. Thread and knot ribbons through the 2 larger buttons. Stick in place with a Craft Glue Dot. The little button has pearl cotton through the holes. Fasten it to the card also with a Craft Glue Dot.

And that’s how to get a square out of a S4-319 Lattice Rectangle die cut! It makes a cute Valentine’s Card, don't you think?
Supplies:
Spellbinders™ S4-319 Lattice Rectangles
Spellbinders™ LF-161 Grand Labels One
Spellbinders™ S4-136 Classic Heart
Spellbinders™ S4-137 Classic Scalloped Heart
Spellbinders™ 12-1009 Flourish Impressabilities
3M Post-It™ Craft Paper – Bashful
Worldwin Paper – Red Cardinal, White
Waltzingmouse - Vintage Ornaments set: “with Love”, “for You”
SCRAPBOOK ADHESIVES BY 3L™ – EZ-Runner, Craft & Photo Tape, 3D Foam Squares
Glue Dots™
Buttons – Red, White
1/8” Ribbon – White Satin, Pink Grosgrain
Pearl Cotton - White
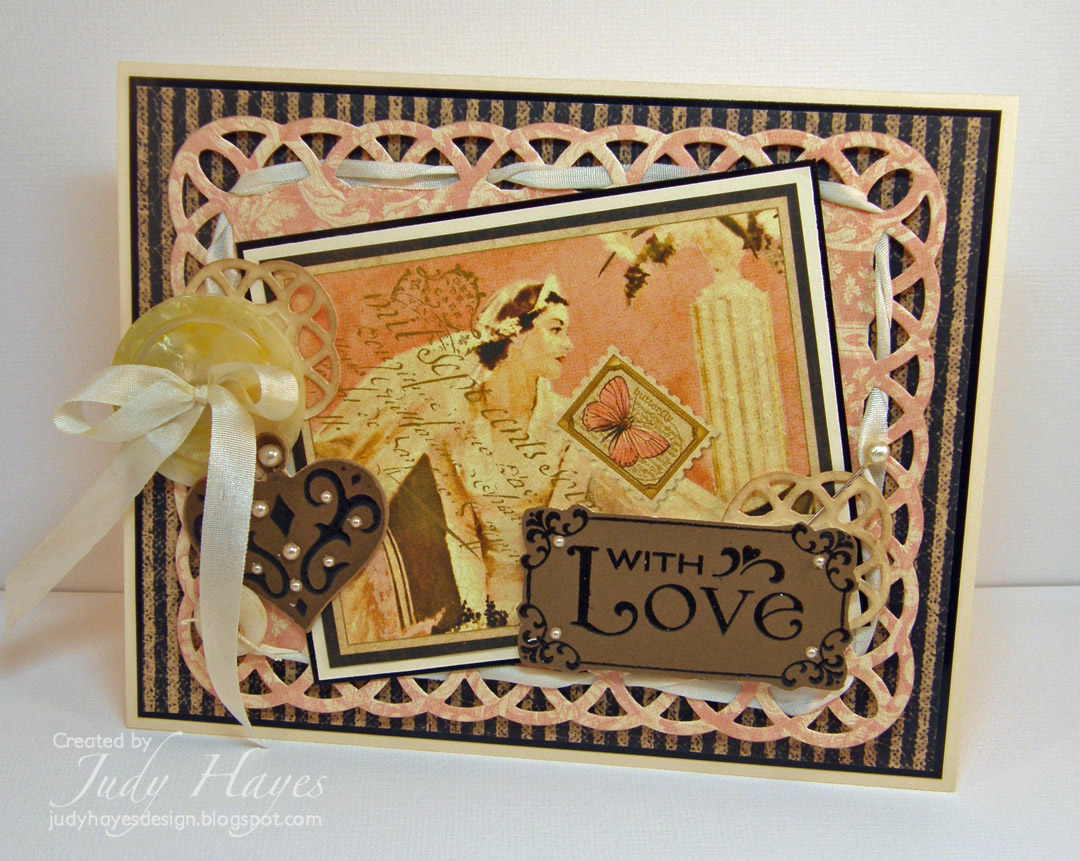
Here’s another “Love” card with a totally different look using S4-319 Lattice Rectangles
This is the Spellbinders product I introduced:

Lattice Rectangles
SKU # S4-319
MSRP $24.99
Measurements:
1: 1¼ x 1½″
2: 1⅞ x 2⅜″
3: 2¾ x 3½″
4: 4⅛ x 5″
This blog contest is now closed!
Click here for the Spellbinders Paper Arts To DIE For!! Winter Release Rules.
TO ENTER MY CONTEST: (Contest is open for entries from 12:01 a.m. January 11, 2011 to 12:01 a.m. January 13, 2011 Central Standard Time)
1) Send your email entry to: Reveal4@spellbinders.us (either click the link or type the address into your email program)
2) The subject must be Lattice Rectangles.
3) Send!
I love your comments! Unfortunately your comment does not count towards a contest entry, so be sure to enter and then leave a comment!
If you have any questions, please e-mail ContestQuestions@Spellbinders.us
Thank you for visiting and good luck!!!
-judy
beautiful!!!! :)
ReplyDeleteWOW, Judy! LOVE the cards (pun intended - LOL!!)! Great step-by-step...all your work paid off! xo
ReplyDeleteJudy! This project is so fabulous! I love this. Great use of the die templates and Impressabilities! Love all the step shots! WOW!
ReplyDeleteBeautiful !!!
ReplyDeleteboth your projects are beautiful thanks for sharing- love your red and pink card and love the vintagy feel of the other.
ReplyDeleteBoth of these are so beautiful. Really, really great job Judy. The step shots were awesome!
ReplyDeleteAaaaack, LOVE these!!!! Gorgeous samples.
ReplyDeleteThanks for showing us how to make this card its so pretty
ReplyDeletewww.shelleyland.blogspot.com
Your cards are beautiful and your detailed instructions so helpful. Thrilled to see how you changed a rectangle (lattice edged at that) into a square. Your LOVE card is one of my favorites!
ReplyDeleteFabulous!! Love how you used all the dies!!
ReplyDeleteOh I just love those lattice rectangles. Think it is my favorite so far.Wonderful job
ReplyDeleteJudy this is such a lovely card. I truly like your finishing details. Oh, and I learned something new! I didn't know you could use an impression plate with the nestie in place! Thanks.
ReplyDeleteThis is fabulous
ReplyDeleteWhat beautiful cards! I love the new Lattice Rectangles die! Can't wait! TFS!
ReplyDeleteWow, love the cards, great tutorial
ReplyDeleteWonderful projects! Thank you so much for showing step by step how you made the Valentine card! Beautiful card!!!
ReplyDeletespeechless...AMAZING cards...FABULOUS dies!!
ReplyDeleteYour projects are gorgeous.... thank you for sharing the step by step for the Valentines card!
ReplyDeleteThank you so much for sharing!!!
~Ola
okj83 at live dot com
zloe.blogspot.com
OMG i love the heartpocketcard! hugs nicky
ReplyDeleteGreat use of this due set. Both cards are wonderful. Love the second one.
ReplyDeleteMarcie
Oh My this is stunning!!
ReplyDeleteLove Sheila xx
Sych stunning cards!!
ReplyDeleteLove Sheila xx
Beautiful cards!
ReplyDeleteBeautiful!!!! =)
ReplyDeleteLovely new dies and a fantastic project and tutorial. I tend to forget about impressabilities!!
ReplyDeletetfs
HW(UK)
x
OMG, Judy, love your cards; how creative!!! You really went all out using the various Spellbinders, love it!!! Very clever, got try this one for sure.
ReplyDeleteBoth creations are gorgeous, Judy! Love the elegant Lattice Rectangles!
ReplyDeleteI really like your valentine card.
ReplyDeleteThat card is really beautiful and I love how you turned the rectangle into a square by doing the scoring! Thanks so much for sharing the step by step tutorial for this! Can't wait to see what other goodies can be found on your blog!
ReplyDeleteGreat cards, thanks for sharing how to make it into a square also, very clever!
ReplyDeleteSimply beautiful!
ReplyDeleteThis is going to be a big seller, I'm betting. Beautiful work.
ReplyDeleteLove those lattice rectangles and how clever to fold it to make the square!
ReplyDeleteJudy, your cards are amazing! thank you so much for showing us how to make a rectangle into a square and with a pocket no less! Wonderful pics and directions!
ReplyDeleteGorgeous card
ReplyDeleteThanks for the step-by-step instructions - lovely, lovely card!!
ReplyDeletewow you card are beautiful Judy and the new dies are awesome...hugz Anita
ReplyDeleteLove your cards and step by step instructions. Thanks.
ReplyDeleteVery nice and wow, what a bunch of work you put into this!
ReplyDeleteGorgeous cards! Love this die. :)
ReplyDeleteDebbie Meijer
Oh I love the second card so much! The colors are me:)
ReplyDeleteLove both projects, especially the vintage style card. So elegant!
ReplyDeleteThis project has me drooling. Would love to have these templates.
ReplyDeleteLOVE these dies - so awesome, just like your work,
ReplyDeleteBeautiful cards. Love the tutorial...thanks for sharing!
ReplyDeleteOh this lattice rectangle die is just a must have! Just love your Valentine card. Thanks for showing us a step by step! TFS
ReplyDeleteGreat new items so far....love these lattice rectangles! The card was great... love the look of the impressabilities as well.
ReplyDeleteLovely design Judy and your pink/red card is just fabulous. Love the vintage feel to the other one.
ReplyDeleteLove the dies and thanks for the tutorial on how to use the imprssabilities!
ReplyDeleteWonderful use of the die. Pretty valentine and love the vintagy look on the second one.
ReplyDeleteFantastic work thanks for the directions can't wait to try this
ReplyDeleteI've already entered the contest for today. Just wanted to let you know that I really loved your projects. It was fun to see how you made the pocket.
ReplyDeleteNot much I can say about these projects but WOW!!! You've done some wonderful things with these new dies. Thanks for sharing. Best wishes, Kym xxx
ReplyDeleteLove the cards. I loving the dies.
ReplyDeleteThank you for inspiring.
syeda
syeda_lubabah@hotmail.com
Thanks for the step by step. They always save a few steps here and there. Beautiful cards.
ReplyDeleteGorgeous projects. Beautifully done. So very creative...
ReplyDeleteThis is fabulous! Thanks for the tutorial.
ReplyDeleteGorgeous!
ReplyDeleteBeautiful lattice cards. The first one is definitely my favorite.
ReplyDeleteGorgeous cards! Love the classic style using the lattice rectangles -- on my wishlist already.
ReplyDeleteAll of the projects you did are wonderful! Thank you for sharing!
ReplyDeleteLove the lattice.
ReplyDeletelike how you added the border to the first card, very creative and love the vintage feel of the second card
ReplyDeleteEvery single die I've seen so far is "To Die For" these were appropriately named.I would love to win these, your gift card holder is awesome.
ReplyDeleteYour cards are stunning and so original in design! TFS all the creative steps to make them!
ReplyDeleteOh Judy....I love the lattice squares!! Awesome tutorial!!
ReplyDeleteluv how you did the pocket on the v-day card & strung the ribbon through the 2nd card:)
ReplyDeleteLove that die. You really confused me though when you said they were rectangles but I kept seeing squares. I am having eye problems and though I'd had some sort of setback!!
ReplyDeleteLove your projects they are beautiful. http://pammejo-scrapbookflair.blogspot.com/
ReplyDeleteWow, Spellbinders has done it again. These are fabulous new dies and your projects are beautiful!
ReplyDeleteThese are awesome!!!
ReplyDeletewow - this is a GORGEOUS card!! Love what you did with the dies - so clever!!
ReplyDeleteBeautiful Valentine Card. So much detail on your card. Love the new Lattice dies!
ReplyDeleteThanks for the trick on getting the square from the retangle and also how to do the pocket, until I read your instructions I didn't see the pocket. Very fun!
ReplyDeleteYour first project is so incredible!! The instructions are clear and concise, and very helpful. Thanks. Obviously, this set has to go on my wish list!
ReplyDeleteWonderful projects and your tutorial is really well explained.
ReplyDeleteTine :)
Wow, what great projects. TFS.
ReplyDeleteJudy this is just brilliant!!! I absolutely love love love what you did with all the dies, the texture of your cards are just beautiful. :) Thank you for the inspiration!
ReplyDeleteWOW- LOVE the lattice! TFS!!!
ReplyDeleteThanks for the tutorial...as well as 2 beautifully done cards.
ReplyDeleteI love your beautiful projects using this fabulous new die set. Thanks for sharing!
ReplyDeleteInky hugs,
Janet
WOW I LOVE WHAT YOU MADE OF IT!!!!
ReplyDeletegreetz Angie
Wow!!! OMG July...this is so freaking awesome!!! I love that you created a pocket on the front...so so cute! I really love this! TFS
ReplyDeleteHugs,
joni
I love these new rectangles and you did such a wonderful job with them!
ReplyDeleteWOW, very COOL! You made a beautiful card, I love how you used all the dies & impress. so creatively and beautifully!! Great step-by-step photos, what fun! Thank you for sharing!
ReplyDeleteThanks for the detailled description on how you made the card(s)! And of course, big compliments on those two different yet equally gorgeous cards!
ReplyDeleteWOW I think your work in showing off this die is AWESOME!!
ReplyDeleteGreat projects! Thanks for sharing instructions!
ReplyDeleteSuch a cute Valentine card. Love all of the dies you used! :o)
ReplyDeleteOMG....I love them! So beautiful!
ReplyDeletelooks like a fabulous die set. Love the cards.
ReplyDeleteWhat beautiful cards! Love all the details on the first Valentines card -- the embossing and sanding just add such pizzazz!
ReplyDeleteThis is an incredible project, looks hard to me, but you say not. Love these dies.
ReplyDeleteThese are totally awesome project Judy. Thanks for the instructions on how to make the card and for the wonderful inspiration. "Hugs" Carol
ReplyDeleteThe pocket idea is ingenious!!! Love the hearts too!
ReplyDeleteBeautiful artwork! Both cards are absolutely delightful!
ReplyDeleteLove Love Love this!
ReplyDeleteYour card is beautiful. Love the lattice rectangle dies. TFS
ReplyDeleteLove your cards - Love these dies! My want list for the dies just keeps getting longer and longer. Thank you for some wonderful ideas!
ReplyDeleteVery cute cards and I love the dies. Thanks for showing changing a rectangle to a square.
ReplyDeleteYour Valentine Card is So Pretty! I think I'll try something like it of course I don't have the new die but I hope to soon! Thanks, Jan :)
ReplyDeleteThe Valentine is terrific - what an innovative way to use the rectangle in a different manner. The more I read the more impressed I was. A great card. So is your second card, btw.
ReplyDeleteVery inventive!
ReplyDeleteWow! Both cards were lovely. I love the vintage feel of your 2nd card a lot.
ReplyDeleteI love your project! Great pictures and tutorial!
ReplyDeleteThanks for sharing! :o)
I love the Valentine card you made.
ReplyDeleteJust beautiful-thanks for the directions
ReplyDeleteThey both are darling Judy!
ReplyDeleteYour cards are beautiful, TFS your techniques!
ReplyDeleteOMG! That Valentine's Day card is gorgeous! I love it and wish I had the dies to make it! Amazing projects!
ReplyDeleteWow!! love both of your cards!!
ReplyDeleteJudy -
ReplyDeleteOUTSTANDING! These projects are just stunning! I think I'm in love with those Lattice Rectangles. Especially the little one.
Elaine Allen
I really really want the grand label!
ReplyDeleteLOVE, LOVE LOVE both the new dies and your fantastic project!
ReplyDeleteThis is so awesome! Loved the tutorial on making the square shape from the rectangle Spellbinder!!!
ReplyDeleteI totally adore these and see a million possibilities!!
I just love the cards. And making a square with a rectangle is pretty cool. Your instructions are great. Now if I only had the dies and impressibilities. Daydreaming about them now!
ReplyDeleteSuch amazing designs. I love what you did with the nesties. I'm definitely going to be a follower so I can learn more about design.
ReplyDeleteHugs,
Snoopy :D
http://snoopyshomemadefun.blogspot.com/
Awesome...awesome project Judy :)
ReplyDeleteWOW!!! Gorgeous projects!!! I love them!!! You did a wonderful job!! Thank you for sharing!!
ReplyDeleteYour card is just adorable! {Love} it!!
ReplyDeleteLove the Valentine card. The pocket is a wonderful idea. Great way to turn a rectangle into a square. Your second card is lovely and classic. TFS!
ReplyDeleteBoth of your cards are beautiful, I just started collecting nestabilities, and I love them! I still have a bit of an issue with embossing , but it will come to be eventually.
ReplyDeleteI love the idea of the grand caliber (as you can cut many things at once) I just wish I could afford it, right now.
Thanks for sharing your talents-- you are such an inspiration!
Susan
Oh I just LOVE LOVE LOVE these rectangles,,, your Valentines card is gorgeous.
ReplyDeleteBeautiful card you made
ReplyDeleteJayne
Great projects!
ReplyDeleteJust getting a collection of dies...this would be one for the files...Tootsie
ReplyDeleteLove the way your project all came together, and loving the new lattice rectangles :)
ReplyDeleteWow, awesome projects! Thanks for the creative tips!!! God Bless!
ReplyDeleteThank you for the wonderful tutorial! Your work is beautiful! Love it!
ReplyDeleteChris Christensen
What a beautiful project! It was amazing to see how you transformed that rectangle into a square!
ReplyDeleteThank you for the tutorials! I need all the help I can get!
ReplyDeleteFantastic work!!!
ReplyDeleteLove this project! Those rectangles certainly are to die for! Thanks for sharing the idea to make them squares.
ReplyDeleteI love your cards they are awesome, I keep seeing all these new Spellbinders, I want them all! Hope I win LOL Love your blog
ReplyDeleteStunning cards. Thanks for sharing.
ReplyDeleteBeautiful creation. I really like the lattice rectangle die. Very clever how you made it into a square!
ReplyDeleteBeautiful work, Judy!
ReplyDeleteWow this is fantastic
ReplyDeleteBeautiful!
ReplyDeleteLove the valentine card, super cute. Thanks for the tourtorial!
ReplyDeleteBeautiful! I had never seen the flourish impressabilities....I'm "impressed"!
ReplyDeleteGreat inspiration here!!
ReplyDeletethank You regards Ingela G Sweden
Beautiful projects Judy! Love all the embossing and texture!
ReplyDeleteWow!perfect tips but how long will it takes to complete one card?I hope someday I can find this one in the market so I can view it personally.Inkjet Paper
ReplyDelete