
Spellbinders™ Paper Arts is absolutely thrilled to bring you our largest product releases ever! These new collections are some of the most innovative and beautiful die cutting and embossing templates in the world! The Spellbinders Abilities and Beyond Blog Frenzy allows you a sneak peek of our introductions for the 2012 Winter Craft and Hobby Association trade show later this month.
Win today’s new Spellbinders products!
Be eligible to win the Grand Prize by entering each day, see the schedule below!
Enter my Blog Frenzy from 12:00 am Eastern Standard Time (EST) January 16, 2012 until 11:59 pm January 17, 2012.
Today’s participating Blog Frenzy includes my blog and Holly Simoni and Heidi Blankenship’s blogs.
You can enter yesterday’s blogs, Samantha Walker, Christine Emberson and Lesley Langdon through January 16 at 11:59 pm EST.
See the Spellbinders Blog for the complete schedule of designers and contest rules.
Thank you Spellbinders Paper Arts for sponsoring this contest!

Here are the new dies I’m introducing:

S5-111 Angle Approach MSRP: $ 29.99
PRODUCT SIZES:
1: 1 3/8”
2: 2 ¼”
3: 4”

MSRP: $ 19.99
PRODUCT SIZES:
Butterflies: 7/8 x 8”
Flowers: 1 1/16 x 8”
Dots: 5/8 x 8”
I am honored to be introducing the new Cut • Fold • Tuck dies from Spellbinders! These European inspired designs create beautifully layered geometric designs in one pass through your die cutting machine! Simply fold the pieces, tuck them under and watch as the amazing designs develop! With multiple dies in each set, you can easily and quickly create different sized Cut Fold Tuck die cuts, or layer them for wonderful dimensional effects!
Watch this introductory video!
See this how-to video on the new Cut Fold Tuck dies:
I’m so excited to be sharing these new Spellbinders shapes with you today!!!
S5-111 Angle Approach and E8-014 Classic Decorative Inserts Six
The new Spellbinders Shapeabilities Cut-Fold-Tuck die templates are so unique! You’ll want to add them to your “Wish List” for sure!!! I've had a lot of fun with S5-111 Angle Approach!
Look at the detail in E8-014 Classic Decorative Inserts Six! These are designed to coordinate with Spellbinders Edgeabilities® die templates that you may already have –E8-001 Classic Scallop, E8-003 Classic Triple Scallop or E8-004 Classic Ric Rac as well as the new E8-008 Classic Edges Two (see the reveal on Day 3 by Kazan Clark).
I’m also using the new Spellbinders S4-354 Splendid Circles (revealed by Latisha Yoast on Day 1) and EL-002 Regal M-Bossabilities™ folder(See Day 2 reveal by Julie Overby) .
Let’s get to my project!
I designed a Mother’s Day card and coordinating box with S5-111 Angle Approach #2, 3 (#1 being the smallest). I used E8-014 Decorative Inserts Six – Dots along with E8-008 Classic Edges Two – Triple Scallop. I’m also using the new Spellbinders S4-354 Splendid Circles (revealed by Latisha Yoast on Day 1) and EL-002 Regal M-Bossabilities™ Folder (See Day 2 reveal by Julie Overby) .
I’ll start with the card directions!

Here’s all the Spellbinders die templates :

First, we’ll create the layers on the card front, and then I’ll show you how to make the Angle Approach medallion. Supply list is at the end.
Starting at the card bottom, I added a narrow strip of green, then a strip of dark pink. I stamped the verse with olive green ink on light pink cardstock and fastened it over the dark pink and green borders. All the paper sizes are listed below on the Supply List.
Now, for the FUN parts!
First, I cut the triple scallop edge on a 4 ½ x 5 ½”piece of green cardstock. I aligned the edges of Classic Edges Two – Triple Scallop with the paper edge and centered and taped it in place.

Next, I cut the Dots. Again I used tape to keep the Classic Decorative Insert Six - Dots from moving when passing through the Spellbinders Grand Calibur® machine.

Because many of the new Decorative Inserts are very detailed, it’s best to place it parallel to the long sides of the Cutting Plate.
Tip: This allows for even pressure throughout the cutting pass. When fed horizontally, or parallel to the short side of your cutting plates, you may need to add a shim. First, cut the Classic Decorative Insert vertically. If an area didn’t cut completely, add a paper or cardstock shim only at that section. Cut again, then emboss for a beautiful and intricate design!
Next, I cut the Classic Edges Two - Triple Scallop on a piece of dark pink cardstock. I used my green piece as a guide to cut the edge exactly the same. I removed the green piece before running it through the Grand Calibur machine.

Embossing comes next! I love the look of embossed paper! I’m really enjoying the new Spellbinders M-Bossabilities™ folders. Each one has two different embossing patterns! I used EL-002 Regal M-Bossabilities on this card.

I centered the cardstock on the pattern from side to side. I’m embossing with my cardstock at a right angle to the folder because the pattern matches the scalloped edge better that way. I’ve used 2 pieces of painter’s masking tape to mark the side to side placement. I’ve aligned the bottom edge so that I can see the embossing folder through the top holes only in the Dots pattern. I used 2 small pieces of removable tape at the top to keep it in place. Remove painter’s tape before embossing.

Here you can see the wonderful embossed pattern! It fits so well with the decorative edge!
I threaded the silk ribbon through a darning needle to thread it through the top holes. Before taping the ends to the back, I added the dark pink scalloped edge piece. Then I glued the ribbon ends in back. I adhered it to the card.
Here’s the completed card front without medallion!


These are all the pieces needed:
S5-111 Angle Approach #3 and another center cut and embossed on pink side of paper
S5-111 Angle Approach #2 cut and embossed on green side of paper
S4-126 Classic Squares SM #4 and S4-354 Splendid Circles # 3 and 4 cut and embossed from light pink cardstock
Double sided paper works so well for these “Cut-Fold-Tuck” shapes!
I like to fold all the edges that will be tucked first. Then I tuck them all.

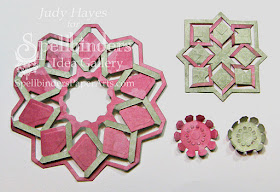
Next, I tucked all the folded pieces.

I’ve layered the star shape onto the light pink Splendid Circle. The square Angle Approach is first layered onto a light pink square and then onto the smaller Splendid Circle. I used the pink square first so all the open pattern would show pink through it. The Splendid Circle isn’t quite big enough to add color to all the corners. I’ve layered the 2 centers, one green side up and outside one with pink side up, and fastened with a Glue Dot. I added a pink pearl to the center.


Add it to the card front to finish it!
Spellbinders™ Products:
E8-014 Classic Decorative Inserts Six - Dots
E8-008 Classic Edges Two – Triple Scallop
EL-002 Regal M-Bossabilities™ Folder
S4-354 Splendid Circles #3, 4
S5-111 Angle Approach #2, 3
S4-128 Classic Squares SM #4
GC-001 Grand Calibur® Machine
Cardstock pieces needed:
White cardstock – 9 x 6 ½”
Bazzill Spring Breeze (green) –5/8 x 4 ½” and 4 ½ x 5 ½”
Bazzil Chablis (dk. pink) – 3/8 x 4 ½”
Bazzill Prismatics Iced Pink – 1 ½ x 4 ½”
Plus:
KaiserCraft Mini Clear Stamp set – Occasions
KaiserCraft Chanteuse Eco paper
Want2Scrap Pearls – Pink
Scrapbook Adhesives by 3L – 3D Foam Squares
Glue Dots – Mini Glue Dots
Olive Green Ink
Pink Silk Ribbon
Do you really want to know how to make the box, too???
Okay….here goes!

I’ll start with the box itself first.

I cut and embossed one LF-007 Hexagon Envelope of green cardstock and one of pink cardstock. I added Scor-Tape to the flaps of the pink one for the box bottom.


I set this onto the pink hexagon base and fastened all the sides with the Scor-Tape. I’ve distressed the edges a little bit with Pumice Stone ink before assembling it.

The box top is held together with little circles cut with a die template from S5-072 Blossom Tags and Accents. (Tip: The little circle from S4-354 Splendid Circles could be used instead.) These are cut from the green side of the KaiserCraft Eco paper. I’ve rubbed on a little Pumice Stone ink on all the edges of the top, too.

I placed the box top on the bottom and put a rubber band around the top edge to hold it together. I added the little circles with Memory Glue Dots. Once all the circles were in place, I took the box top off and pressed each circle firmly in place. I added a medium pink pearl to the center of each circle.
Now, we’ve come to the most involved part!!!
The dimensional Angle Approach piece for the top! It takes a little patience to make the folds. After that, it’s not too hard!

These are the pieces needed. You can see the dimensional piece is already folded and shaped. I’ll take you through those steps next.
I’m switching colors for this step! I forgot to take photos as I made the piece I used on the box so I recreated the steps in a different color paper. I didn’t have enough of the pink and green.

The dimensional shape starts with 2 - Angle Approach #3 shapes folded and glued together. I removed the center from both just as I did for the card. I also scored from each point across to the other point all around the shape. The top shape is scored in the photo.

I folded all the angle pieces up just as for the card. I did not tuck them!

I also folded the “tuck” piece down. Hard to explain that in words! The open angle is folded up and the sold part is folded down on the score line. I did this on both shapes.


Both pieces are folded and ready to glue. I lapped a point on each end to glue them together. I cut off the under open angle piece so it wasn’t double thick.

Now it forms a circle again.
Now I’m back to the actual box photos!
To assemble the box top, I cut and embossed a light pink Splendid Circles #4. I centered the #2 Splendid Circles die template on it and traced the center opening with a pencil. This will be my guide when I glue the medallion on.

I used craft glue in a ring about ¼” from the drawn circle. Beacon Craft Glue works great for gluing as it sets up fast! I laid the dimensional Angle Approach circle on the glue and squished it smaller so the center aligned with the pencil line. I arranged it as even as possible, and held it in place until the glue set up.

The assembly of the square Angle Approach for on top is the same as for the card (see above). To fasten it to the box, I used a stack of Scrapbook Adhesives by 3L – 3D Foam Squares (3 or 4) in the center.

Voila! It’s done.
Box Supplies:
Spellbinders Products:
S4-354 Splendid Circles #3, 4
S5-111 Angle Approach #2, 3
LF-007 Hexagon Envelope
S5-072 Blossom Tags and Accents
S4-128 Classic Squares SM #4
GC-001 Grand Calibur® Machine
Other supplies:
Bazzill Spring Breeze
Bazzil Chablis
Bazzill Prismatics Iced Pink
KaiserCraft Chanteuse Eco paper
Scrapbook Adhesives by 3L – 3D Foam Squares
Glue Dots – Mini Glue Dots
Want2Scrap Pearls – Pink
Scor-Pal and Scor-Tape
Beacon Craft Glue
Pumice Stone ink
Here's another card that’s similar in design yet totally different in color. There are 2 - S5-111 Angle Approach shapes that make up the medallion on this card. Can you pick them out?

I’ll post directions for this card soon.
Thank you so much for getting this far on this post!!! It’s a long one!
By entering the Spellbinders Abilities and Beyond Blog Frenzy you agree to the Official Rules. For questions on the Spellbinders Abilities and Beyond Blog Frenzy, send an email to contestquestions@spellbinders.us ; no entries will be accepted at this email address.
TO ENTER:
My blog is open for entries from 12:00 am, January 16, 2012, until 11:59 pm, January 17, 2012, EST.
1) Send your Blog Frenzy email entry to: reveal15@spellbinders.us
2) The subject must be S5-111 Angle Approach and E8-014 Classic Decorative Inserts Six
3) Send!
Be sure to visit all the Designers on their Blog Frenzy dates!
January 12
January 13
January 14
January 15
January 16
Judy Hayes – you are here!
January 17
January 18
January 19
To be eligible for the Grand Prize, enter each and every Blog Frenzy within its designated time period, send your entries from the email address for each entry. The Grand Prize has a retail value of over $1900 and includes the complete Spellbinders line of die cutting and embossing templates released at the 2012 Winter CHA show, and a Spellbinders Grand Calibur® Die Cutting and Embossing Machine!
I love your comments! Unfortunately your comment does not count as an entry, so be sure to enter as stated above, and then leave a comment!
Thank you for visiting and good luck!!
To receive information and announcements from Spellbinders, sign up for the Newsletter and subscribe to the Spellbinders Blog. Find us on Facebook, Twitter, and YouTube and Pinterest. Thank You!
Spellbinders and M-Bossabilities are trademarks of Spellbinders Paper Arts, llc.
Grand Calibur is a registered trademark of Spellbinders Paper Arts, llc.

Wonderful work you did! love the medallion and your box!
ReplyDeleteLove your projects, they are awesome. TFS
ReplyDeleteWOW! Beautiful work as usual.
ReplyDeleteYou did a great job! Love the hexagon box!!!
ReplyDeleteWow! Stunning projects!
ReplyDeleteGorgeous projects, love that box.
ReplyDeleteohhh... wonderful work, Judy!
ReplyDeleteLove your box and the card.. everything is so adorable! And the bi-color effect is just gorgeous!
Sylvia xx
WOW- you blow me away- these projects are amazing and the dies look like fun
ReplyDeleteGreat cards and projects, another to the list.
ReplyDeleteI`m almost speachless!! Your projects are amazing and inspiring! And the dies...they`re spectacular!!! I can hardly wait to get them. For now they`ll have to go on my wish list though.
ReplyDeleteUnbelievable project Judy, the cards are amazing and the box just made my mouth fall open.
ReplyDeleteThese new dies are incredible!!
Beautiful and inspiring projects xx
ReplyDeleteYour projects are amazing, i love how you made that box!! Thanks for sharing how you made it!! I am a new follower
ReplyDeleteKristan
Gorgeous dies and stunning projects.tfs
ReplyDeleteHugs
Heather (UK)
xtrat
WOW beautiful box, loving these dies!!
ReplyDeleteThank you for showing us step by step how your wonderful project went together because it look very hard but you made it look really easy. Beautiful work and great dies! janiceaeschliman.blogspot.com
ReplyDeleteYou did such an amazing job here especially on the box, which I just absolutely love, but also both these cards are sooooo great and well done.
ReplyDeleteThese dies here are just sooo awesome and you girls have really shown us some great use of them all.
Very beautiful projects. I love them. Thanks for sharing, Johanne L.
ReplyDeleteWow! Love these.
ReplyDeleteThe card and box are fantastic!
ReplyDeleteAs always, your projects are absolutely AMAZING, Judy!!! Thanks so much for sharing all the details.
ReplyDeleteJudy!! Wonderful projects they look like a quilted blanket how they interlock. What an imagination you have:)
ReplyDeletewow - such complicated work and absolutely stunning.
ReplyDeleteBeautiful Job Judy! Love all the opportunities the new dies and M Bossibilities offer. Thank your for sharing you beautiful work.
ReplyDeleteBeautiful projects.
ReplyDeleteStunning projects Judy. Everything was so cleverly thought out. Great use of all dies used. Love that the edgeabilities interchange with the embossing folders as well. Gorgeous results.
ReplyDeleteMarcie
Beautiful projects, Judy!!!! Love how you created an even more detailed flower on the box!! Clever lady!!! See you soon!!!!
ReplyDeleteWow! Your work is outstanding! I love the box!
ReplyDeleteYour box and cards are gorgeous.
ReplyDeleteAwesome. Love all your projects, especially the box.
ReplyDeleteSmiles~
Marilyn
Fabulous use of the dies and a great little box!
ReplyDeleteWonderful wonderful projects!! What you did with those dies!
ReplyDeleteWow, gorgeous projects - you went above and beyond with these!
ReplyDeleteYour cards and your box were all stunning!!! What great dies ...
ReplyDeleteAwesome projects! Loved the set of box and card.
ReplyDeleteBoth cards are Lovely, such pretty threading of the ribbon in the first. That box is gorgeous and just love the side details too!
ReplyDeleteAmazing projects, I love the box.
ReplyDeleteBeautiful projects! Thanks for sharing!
ReplyDeleteThe details are amazing on this project!!!
ReplyDeleteThank you for sharing "all" the steps-love to see how things are put together.
I am loving this new Fold and tuck idea.
fabulous. Love the 3D cut/fold ornament. The cream/gold card is so pretty. And a mother will love the box and matching card. Fabulous
ReplyDeleteLovely!
ReplyDeleteWow, what gorgeous projects!! Thanks for the instructions. Love these new dies.
ReplyDeleteIncredible! I'm loving the cut-fold-tuck dies!
ReplyDeleteAwesome, awesome, AWESOME! Your work with these amazing dies is just gorgeous.....love the instructions, too!
ReplyDeleteJudy, these are amazing, such great instructions and photos too! thank you so much for sharing your talents
ReplyDeleteyour projects are amazing! love that box!!
ReplyDeleteWow! Fantastic projects Judy. Especially love the box! The new dies are awesome!
ReplyDeleteGorgeous projects you have done.
ReplyDeleteThat little box is darling.
Thank You for all the instructions on the 'how-to's. '
ColleenB.
Gorgeous Projects!!
ReplyDeleteBeautiful projects. Thanks for sharing.
ReplyDeletegreat work you ar so telented
ReplyDeleteWOW! The edges, embossing and that dimensional flower are AWESOME together! So many possibilities! Thanks for the inspiration ;-)
ReplyDeleteOh soooooopretty!
ReplyDeleteWow! That box is fabulous! You made these new Spellbinder dies shine!! I'm bookmarking your site and will be back for future posts.
ReplyDeleteJudy, Your projects are awesome. Love what you did.
ReplyDeleteSuch a cute project!
ReplyDeleteWow! I am just blown away by all these new products - so amazing and fun. Thanks for sharing your beautiful projects today to introduce the new items. Beautifully done! ;-)
ReplyDeleteSuch a beautiful box and card, thanks for showing such detailed instructions.
ReplyDeleteWOW...your work is absolutely stunning! Can't wait to try these dies!
ReplyDeleteLove these projects! Stunning! I'm really wanting the cut/ fold dies!!
ReplyDeleteOMG!!! Love those projects. Thanks for sharing.
ReplyDeleteHugs,
Farida
Your work is simply amazing! Those cut fold dies look hard to use! Beautiful work!
ReplyDeleteBeautifully done Judy! Everything looks so polished and dainty! You've pulled together a stunning ensemble!
ReplyDeleteLOVE,LOVE,LOVE that box. You did a truly wonderful job on it. These dies just keep getting better and better, Love it!
ReplyDeletebeautiful work. really like the cut, tuck, fold dies. must get some of those asap.
ReplyDeleteAll I can say is WOW!!! LOVE those dies! Of course your beautiful work makes it more special
ReplyDeleteWOW!!! These are just incredible!!!
ReplyDeleteFantastic projects!
ReplyDeleteAh my goodness! These are amazing dies! I LOVE your gift box.
ReplyDeleteGreat creativity with the box and the way you did the top! Love the medallions!
ReplyDeleteNoreen
http://www.craftlinky.com/
Such beautiful things you created! Those fold and tuck dies are such a great idea and your projects showed the use of them so well.
ReplyDeleteWow, your projects are just amazing. How incredibly detailed these new dies are. Thanks so much for such detailed instructions.
ReplyDeleteomgoodness, the dies, the cards, the box, the folds - awesome!!! I love everything!!!
ReplyDeleteThis is incredible. I was blown away with your innovation with the box, but then you went and made the coolest looking rosette I have ever seen. These new dies are incredible! Thanks for your tutorial as well!
ReplyDeleteI love the way you match the embossing to the pattern of the bottom edge, Judy...your projects are gorgeous!
ReplyDeleteYou outdid yourself and we appreciate it! The colors used are favorites of mine. Gorgeous card and box design. TFS
ReplyDeleteBeautiful work... TFS...
ReplyDeleteI am simply amazed and fascinated with that little box you created and how these new dies make the decoration for the top! It's divine!! SO are the cards you've made too! I love it all!
ReplyDeleteJudy, all of your projects are over the top gorgeous. I love how you threaded the ribbon on your first card.
ReplyDeleteThese new dies and folders are incredible. Thanks for introducing them.
Wow - What inspired you? you did a tremendous job on your projects! so much detail. They were beautiful!!! I look forward to seeing more of your work;)
ReplyDeleteAll I can say is WOW! Thank you for sharing.
ReplyDeleteThat medallion is soooooooo pretty. A must have.
ReplyDeleteGorgeous projects! I really love those edge dies and how they add so much elegance too!
ReplyDeleteWow! You have gone above and beyond amazing! All of your projects are fabulous! Thanks and God Bless!
ReplyDeletegreat stuff ... thanx for the photo tutorial!
ReplyDeleteThose dies are just so awesome..I love your cards and the box is just so adorable. TFS
ReplyDeleteThose dies are just so awesome and your cards and that box are absolutely lovely. TFS
ReplyDeleteWow oh wow! THESE are soo incredibly awesome! Love your projects.
ReplyDeleteOh wow these are absolutely gorgeous. Love each and every one of these.
ReplyDeleteKim xXx
Beautiful!
ReplyDeleteOh. My. Word. My jaw is on the ground! Your card and box are simply amazing!!
ReplyDeleteLove these dies. They remind me of my old Lace'templates. I love that you don't have to do all of that intricate cutting with a craft knife!! Your box is just beautiful!! Thanks for the beautiful ideas!
ReplyDeleteThese new dies are fabulous! And your projects are fantastic. Great work!
ReplyDeleteStunning projects. I could see where it could get a little addictive playing with these dies. You came up with some fabulous ways to use them. I also have to say that the deep emboss I am seeing on your card from the M-Bossabilities is very impressive!
ReplyDeleteAnother fun and informative visit to your blog - thanks!
Judy, you did a *magnificent* job!!
ReplyDeleteWhat a gorgeous box and cards and the tutorial. You made it all look so very easy and made up in minutes but I bet you spent hours at first getting it right. The folds look so intricate but just fabulous all made up. Thank you for showing it
ReplyDelete