Saturday, April 24, 2010

Coloring Exercise

Can you believe it? I haven't done any stamping since I got back from the Spellbinders Retreat last Sunday night!  I think I have "stampers block"!  I'm hoping to get over it this weekend........hasn't happened yet but I still have tonight and Sunday to go!
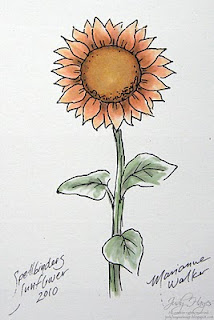
In the meantime, I have a coloring exercise to share that I did at the Spellbinders Retreat last week. We were privileged to have Marianne Walker from Copic speak to us on Saturday.  She is a very talented artist as well as a Copic instructor. 
When she suggested this coloring exercise, she asked if we could each stamp something to color.  Well, this was Saturday afternoon.  We were all leaving early on Sunday.  We had all packed our stuff!  No one had any stamps or ink.  So with just a little encouragement from all of us, she sat down and drew a sunflower for us to color.  After a quick trip to the hotel business center to make copies, we were set to color.
.....this photo shows the sunflower taking shape.....
We each had 2 sunflowers to color and we were each given 2 letters of the alphabet.  We were to choose a word starting with one of the letters showing feeling or emotion, write it down and tuck it away.  Then, out came the Copics.  We were free to color one sunflower any way we liked.  The 2nd flower was to be colored depicting the word we had written down.


......here Marianne puts the finishing touches on her creation with her signature and a title.....
Everyone was so quiet once we started coloring. How relaxing it was!


Here's my first sunflower.  I chose to make it more orange than a traditional yellow sunflower.


This is my 2nd flower.  I chose a word starting with "R" to influence my color scheme.  Can you guess what the word was? What kind of emtion does this color portray versus the color of my first flower?

My word was "restful".  I chose softer pastel colors to portray that emotion.  Do you think it seems more restful than the orange one?

It was so interesting to see what the rest of the DT did with their sunflowers.  I wish I'd taken a photo of all of them on the table.........but I didn't.  Marianne laid them all out on a table and talked about each set of flowers commenting on techniques and colors used to portray each word.  There was a very wide variety of colors and styles.  Each one unique!
Here you can compare them side by side.....

It was a fun exercise.  Color does make a difference in the emotion or mood portrayed.


Margie just sent me this photo of all the DT sunflowers!!! Thanks, Margie! ...so you get to see all the flowers after all!
Margie is on the Spellbinders Blog Team. We met at the Retreat.  She's so fun!  And as you can see, she always had her camera!
                                         (added April 25, 2010)

Hope you enjoyed this little exercise!

Happy coloring!
-judy

Wednesday, April 21, 2010

New "Wonderland Collage"

Artistic Outpost is releasing a new stamp set today called "Wonderland Collage".  If you love fantasy and a hint of quirk, you'll love these stamps!
This set includes some of the most zany iconic images from Lewis Carroll's "Alice's Adventures in Wonderland" and "Through the Looking Glass", to bring to you a fun collaged set of Alice-themed stamps.
This collection features unique images including the White Queen and the Dodo characters as well as an ATC sized White Rabbit collage.

This set is available in unmounted sheets and mounted on EZMount cling foam with indexed storage sheet.
Looking for inspiration using Wonderland Collage, check out the creations by these Design Team members:


Because of the Spellbinders Retreat, I chose not to work with Wonderland Collage.  I just didn't have enough time to devote to creating quality projects.  I'll be ready for the next release!

Monday, April 19, 2010

Back Home

I'm back from the Spellbinders DT retreat!
What an incredible journey! Absolutely unbelievable! Everyone on the DT is incredibly talented and so genuinely nice! It will be a super year! We had a great time! We learned lots of things!  ......and came home with lots of new products! 
 
What a glorious day here! ....mostly sunny, warm and no wind! (we seem to always have wind!) I took time to walk through my gardens this morning. Lots of tullips are blooming!  What a change in just 5 days!

The tullips in this photo are on the edge of my shade garden. The white ground cover flower is always one of the first things to bloom.
I've still got some unpacking to finish and laundry to start but instead, I'm heading outdoors to my sky chair......a canvas swing hung in one of my backyard trees.......to take in the warm sun and maybe a short nap!
Have a super day!
-judy

Wednesday, April 14, 2010

Spellbinders Retreat

............here I come!

I'm flying to Phoenix today for the Spellbinders Retreat.......3 days of intense training for the Design Team.
We've been promised lots of fun, too!  I'm so excited and a little nervous!  I don't think it will feel real until I get to Phoenix and meet everyone!
My assignment for the trip is to write a jingle about the retreat or Spellbinders!  Any ideas or suggestions? Leave me a comment!  I'll have my laptop along.  I have one that I'll work on on my drive and at the airport.  I plan to sleep on the plane! Way too many late nights lately.
I hope to find time to post while I'm there.  I think we have a pretty full schedule every day so no promises.
I ran out of time to get anything posted ahead for the days I'm gone......
Thanks to all of you out there who follow my creative journey!  Thanks for cheering me on! 
Have a great day!

Smiles.......
-judy

Sunday, April 11, 2010

Simple Pleasure

As the verse on this card says, "nothing compares to the simple pleasure of a bike ride". 

The girl and bicycle are 2 images from Artistic Outpost's Lovely Day set.  I combined them for this card.  I first stamped the girl with flowers.  I stamped her again on Eclipse tape to make a mask.  I cut it out including the space in the handle of the basket and placed it over the stamped girl. I then stamped the bicycle with basket.  I really like how the 2 images fit together!
I used Copic markers to color the girl and bicycle. See photo for all the Copic colors.   I added Antique Linen around the edges for shading.
The punched edge was cut with a Martha Stewart punch.  The DP is from Basic Grey.

Take time to enjoy simple pleasures!

Have a great day!

Tuesday, April 6, 2010

Spellbinders International Blogger Contest

To all my international viewers........check out the Spellbinders blog today!  They're having an International Guest Blogger Contest!  What a great opportunity to work with Spellbinders' great dies AND show your design talent!

Here's an excerpt from the announcement:

We are excited to announce the Spellbinders International Guest Blogger Contest. Spellbinders is looking for one fabulous International Guest Blogger to appear on the Spellbinders Paper Arts Blog during the month of June! This contest is for Spellbinders Paper Arts enthusiasts currently living outside of the United States. We will select one International Guest Blogger to create four projects with instructions, for publication on the Spellbinders Paper Arts Blog.


The International Guest Blogger Contest Winner will select $100 in Spellbinders Die Templates to use in the four blog posts. These die templates will be chosen from the Spellbinders website, and excludes Limited Edition die templates, Presto Punch machine, Presto Punch templates. A link to the Contest Winners' blog will be posted on the Spellbinders Blog for one year. The Winner will receive a personalized Spellbinders Badge to post on his/her Blog. Following completion of the four posts, the International Guest Blogger will receive an additional $100 in Spellbinders Paper Arts product, from the July 2010 New Release Collection. The Winner will be among the first to receive that new product! Spellbinders will pay all shipping charges.


Spellbinders International Guest Blogger Contest Winner will complete four paper craft projects using current Spellbinders Die Templates, with instructions. Winner must post a partial image of each project with a link to the Spellbinders Blog on publication days. Dates of publication to be determined.

You'll find all the application requirements, directions and forms on the Spellbinders Blog. ( I'll update this link to take you directly to the post once it's published.)

Give it a try!  Good luck! 

Monday, April 5, 2010

Two Sympathy Cards

I entered this card on JustRite's Friday Challenge 011.  It made Honorable Mention!  Click here to see the winner and other Honorable Mention creations.    I used a verse and border from JustRite's Thinking of You.   The border was stamped and cut it out with the largest oval from Spellbinders Classic Ovals SM S4-112.  I cut the verse oval out free hand.  It's mounted with foam tape. Both were stamped with Memento London Fog ink.  The paper lace border was cut with Spellbinders Classic Lace Border Grand S7-014.  I used both the lace and the cut away paper placed slightly below the lace.  There's a little Antique Linen Distress ink on the lace, card edges and ovals.  The DP is Bella Bella from My Mind's Eye.

 This second card uses the same verse stamp with a different border, again from JustRite's Thinking of You.  I used Ranger Oregano ink to coordinate with the DP from Basic Grey's Wisteria line.  The Spellbinders' dies are the same Spellbinders Classic Ovals SM S4-112 and Classic Lace Border Grand S7-014.
Thanks for visiting! 
Smiles to you,
-judy


Sunday, April 4, 2010

Happy Easter

Wishing you all a beautiful Easter Day!


My Easter card is created with stamps from Penny Black.  I stamped "candid" with Black Onyx on watercolor paper.  I used a Koh-I-Nor watercolor wheel and waterbrush to color it.  I added a little sparkle with Spica pens: Pink, Blush, Clear, and Mint.
I masked off  "wishing you a very" on the "a very happy Easter" stamp when I inked it so I could stamp just "happy easter".  It's clear embossed.  I added a little more sparkle with Sparkle Shimmer Spritz from Tsukineko.  I wish it showed up in the photo. It has such pretty sparkle!
I used Spellbinders Labels Eleven S4-246 for the shape.  I cut the White Luster and pink mats free hand. 
The card is stamped repeatedly with "paisley swirls" first usingTattered Rose and then overstamped with Spun Sugar.  I love the subtle pattern and soft color! 
I slid my Spun Sugar ink pad over the mesh and embossed it with Silver Pearl.  I wish you could see it better....it's a nice pearl finish.  I fastened it to the left side of the card front and fastened the image over it.  I offset 3 little pearls at the top and bottom.


Supplies:
Penny Black 4039K  candid
Penny Black 4038F a very happy Easter
Penny Black 40-011 paisley swirls
Distress: Spun Sugar, Tattered Rose
Spellbinders Labels Eleven S4-246
Versafine Black Onyx
Tsukineko Sparkle Shimmer Spritz
Koh-I-Nor Watercolor Wheel
Spica pens: Clear, Pink, Blossom, Mint
Embossing Powder:  Silver Pearl, Clear
Paper: Watercolor, White Luster, Bazzill pinks
Creative Impression Mesh
Hero Arts Pearls

Thursday, April 1, 2010

Little Easter Baskets

                              ..........for special little ones!

Today is my official first day on the Spellbinders Design Team!   A dream becoming a reality!  I'm still pinching myself! You can see the annoucement on the Spellbinders blog here.

Of course, I wanted to show you something made with Spellbinders dies!

I created these little Easter baskets for my grandchildren. I love the colors of these papers from We R Memory Keepers Hippity Hoppity line!  So fun to put together!

I made this template for the box - 4 3/4" x 6 3/8".  I scored all the folds, added papers to all the sides and glued the ends together.


I used a Rectangles Scalloped LG to cut scallops on the top edge of the pieces to fit the ends of the box.


For the sides I simply cut the rectangle in half.  The edges extend a little beyond the box. 


Here you can see how the papers fit the box sides.

I cut an oval..........

.......and a scalloped oval to use on each side of the basket.  I cut each of these in half and glued them together.


For the handle, I cut a strip 1" x 6".  I cut scallops on a slightly wider strip using the #5 Long Classic Scalloped Rectangles LG die. I glued them together to form the handle.


Here, you can see all the pieces put together  before I added the bunny.  I glued the handle to the outside of the box before I added the half ovals. 

I added a cute bunny diecut to this basket.  I added diecuts with eggs to the other 2 baskets.

This would be a cute May basket, too!  Have I started ideas churning in your mind?  I hope so....


Wishing you a blessed Easter! 
-judy