Saturday, December 15, 2018

Fun Merry and Bright Button Christmas Tree


I posted this fun project on Scrapbook Adhesives by 3L blog. All the details are there:
https://www.scrapbook-adhesives.com/blog/2018/12/14/merry-bright-button-christmas-tree/

It’s a fun way to use red and green buttons!

Happy crafting!

Judy

Monday, December 10, 2018

Amazing Paper Grace December Die of the Month Blog Hop


Sponsored:  As a designer for Amazing Paper Grace and Scrapbook Adhesives by 3L, I receive product to create projects.  

Good morning!!!
Today I'm bringing you inspiration for the Amazing Paper Grace Die of the Month; today is our Die of the Month Blog Hop!!   The Die of the Month is like a "swiss army knife"  you can manipulate it to do a variety of things.  At the very least you can do a card and normally you can use the pieces and parts for cards and other 3D items.  The Amazing Paper Grace Creative Team has joined in to give you their spin, in their style.  We all hope you'll see something that resonates and inspires you.

If you are new to our blogs, the Die of the Month is an exclusive die Becca has designed for Spellbinders - the December die is called Softly Spoke'n Flip and Gatefold Die.  This particular set has 9 dies and they can be used to make a background, a gatefold card, a tent card and the individual dies in the set can be used for many things.

If you want to find out more about the Club - prices, how you sign up and what's included, please look -------- HERE.
If you missed the introduction and want to know more about what inspired the Die of the Month Club, look -------HERE.
For My Project Today:


I chose to make a framed art décor piece.  Of course, this die set makes lovely cards!  I wanted to show that it can be used in other ways.  I used this beautiful die to frame a stamped image.  It makes a beautiful vintage looking framed project.   The base of my framed piece is two layers of foam core board glued together.  I glued tissue paper over it and around the edges and then painted it.  Most of the intricate die cut parts of my project are made with black cardstock.  I cut several layers of most pieces and layered them together for thickness.  I rubbed gold Gilders Paste over it and allowed some  black to show to give a vintage metal look.. It's amazing what the gold does to black cardstock! If you look at the die set pictured above, you can see the oval that's part of the intricate square is fastened to half of it.  It's easy to snip it apart to use it separately.  I used it as a mat behind the bird image. The bird oval was cut with a separate oval die that's part of the set.  The bird and branches are stamped. I painted it with inks using a water brush and added a touch of color pencil. With some of the scraps from this project, I also made a small 3 x 4.5 inches card.  I used pieces cut with the three smallest dies for the focal part.  There are actually 2 layers of the wreath shape layered together and offset slightly and rubbed with gold.  Feel free to contact me for more details. 


Be sure to check out the other blogs for more inspiration!  All the projects are amazing!!! Beautiful! Very unique designs with the same set of dies!  Blog links are listed below my supplies list.


Supplies:
Amazing Paper Grace Die of the Month: Softly Spoke'n Flip and Gatefold Die


Baroque Art Gold Gilders Paste
DCWV Vintage Memories Paper Pad
Penny Black "fragrant flowers" Stamps
Penny Black "script" Stamp
Prismacolor Pencils
Ranger Distress Vintage Photo Ink 
Ranger Distress Markers
Versafine Onyx Black Ink
Versafine Clair Morning Mist Ink
Self Adhesive Pearls
Black Cardstock
Aqua paper
Seam Binding
Gold Cord
Foam Core Board
Tissue Paper
Black paint

More Inspiration with the Die of the Month
There is much more inspiration in store for what you can use this die set for.  Just pop down the list of Creative Team Members to see more!

Visit Joanna   – joannakrog.blogspot.com
Visit Teresa   –  victorianpaperqueen.blogspot.com
Visit Ewelina -  elinaart.blogspot.co.uk
Visit Melissa  – keepsakesbymelissa.blogspot.com 
Visit Judy       – judyhayesdesign.blogspot.com
Visit Becca     – amazingpapergrace.com/blog

Thanks so much for joining us for the Amazing Paper Grace December Die of the Month Blog Hop.   We can’t wait to see what you make with these exclusive dies – be sure to post your creation on Instagram using the hashtag #AmazingPaperGraceClubKit.
                             

Monday, December 3, 2018

Graphic 45 Twellve Days of Christmas Book Box, Cards and Tags


Sponsored: As a designer for Scrapbook Adhesives by 3L, I receive product to use for projects.

This week Scrapbook Adhesives by 3L®  and Graphic 45® have paired up to share some holiday inspiration.  There will be projects featured every day on Scrapbook Adhesives by 3L Blog.  My project is Twelve Days of Christmas Book Box with Cards and Tags.  It's made with products from both companies.


All the papers are from Graphic 45® The Twelve Days of Christmas – Deluxe Collectors Edition  of paper, stickers, and chipboard shapes. The box is also from Graphic 45. It's shaped as a book.  It comes with 3 large tags and book ring.  I decorated it with various papers and a chipboard piece on the front.

The box front features a chipboard shape with circle insert.  I traced the outer edge on ivory cardstock and cut out for a mat.  


The center is popped up with  3D Foam Circles Black Mix.  These work so well on a round shape!


The box is covered with layers of contrast papers all fastened with a combination of 

I made the tags into gift card holders with papers, stickers and chipboard pieces from the collection. 


The gift card pocket is made from paper cut 3 x 8.5 inches.  One end is folded 2" in and other 2 3/4". The longer end forms the top flap.  The shorter end is fastened at edges with Home and Hobby Premium Double-Sided Tape ⅛ʺ Permanent  to form a pocket.  Each tag features different papers from The Twelve Days of Christmas – Deluxe Collectors Edition from Graphic 45®.


On this tag, the papers behind the pocket have rounded corners.  I  a sticker and contrast borders to the flap. It also has rounded corners. Two chipboard circles are fastened over seam binding with Adhesive Dots Ultra Thin.  I've fastened all the papers and the pocket to the tag using  E-Z Runner® Ultra Refillable Dispenser


This is the inside showing the pocket.


This tag has a border made of Creative Photo Corners Gold along with contrast papers and a sticker.  The chipboard button at top has seam binding bow.  That's fastened with Adhesive Dots Ultra Thin.  


The inside of this tag showing a gift card in the pocket.  You can see the photo corner edge which is covered on the inside with a contrast paper. 


This tag also has a border created with Creative Photo Corners Gold.  A tag is tied at top with red twine. 


I added a sticker on the pocket. 


I made some Christmas cards as well to fill the box.  I used images from one sheet of paper and fastened them to 4 x 6" ivory cards. All papers were fastened to card with E-Z Dots® Permanent Refillable Dispenser


 Each one has Creative Photo Corners Gold plus various chipboard pieces, stickers, seam binding, and twine.


This card has gold foil accents on the chipboard piece.  I applied dots of adhesive with E-Z Dots® Permanent Refillable Dispenser around the chipboard edges.  Then gold foil from 3D Foam Holiday Embellishment Kit was placed over adhesive and rubbed to transfer it.  Just that small touch of gold highlights the chipboard piece and adds a touch of elegance.  The chipboard piece is popped up with Thin 3D Foam Squares Black Mix


I simply added a twine bow over the printed bow on the this card held in place with Adhesive Dots Micro.  These are the perfect size for a tiny bow! 


This card has the same technique with E-Z Dots® Permanent Refillable Dispenser and gold foil. It's applied around the chipboard tag and also along the card edges.  That touch of gold really dresses it up! The chipboard tag with seam binding bow is fastened with Thin 3D Foam Squares Black Mix.  


This card features a chipboard tag with twine bow fastened in place with Thin 3D Foam Squares Black Mix.  I added a seam binding bow and chipboard circle fastened with Adhesive Dots Ultra Thin.


  All fit into the box!  I tucked in some envelopes, which fit the tags as well, and it makes a nice gift!  Or a perfect storage for cards waiting to be sent to family and friends!

Thanks for visiting!
Happy creating!

Judy

Creative Time:  3 Hours
Skill Level:  Intermediate

Materials Needed:


Other Supplies:  Ivory Cardstock, Ivory Envelopes, Cream Seam Binding, Red Twine,

Sunday, November 4, 2018

Introducing Amazing Paper Grace Die of the Month Club


Good morning!!  Welcome to our inaugural blog hop of the Amazing Paper Grace Die of the Month.  Today we're here to pump you up with some inspiration for the many ways and many colors to use the Die of the Month as well as to give you the skinny on the club.  Stay tuned until the end of the post when I'll point you to the next inspiration stop in our blog hop.

What is the Die of the Month?
The Die of the Month is an exclusive die, crème de la crème, designed by Becca Feeken that are unlike previous collections.  These are the special ones, the ones that have waited for a special occasion!  What better way than to take you on a year-long ride of pleasant surprises!

Where is the Die of the Month available?
The Amazing Paper Grace Die of the Month is available through Spellbinders.  You can buy it -------HERE.

How much is the Die of the Month?
It's a large die and subscription to the club is $30.00 per month and includes US Shipping.

What's so special about the Die of the Month?
These are dies designed by Becca that are chock full of extra rims and options so that you have a huge amount of flexibility in creating more than one creation from the same set.  It's exclusive and limited, so you won't see it anywhere else and it's available until the subscription quantities are gone.

When is the Die of Month available?
The die of the month is available on the first of every month in quantities to cover subscriptions.  When it is gone, it's gone :-)

Why have a Die of the Month?
When most of Becca's dies come out they are themed collections of 12 to 14 dies.  These are the dies that are more specialized that she didn't want to build an entire collection around - they are definitely Becca's style but she's built extra functionality and thought into these sets.  You all have spoken loud and clear to say that you have a monthly budget and that you want Becca dies all year long without breaking the bank.  Well, here you go.  Don't worry, collections are not going away but streaming them out on a monthly basis you'll see one once a month and they are delightful on the budget.

Join other "Gracelets"
Once you're in, start creating!!  We can't wait to see what you make with these exclusive dies - be the first to post your creation on Instagram using the hashtag #AmazingPaperGraceClubKit

Why post?  You'll be showing Becca how you use the die so that she can fine tune upcoming months to fit your groove and you'll be inspiring everyone who looked at the die and didn't know all the possibilities - it's a community thing.

Still, need more info?  Be sure you read all the Frequently Asked Questions ------HERE.

Here's My Die of the Month Make:
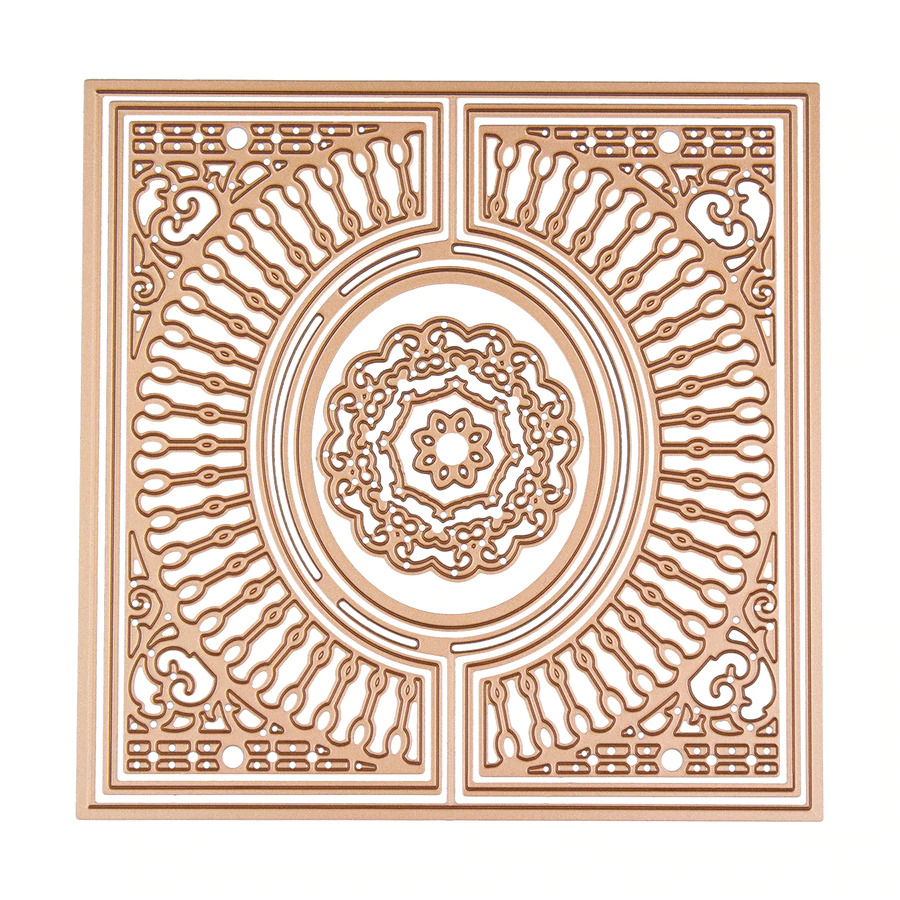
This month's die is called  Christmas Village Vignette Frame Die.  If you look closely you'll notice that it looks a whole lot like the popular 3D Vignette Grand Cabinet.  That's no accident - Becca likes to make things that work together and add value to what's already in your stash.  No worries though, you don't have to have 3D Vignettes to use this die.

I made two totally different projects!  That's what I like most about Christmas Village Vignette Frame Die set, it's very versatile.  The pieces can be layered without a lot of dimension as shown in my vintage looking little book shown at top of my post.  I've colored the pieces and layered them for my Christmas scene.  To make it into a book, I used an accordion fold binding with pages cut same as the cover.
My second project, a dimensional card, is a total contrast from my book!  It shows a white wintery scene with lots of dimension.  Each layer is popped up with 3D Foam Squares.  I love all the white buildings against a starry blue sky! 


More Inspiration
There is much more inspiration in store for what you can use this die set for.  Just pop down the list of Creative Team Members to see more!

Visit Joanna   – joannakrog.blogspot.com
Visit Teresa   –  victorianpaperqueen.blogspot.com
Visit Melissa  – keepsakesbymelissa.blogspot.com 
Visit Judy       – judyhayesdesign.blogspot.com
Visit Becca     – amazingpapergrace.com/blog

Hop along with us every month as a new die of the month is revealed.  The line up is pretty awesome!

Thanks for stopping!

Judy