
This contest is now closed. Please
visit the Spellbinders
Blog to see the remaining open contests! Thank you!
Welcome to
DAY 2 of Spellbinders Spring Blog Hop and Giveaway!
Since today is May Day, I have some little May baskets to share with you!

Supply List:
•
Clearsnap Colorbox Inks – pink, mint, heliotrope
•
JustRite You Inspire Me
•
Scor-Pal Scor-Tape – ½”
•
Buttons Galore & More –
white, pink buttons
•
Xyron Permanent Adhesive
•
Ribbon – mint,
pink, purple
•
Pearl cotton –
white
•
Purple Buttons
•
Glue Dots
•
White cardstock
and text paper
•
Black ink
•
Yellow tissue
Paper
•
Magnet sheets
•
Viola plants or
candy
First of all, I’ll show you how to make the letter press paper that I used for each of the baskets. I chose to do 3 colors and mix and match the handles, tags and base of my baskets. Each basket, including base box, handle and tag require just one 8 ½ x 11” piece of cardstock and a sheet of text or printer paper which is optional.

We’ll start with Grand Impressabilities Flower Delight, 2 magnet sheets, Colorbox Petal Point Enchantment ink and re-inkers for the pink, heliotrope, and mint plus white cardstock and text weight paper (printer paper).

I cover my work surface with plain newsprint. On that I place the 2 magnet sheets one on top of the other face up. These will hold the Grand Impressabilities in place while I ink it. I discovered 2 magnets are much stronger than one and really hold my paper and Grand Impressabilities together tightly! Next, I place a piece of cardstock (or text weight paper ) on top of the magnet. The Flower Delight Grand Impressabilities lies on top of the paper.

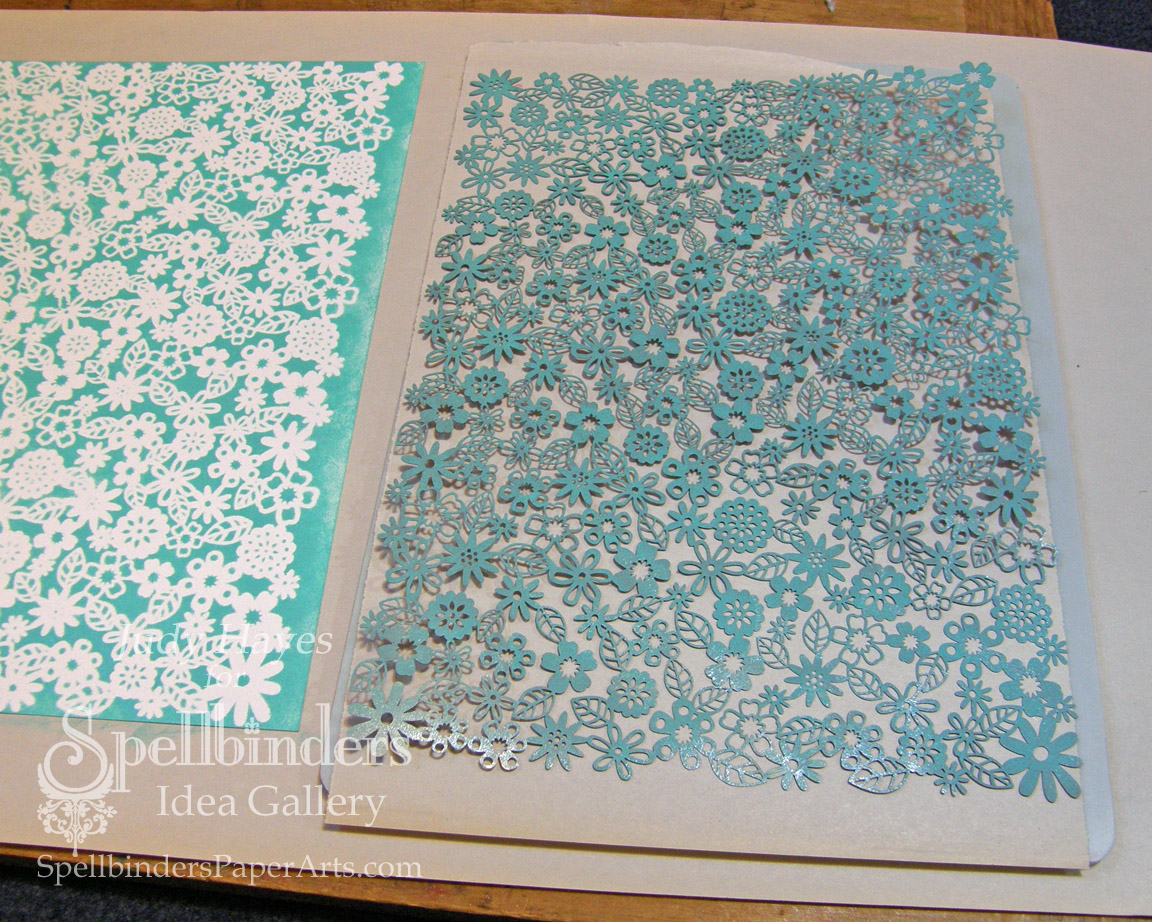
In this photo, you can see the inked Flower Delight Impressabilities as well as the stenciled paper that was under it. A bonus sheet for another project! After it’s all inked, I place it on the Grand Calibur base plate with a sheet of newsprint over my base plate (under the Impressabilities) to catch any excess ink and keep my base plate clean. Next step is to carefully lay a piece of white cardstock over the Impressabilities. Once it’s in place, I hold it in place with one hand while I lay the embossing mat over it. Place the pink embossing plate on top. Hold the sandwich snuggly together and run it through the Grand Calibur™ machine.

The letter pressed sheet! The inked pattern is crisp and embossed! The actual inking of the Grand Impressabilities takes a little time, but the whole letter press process is really quite easy! Because I used a pigment ink, the Grand Impressabilities still has enough ink for a second generation print. The second time I use text weight paper which is on the inside of my baskets. Repeat the sandwich layers - base plate, newsprint, Grand Impressabilities, text weight paper, embossing mat and pink plate. Run it through the Grand Calibur machine.

The result will be a very pastel letter press sheet. I used my Xyron with Permanent adhesive to fasten the text weight paper to the back of the letter press cardstock sheet. I was able to easily cut both layers with the Petal Top Box die template and the Grand Calibur machine for my baskets.
Now we’re ready to make a basket!

These are the die templates for the basket and tag: Square Petal Top Box & Dahlia
First, cut the Petal Top Box on the dark side of the letter press paper with text paper backing.
 |
| (I forgot to take a photo of this step earlier so this photo shows a stencil pattern paper rather than the letter press paper.) |

I chose not to emboss the box template with the Grand Calibur machine because I didn’t want the emboss line across the petals. Instead, I scored the lines for folding with my Scor-Pal and stylus. No score lines across the petals!

Make all the folds. Before assembly, curl the petal edges by rolling the paper over a round pencil. Use 1/2” Scor-Tape to fasten the box together.

Cut 2 – 1 x 7 ½” strips from the leftover paper to make the handle. I used ½” Scor-Tape™ to fasten the ends together with about a 2” lap to form a 1 x 13” strip. I added 2 strips of Scor-Tape at each end of the handle to fasten it inside the basket.

For the tag, cut Dahlia #2 out of the letter press leftovers. Stamp the verse on a scrap of white cardstock with black ink. Then align the Dahlia #1 die template around the verse, tape in place, and cut. Fasten them together and punch a 1/8” hole at the top. Use Pearl Cotton to tie tag to the basket handle.

Tie a ribbon bow around the basket handle near the tag.
Thread pearl cotton in 4 buttons. Fasten one to each side of basket edges.
Voila! A basket!!
The finishing touch is tissue cut with a scalloped edge. I used Spellbinders Grand Scalloped Squares #6 to cut 6 pieces at the same time! I used 2 sheets in each basket.

These baskets can easily be filled with candies, a tiny gift or a tiny plant. I chose tiny Violas to fill each of my baskets. I tucked 2 plants into a Styrofoam cup that I had trimmed short. The tissue paper hides the cups. The little flowers are so cute peaking around the tags and handles!!!

The Spellbinders™ Spring Blog Hop will
begin April 30th, and will end on May 5th, 2012. It consists of 16 individual
and one grand prize drawings. Enter the Spellbinders™ Spring Blog Hop by visiting the participating blogs each day.
From each Blog
Hop post, click on the Blog Hop "Enter HERE" at the end of each blog
to open the entry form. You may only enter once
from each blog each day.
Spellbinders™
will randomly draw one winner from each participating blog to receive all of
that day’s products. The Grand Prize Winner will be randomly drawn from
the pool of entrants that sent entry forms from each and every participating
blog during the 48 hours each blog was open. For the full list of official
rules please click RULES.
**Enter the Contest by Clicking Here**
I hope you
enjoyed your visit today! Why not give
this Letter Press technique a try!!!
This technique can be used on all the Impressabilities. Feel free to contact me with any questions.
For even more
inspiration, hop over to Iwona’s blog .
I know she’ll have something wonderful to share!
Here’s a list of all the participating designers and their blog
links:
Monday, April 30th
Tuesday, May 1st
Wednesday, May 2nd
Thursday, May 3rd
Friday, May 4th
Saturday, May 5th
Questions? ContestQuestions@Spellbinders.us
No entries will
be accepted at this email address.
112 comments:
Sooo lovely, Judy!! Love the letterpress technique, looks so neat and crisp. Hugs!
Great project. Thanks you for showing different uses for the embossing sheets.
excellent tutorial, Judy! Love those baskets!!
Happy May Day to you too Judy!! I remember delivering flowers on May Day when I was young. These would have been a wonderful way to do that. Thanks for sharing another way to use my Grand Calibur!
These are just lovely.
Amazing! Thanks for sharing!
These baskets are so cute!
Those baskets are so gorgeous, I thought they were made of patterned paper, the stencils are so beautiful, must add them to my long wish of Spellbinders products.
Great technique! I love the paper baskets!
Great project. Everything perfect. I love it! Thank you for the tutorial.
Hugs,
Irena
So lovely, i love yours baskets, thanks so much for the explains.
Wow, these are amazing, I love every detail you have shown so clearly! The final finishing touch of the die cut tissue is just perfect and such a great idea. Yet another die for my wishlist (sigh)
Wonderful, such a cute idea, and the letterpress technique tutorial is a real bonus, thank you so much
:-)
Such a cool tutorial here, these baskets are really amazing and such a great idea, and they looks awesome too. Really cool work.
Such fabulous baskets! Loving the letterpress idea xx
I love letterpress! Such a darling project...very timely, too! Happy May Day!
Gorgeous project Judy - love the letterpress demo - what a pretty gift to make, thanks for the inspiration.
Happy May Day.
Heather (UK)
This is gorgeous!! I love how you created your own patterned paper for it!!
Kristan
Seriously??? You rock my world Judy!! I ADORE this!!!!!!! What a fabulous project than anyone can reproduce! You never cease to amaze me with your ideas!! You are such an inspiration!! ((HUGS))
Judy this is really a cute project. great tutorial too.
Love this new basket die! Your little baskets are adorable and thanks for giving us the step by step on how you made your paper.
what a pretty project- I love letter press effects but your baskets are divine
These little baskets are so cute!!
Cute baskets. Very springy.
God bless,
Peggy
How clever these are, Judy! So bright and beautiful!
What a great idea for holding the template in place while inking! Thanks for sharing that, and all the lovely details of your baskets.
These are beautiful!
What an adorable gift idea! These are so pretty. Thanks!
Love the little baskets! Thanks for the tutorial.
Judy, those baskets are gorgeous!
Hugs and smiles
These are amazingly pretty!!!! Really awesome tutorial! Thanks so much, I'll definitely be referring back to this post for a while!
Gorgeous May baskets love this technique and great tuturiol thanks for sharing
Maggie
These are so sweet-and your tutorial is perfect.Thank you for such wonderful inspiration.
OMG the baskets are beautiful and I love the colors you picked. I love the idea of using magnets to hold the impress in place never heard of that. TFS
I was so excited to see you were designing for the Blog Hop, Judy, as you're always such an inspiration! Your May baskets are delightful!!! TFS your letterpress technique -- LOVE it!!!
This is such a sweet project and the letterpress images are so crisp! I was not familiar with the magnet sheets so I will have to check that out. Thanks for the tip on running it through for a second pass. Great tutorial, Judy and Happy May Day to you!
Adorable baskets, these would be perfect for a teacher gift. thanks for the inspiration.
What adorable baskets.. perfect for mother's day or even today..May day!!
Love the may baskets they are Beautiful. Love the way you used the embossing I will have to try this with mine. thanks for sharing
Great baskets!!! Love the idea of 2 custom coloured pages in one run! Thank you for the inspiration!!!
I love this idea - thank you for the step by step instructions ... it's my favourite way to learn something new!
Too stinkin' cute!! Would be FABULOUS for a Mother's Day tea! Well done!
Cute baskets. Thanks for sharing.
How cute are these!!!!!
So cute. I would love to have one of these on my doorstep!. Thank you for sharing.
How cute!!!! just love it!!!
Wow, these are so beautiful and creative!! Thanks for the easy-to-follow tutorial!! :)
Lisa
A Mermaid's Crafts
I love the baskets would be so cute for a small gift for a teacher,
Thanks for sharing
Linda
so dainty, pretty and sweet! any mother would love them!
These baskets are so cute!
These little baskets are adorable! Thanks so much for the tutorial: something new to try with my Grand Calibur! Woo hoo!
Oh they are so pretty, great spring look!
Really cute little baskets perfect for a small plant. Thank you for sharing them.
so cute. i like that i got a cute way to cut tissue paper ,too. tfs.
Thank you Judy, this is a wonderful project and a really useable idea. Best wishes Linda x
Judy - How sweet are your May baskets. I remember making these when I was a little girl and hanging them on the doorknob for my mother. Such wonderful memories! Thanks for sharing.
Your flower baskets are so sweet! Love how you did the letter press paper, too!
Happy May Day! Wonderful projects!~
I couldn't get my comment to post so I will try again. This is so beautiful and creative! I love the letterpress idea and the sea flowers!!
Sorry the delight flowers!!!
Gorgeous- thanks for detailed pictorial tutorial.
Stunning boxs must try these its my Mum`s 80th on saturday ,thanks for sharing.Melanie
Love those basketsJudy!! Excellent tutorial.
Hugs
What a smart, smart creation! Thanks for sharing your creative wisdom today!
These are the cutest! So many possibilities for these baskets. Thanks for the great tutorials Judy.
Judy thank you for such wonderful instructions and great photos of the tutorial. Now I need to add more to my wish list for sure.
gettin' inky...
Love it!
Wow - love these baskets! So so cute!
Love the May Day baskets. What a great day. I remember doing that as a kid and leaving them on the neighbors porches. Didn't know Spellbinders had a die like that. Gotta add it to my wishlist. Thanks for sharing
Judy, these are adorable! What a lovely, creative way to use the emboss template!
what a great idea!! And you are right, it looks very easy.
The baskets are so awesome! I learned a few new techniques today, thank you so much. I cant wait to try this with some of my embossing folders.
Adorable baskets! You made it look fun and easy to make these. Thanks for sharing the tutorial!
Jusy, thanks for the details and tips of making your pp , really cute baskets
ava
These little baskets are so sweet Judy! I love violas :) Thanks for sharing this technique!
great projects! so love the colors and very pretty.
Thanks for showing how you made them.
~Luanne
Judy, your wonderful little May baskets brought back wonderful memories of my childhood-we used to make May Baskets, fill them with candy and hang them on our friends' door. Our whole neighborhood participated in this every May and it was so much fun!
Thank you also for the tutorial.
Those are really cute! Thanks for the tutorial!
what an adorable set of baskets!
You are amazing! Great idea for those die templates & that letter press technique... AWESOME!!
Sweet baskets! Happy May Day!
cute basket!!
Your may day baskets and tags are lovely. I just love pansies too! Thanks for sharing your letterpress technique.
Hi Judy
Love the new idea to stencil! Beautiful spring basket.
Thank you for the tutorial.
Carol
Judy, this is fabulous!!These May baskets are adorable, TFS
Have a great day
Liz
It's a triple header of gorgeous baskets...thanks for the instructions.
Creative Wishes,
Claire S.
The baskets are so cute! Thanks for sharing!
wow Judy, these are gorgeous.. I love the different colors. This die is a must have!
What a beautiful creation
hugs Linda Dekker
Gorgeous!!!!!!!
I like them to give them away on mothers day
MARVELOUS!!! I really like these. Cutting the tissue paper is a very clever idea. Thanks for sharing.
Oh these little boxes are just adorable!! Love the way that you embossed the paper also. Lovely!
Beth Greco
What adorable little baskets! Love the way that you embossed them also.
Beth Greco
This technique looks fabulous I will have to try it, I love your baskets
What gorgeous gift baskets! Thanks for sharing :) I had no idea there were box dies!
Just and adorable and creative project. I had no idea about these embossing sheets, they look fun.
Oh wow, these are gorgeous! Loving the hop and thank you so much for sharing and inspiring :)
What a GREAT box for Mother's Day!! I love how you used the embossing sheets...thanks for the mini tutorial!!
How fantastic!
Love your baskets! I'll be back to catalog this for future use.TFS!
Such darling little boxes and your letterpress tut was fantastic! Thanks so very much for sharing!
Love the baskets and the flowers are darling!
WOW! thanks for the letterpress and visual pictures and directions. i have never tried this before. Your creation is so lovely for gifts and decorations in the spring.Inspired. .....thanks again......hugs and smiles
Beautiful Judy! Your baskets are lovely and look so sweet with the violas in them. Thanks for sharing this technique with us. These would make wonderful teacher appreciation gifts!
Very cute baskets.
I simply love these cute little flower boxes!
How pretty are these baskets.I love how you created the pattern and the colours are so fresh.
Awww...these are adorable!! Love the patterns. TFS!
Oh this is a neat project. I love making things like this and boxes too. I think I will try this technique on my boxes....Thanks so much for the inspiration.
How beautiful are these little baskets?!?!? Love them!
So pretty and such wonderful gifts!
Post a Comment