Sunday, January 30, 2011

Like a Singing Bird

'morning, everyone!
I'm in LA for CHA! So wonderful to get away from the cold of Minnesota and all the snow!
Yesterday was the first day of the show! The highlight for me was seeing my artwork in the Spellbinders booth! The booth is beautiful! Fabulous artwork!
I can't share any photos as yet. Maybe by the end of the show..... I can share photos of my project for the book Spellbinders Nestabiliies Basics & Beyond when I figure out how to load them on my iPad! Or I'll go to the business center here at the hotel....that will probably be much quicker.

For now, I have a "mini art piece" created with the new Artistic Outpost Songbirds set.


Happy Creating! -judy

Friday, January 28, 2011

Flying to Los Angeles

Flying to LA for CHA!
I'm actually in flight as I write this! How incredible is that!!!
I'm excited to see all the new products! Of course, I'll be heading to the Spellbinders booth to see everyone. And to see my projects in the booth! So awesome!
it 's going to be so nice to get away from the cold and snow of Minnesota!
With luck I'll post some photos....no promises.

-Judy

Wednesday, January 26, 2011

A New Artistic Outpost Release!

Artistic Outpost has three new collections just to get your creativity going. Ephemeral Backgrounds, Think and Wonder, and Songbirds are all available unmounted and mounted and pre-trimmed.  These new sets all work so well with any of  the Artistic Outpost sets! 


Ephemeral Backgrounds: Multiple vintage images to accompany all of our images. This set includes postcard snippets, sheet music, and a large 3.75 x 5"antique ledger stamp.  What a great background for so many images!


Think and Wonder: Beautiful collages and adorable children adorn this collection featuring some of our favorite quotes by Dr. Seuss. Lots of fun things to do with this set!  It works great with Ephemeral Backgrounds!


Songbirds: You will find so many beautiful uses for this unique vintage set of stamps. Elegant and musically inspired images featuring vintage bird illustrations.  The stamps in this set are so beautiful. 


To celebrate these releases, Artistic Outpost is offering 15% off your entire purchase.  Now, through February 14th, use coupon code January2011 at checkout, and you will receive 15% off all items.

Be sure to check out the galleries featuring beautiful cards, tags, and mixed media projects by our super talented design team.  You'll find lots of inspiration for these new releases at the blogs of each member of the Design Team!  Just click on a name to take you there......


Judy Hayes - you are here!


I have 2 projects to share today featuring these new stamps!

My tag features the kids with the alphabet background from Think and Wonder.  This is my favorite image of this set!  I inked the stamp with Ranger Cranberry ink around the edges and Espresso on the children.  This technique is not exact!  The colors do run together yet leave a hint of different colors.  
I stamped my image again on white cardstock.  This time I colored each of the coats with Copic markers and cut them out.  I glued them over the coresponding child for a touch of dimenstion as well as adding color.
Do you see the antique ledger from Ephemeral Backgrounds stamped around the children? 
I masked them off when I stamped it.  I rubbed on Antique Linen, Vintage Photo and Walnut Stain Distress inks around the edges and up to the alphabet background.  Making the edges darker really focuses the eye on the center area!
I stamped "think and wonder" with Cranberry ink and clear embossed it!  I cut the words apart to mount on my tag with foam tape.  I also added the verse along the side that says " Why fit in when you were born to stand out?"
At the bottom I added "a, b, c" letters from a set of vinyl coated die cut foam letters by American Crafts. 
I stapled on a bit of ruler printed twill tape near the bottom.  I added another pieceo of the twill tape in the tag hole plus some baker's red and white cord.             
              

I used the Song Birds set for this card.


I've been on a roll with this ink color called Chipped Saphire from Ranger. It's one of the newer Distress Inks.......really great color! In fact, it's the only ink color that I used on this card. I added a touch of light orange color to the breasts of the birds with Copic markers.
I created a piece of sheet music with the stamp from Ephemeral Backgrounds stamped on text weight paper. I tore the edges and distressed them a bit. 
The frame and birds are mounted on foam tape.  I created my "DP" on my card by stamping a floral image from the Serenity set.  I stamped over the blue strip, too.  The lacey edge was cut with a Martha Stewart border punch.

Of course, I used Vintage Photo an Antique Linen Distress inks, too, to give it a vintage look!


Aren't these new sets wonderful?  The Ephemeral Backgrounds adds so much as a background for most of the Artistic Outpost sets. 

Be sure to check out the blogs of the other members of the Design Team for more inspiration!  They're listed above with links to each blog!

Thanks for stopping!  I sure hope you've been inspired in some way! 
Happy Creating!
-judy

Wednesday, January 12, 2011

A Vintage Love Card

Here's a few details for my Vintage Love card shown yesterday for Spellbinders "To Die For" Winter Release Blog Frenzy! 
This card shows the new Spellbinders S4-319 Lattice Rectangles, a new release!  If you missed the post yesterday, just scroll down or click here.


When I created this card, I started with the Lattice Rectangle cut from Graphic 45 paper.  I found the collage image of the woman in the same Le Romantique collection.  Next, I chose the stripe paper to put behind the Lattice Rectangle.  I like the contrast to show off the open edges of the lattice.  The stripe is layered onto a very narrow black mat and then onto a cream card. 
To the collage image, I added cream and black mats and set it askew against the Lattice Rectangle.  I laced a 1/4" ivory silk ribbon through the lattice edges and fastened it through a big vintage button found in a jar of old buttons that I've collected.  It's perfect for this card!      I used "Cocoa" 3M Post-It Craft Paper for the heart and "with Love" label.  I peeled the backing off and fastened it to a scrap of card stock to give them both some body.  Once I had cut  and embossed the heart, I sanded off the color on the embossed pattern.  Then I rubbed black ink over the raised pattern.  I also added clear embossing powder and heat embossed it.  The clear over the black really makes it crisp and very black.
The stamp "with Love" is from a set by Waltzingmouse, called Fancy Phrases.  The frame is part of that set, too.  I used Versafine Black Onyx which is very black and stamps details so well.   I added clear embossing powder and heat embossed it, too.  I simply trimmed out the label by hand with a scissors.  It's mounted to the card with 3D Foam Squares by Scrapbook Adhesives by 3L.   I added little Latte colored pearls  to the heart and label from AMuse. There's a smaller button just below the heart, hidden by the ribbon.  I trimmed out little portions of a Lattice Rectangle #3, cut from cream paper, to tuck behind the verse and button. I distressed it a bit with Antique Linen ink.  There's a  straight pin with a pearl head tucked behind the verse through the Lattice piece.  A little thing but it certainly finishes the design!

Supplies:
Spellbinders S4-319 Lattice Rectangles
Spellbinders S4-296 Nested Hearts
Graphic 45 Le Romantique papers
Waltzingmouse Fancy Phrases
AMuse Latte pearls
Buttons
Silk Ribbon
Cream & Black Card stock
Pearl head straight pin
Versafine Black Onyx ink
Clear Embossing Powder

-judy

Monday, January 10, 2011

Spellbinders Paper Arts "To Die For!!" Winter Release Blog Frenzy - Day 2


This blog contest is now closed! 
See the list below for other opportunities to win!


Spellbinders Paper Arts "To Die For!!" Winter Release
Blog Frenzy
January 10 – 18, 2011

Welcome to the second day of the Spellbinders Paper Arts "To Die For!!" Winter Release Blog Frenzy!

Spellbinders™ Paper Arts’ has been working hard to bring you another selection of the most innovative and beautiful die templates in the world. The To DIE For!! Winter Release Blog Frenzy allows you a sneak peek of the products we’re introducing at the Craft and Hobby Association trade show later this month. The To DIE For!! Winter Release Blog Frenzy is from January 10 - 18, featuring 16 fabulous Designers and prizes To DIE For!!

• Win today’s new die templates!

• Be eligible to win the Grand Prize by entering each day from each blog!

• One entry per person, per blog please, on the designated days!

• Each contest is open for 48 hours to enter the contest!

• You have until 12:01 a.m. January 13, 2011 Central Standard Time to enter my contest. Be sure to read the Official Rules before entering so that your entry will be valid!

These are the Designers and their contest dates:

January 10

January 11

January 12

January 13

January 14

January 15

January 16

January 17

Daily contest winners are randomly chosen from valid entries, as stated in the Official Rules. The winners will receive an email within 24 hours of the contest’s closing. The winners will have 72 hours to reply to that email to claim the prize. If a winner fails to respond within 72 hours, a new winner will be drawn.

Entrants that send valid contest entry emails to each of the contests will be automatically considered for the Grand Prize. The Grand Prize has a retail value of over $800, and includes Spellbinders CHA Winter 2011 release die templates revealed in the Spellbinders To DIE For!! Winter Release Blog Frenzy and a Grand Calibur™ die cutting/embossing machine!

Thank you, Spellbinders Paper Arts, for sponsoring this contest!

I’m thrilled to share S4-319 Lattice Rectangles, a new Nestabilities® Decorative Elements die template, with you...


I chose to make a Valentine’s card to show off this wonderful new set: S4-319 Lattice Rectangles!
I used 3 of the 4 die templates on my card. Can you pick them out?
Are you wondering how I got a square card with a rectangle die cut?

Let’s see the steps…

These are the die templates I used.


First, cut a white card with LF-161 Grand Labels One. The Grand die templates are great for this! I used a 5 ¼” x 10 ¼” piece of Worldwin White card stock folded in half. I positioned LF-161 Grand Labels One #2 (the smallest being #1) so that part of the fold was inside the cutting edge.


You can see the die template peaking out along the fold….


and ready to be cut with LF-161 Grand Labels One #2 taped in place.

The next step is to cut and emboss the pink mat out of 3M Post-It Craft Paper. This color is called Bashful. Use the same LF-161 Grand Labels One #2.


To make the mat about 1/8” smaller all around, carefully cut along the embossed line.


It's easy to follow the embossed line is for cutting.

Then, emboss it again with 12-1009 Flourish Impressabilities™.


It’s a little too big to fit completely on the Flourish Impressabilities so do half at a time. 


After embossing the first half, sand it lightly to reveal the white core of the Post-It™ Craft Paper.  The color coating is quite thin making it easy to sand.  It’s also easy to sand off more than planned so sand gently, especially along the edges.

After sanding, emboss the other half and sand. You’re probably thinking the line down the middle won’t look good on the card! As you can see, the pattern seemed to sand more readily than the edge lines.  Only the edges will show on the card.

The next step is to cut the Lattice Rectangle pieces and hearts. The size of the Grand Calibur™ mats make it possible to cut many pieces at once.


Here’s a list of the die templates and paper colors to cut:
S4-319 Lattice Rectangles #4 - Cardinal Red Worldwin card stock
S4-136 Classic Heart #2 - Cardinal Red Worldwin card stock
S4-319 Lattice Rectangles #2 – White Worldwin card stock
S4-137 Classic Scalloped Heart #3 – White Worldwin card stock
S4-319 Lattice Rectangles #3 – strip of White Worldwin card stock
S4-136 Classic Heart #3 - Bashful 3M Post-It Craft Paper
S4-137 Classic Scalloped Heart #2 – Bashful 3M Post-It Craft Paper


Next, emboss the red and white Lattice Rectangles.  At the same time, emboss the pink and red hearts laid over 12-1009 Flourish Impressabilities.  They all fit easily on the mat. Sand both embossed hearts and edges of pink scalloped heart. 


Sanding the red heart accents the embossed pattern by slightly changing the color.

Stamp “with Love” on a scrap of Bashful paper with Versafine Black Onyx ink.  Heat emboss it with clear embossing powder. Position S4-319 Lattice Rectangles #1 over “with Love” and tape the die template in place for cutting. (It really is stamped with black ink. The shine makes it look metallic in my photo!)


After cutting and embossing it, sand the edges to reveal the embossed pattern.


Here are all the cut pieces.


The next step is to score the white Lattice Rectangle to fold over the pocket on the red Lattice Rectangle.  The score line is almost 3/4" from the lattice edge.  Score half way through the first edge scallop after the corner.


To make a pocket for the pink heart and change the Lattice Rectangle die cut into a square, score about
1 ¾” from one end.  Use the lattice pattern as a guide, scoring between the 2nd and 3rd  scallop after the corner scallop.  Make another score 1 scallop away (about ½”), turning the paper over to the back to make a score for a valley fold.


You can see the 2 scores here.


Here you see how both pieces folded look after folding. Trim the straight edge of the white piece to about 3/8” from the fold so it will fit into the tiny pocket on the red lattice “square”.

Next, stamp “for You” at the bottom of the red lattice with Versafine Black Onyx and heat emboss it with clear embossing powder.


Here are all the pieces! 

To assemble, peel the backing from the pink embossed piece to fasten it to the white card.  The white lattice is glued to the fold of the red lattice piece. I used SCRAPBOOK ADHESIVES BY 3L™ Craft and Photo Tape to secure the pocket ends.  Then, adhere it to the card front.  Layer the pink embossed heart onto the white scalloped heart and tuck it into the pocket.  Use SCAPBOOK ADHESIVES BY 3L 3D Foam Squares just at the top to hold it in place.  The little red heart is glued to the pink scalloped heart and fastened over the white lattice of the pocket with 3D Foam Squares again just at the top.  The “with Love” piece is popped up with Foam Squares, too.  Thread and knot ribbons through the 2 larger buttons.  Stick in place with a Craft Glue Dot.  The little button has pearl cotton through the holes.  Fasten it to the card also with a Craft Glue Dot.


And that’s how to get a square out of a S4-319 Lattice Rectangle die cut!   It makes a cute Valentine’s Card, don't you think?

Supplies:


Spellbinders™ S4-319 Lattice Rectangles
Spellbinders™ LF-161 Grand Labels One
Spellbinders™ S4-136 Classic Heart
Spellbinders™ S4-137 Classic Scalloped Heart
Spellbinders™ 12-1009 Flourish Impressabilities
3M Post-It™ Craft Paper – Bashful
Worldwin Paper – Red Cardinal, White
Waltzingmouse - Vintage Ornaments set: “with Love”, “for You”
SCRAPBOOK ADHESIVES BY 3L™ – EZ-Runner, Craft & Photo Tape, 3D Foam Squares
Glue Dots™
Buttons – Red, White
1/8” Ribbon – White Satin, Pink Grosgrain
Pearl Cotton - White


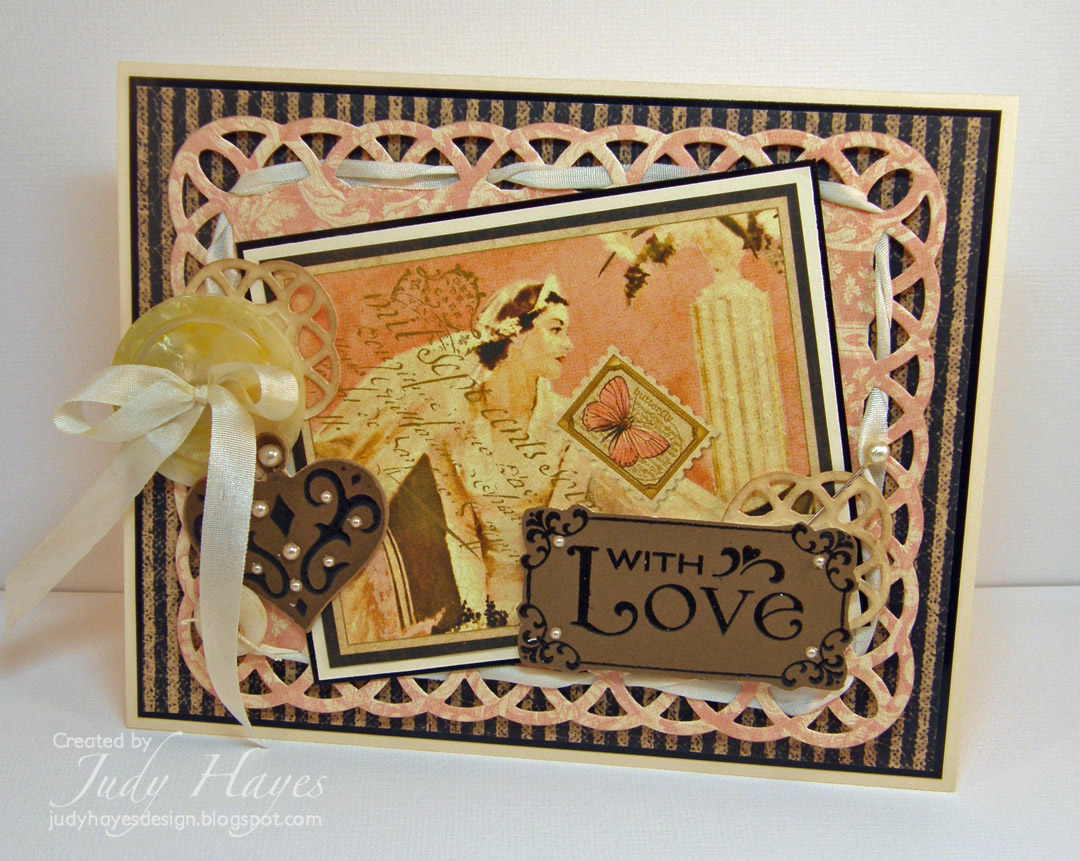
Here’s another “Love” card with a totally different look using S4-319 Lattice Rectangles


This is the Spellbinders product I introduced:


Lattice Rectangles

SKU # S4-319
MSRP $24.99

Measurements:


1: 1¼ x 1½″
2: 1⅞ x 2⅜″
3: 2¾ x 3½″
4: 4⅛ x 5″


This blog contest is now closed!


Click here for the Spellbinders Paper Arts To DIE For!! Winter Release Rules.

TO ENTER MY CONTEST: (Contest is open for entries from 12:01 a.m. January 11, 2011 to 12:01 a.m. January 13, 2011 Central Standard Time)

1) Send your email entry to: Reveal4@spellbinders.us (either click the link or type the address into your email program)
2) The subject must be Lattice Rectangles.
3) Send!

I love your comments! Unfortunately your comment does not count towards a contest entry, so be sure to enter and then leave a comment!

If you have any questions, please e-mail ContestQuestions@Spellbinders.us

Thank you for visiting and good luck!!!
-judy

A Snowy Layout


This layout features a photo that I took last January when the sun came out after a raging snowstorm!  We had so much snow then!  It could easily be a photo from this January!  We have a lot of snow again!

For the 12 x 12" background I laid die cut snowflakes on the paper and sprayed Glimmer Mist over the top.  You can see the faint shape near the journaling tab.  All the "glimmer" gave my camera a hard time for photographing! 

The snowflakes are covered with crystal glitter.  So pretty in reality! They don't show well either.


I hid my journaling behind the photo.  The photo is fastened to the page so that there's a pocket for the journal card to slide into, leaving just the tab showing.  A little tug on the tab and a journaling card slides out.

I thought this an appropriate post considering we're getting more snow here tonight, with more predicted for the next 2-3 days.  If we get winds, I'll be snowed in or out depending on when they hit.  The cuts between the snow banks are getting very deep.   We've already spent 2 nights at my parents home because our road was drifted shut.  We've been snowed in several weekends, too.  We didn't mind that! 

Check out these Designer's blogs for the Spellbinders "To Die For!!" Winter Release Blog Frenzy which started today:


Be sure to enter the contest to win each day's new Spellbinders die templates!

Sunday, January 9, 2011

Spellbinders DT Contest - Round 1

I made the 1st Round of the Spellbinders Design Team Contest!  Woohoo!

I was notified by email early Friday morning!!! You can see the annoucement on the Spellbinder's Blog here.
Yes, I'm trying out for the DT again!  It's been an awesome year so far.  Lots of challenges and lots of rewards.  I'm even beginning to get more comfortable putting scrapbook layouts together.  That definitely has been my biggest challenge! 

I'll be working on my Round 2 assignment in the next week.  It's due January 21, 2011.  I'm a little nervous about it!  The talent among the 1st Round Finalists is incredible! 

Be sure to check out the Spellbinders "To Die For!!" Winter Release Blog Frenzy starting tonight at 12:01 a.m., Monday, January 10!!!  
Stop back here on Tuesday to see my project with one of the new releases!  You'll love all the new Spellbinder die templates!  It's an incredible release! 

Lady in Blue

I created this card in blue with Artistic Outpost's set called Jane's Countryside.

I stamped "Jane" and colored her in hues of blue and blue-green using Copic markers. I forgot to take a photo of the marker colors or even make note of the numbers ( so sorry!).  I also used Spica Turquoise for accents on the hem of the dress and hat.The background behind her is the building from Jane's Countryside stamped with Stormy Sky Distress ink onto an aqua colored Bazzil paper.   I cut and embossed it with Spellbinders S5-019 Labels Eight.  I added color with Tumbled Glass and Faded Jeans Distress inks especially around the edges.
I cut the "frame" behind Jane with Spellbinders S4-294 Beaded Ovals out of navy Bazzil paper.  I rubbed some Faded Jeans ink over the embossed areas and added tiny turquoise gems.  It's layered over a "frame" cut with Spellbinders S4-113 Classic Scalloped Ovals SM #4 and Spellbinders S4-113 Classic Scalloped Ovals LG #5 out of white card stock.  I added color to the edges with Distress inks.  When I assembled the frame over the Labels Eight background, I added a piece of ribbon at the bottom. 
I stamped the verse with Denim ink on a scrap of card stock. Then I cut it out with one of Spellbinders S4-234 Ribbon Tag TRio Two. After I embossed it, I traced around the edges with a Copic marker.   I threaded the ribbon through it and added little pearls at each end.  I colored the Pearls with a Copic markers.
I popped up "Jane" and the tag with 3D Foam Squares.
The card itself is white card stock.  I added color to the front with Distress inks.  

Have a creative day!
Judy

Saturday, January 1, 2011

Happy New Year!

Happy New Year!

I hope you're snug and warm wherever you are! 
Snowy road!
This is my world this New Year's Day! Snow everywhere!  Believe it or not, we had about 1/2" of rain on Thursday!  The temp was around 35.  It was so odd having rain pouring down.  The temps dropped by mid afternoon turning all that rain and melting snow into ice.  The only good thing is that the snow is sealed now so it won't blow around.  That is until we get new snow......about 2" yesterday morning.  Big fluffy snow flakes!  Then ice pellets! No wind as it fell but it's predicted for today. What a winter!
Sheets of snow and ice hang from a shed roof.
The combination of the rain and sudden falling temps must have created these snow sheets hanging off an old shed.  They looked incredibly delicate, airy almost.  Incredible that they stay there as if waving in the breeze!  
I'm spending my New Year' Day working on Spellbinders projects, getting ready for the big Spellbinders "To Die For" Winter Release! Be sure to mark your calendar for January 10th. That's the 1st day of the Blog Frenzy.  My day is January 11th.   I'll be posting 2 projects using one of the new winter release die templates!  Be sure to stop by then!  Lots of inspiration and NEW Spellbinders die templates!!!

New year's resolution:  spend more time playing and creating! 

Blessings to you in the New Year!
-judy