Thursday, December 25, 2008

Merry Christmas!

Wishing you all a joyous Christmas!


I've been so busy with Christmas preparations that I haven't created much of anything. Yesterday afternoon, I quickly put together a card, signed it & took it to the recipient....no time to photograph it for the blog.


I wanted to post something to celebrate the day so I pulled this card out of my collection. It was posted to the Fond Memories blog sometime ago. To me, it signifies the importance of this day.


Christmas blessings,

-judy

Tuesday, December 23, 2008

A Can of Cookies


An idea for this can of cookies popped into my mind while I was cooking supper one night last week. I emptied 2 cans of tomatoes. The cans had such nice white insides......I had to think of something to do with them.


So, I attached some Christmas paper to the outside, colored the metal rim with a Copic marker and added a button to the lid. I also glued ribbon along the top & bottom edges.

Pretty cute for a tin can!

Yes, I made the cookies, too. Spritz are one of my family's favorite cookies!

Supplies:
Making Memories Fa La La paper
Spellbinders Circle & Scalloped Circle dies
Ribbon
Button
Copic marker
Red Line tape
Spritz cookies
Keep creating!
-judy

Sunday, December 21, 2008

Snowbound...

Good Morning!

I have been so busy getting ready for Christmas that I haven't had much opportunity to create anything to post. My creating has gone into baking & wrapping gifts...

The weather helped me out a bit this weekend.

We were supposed to go to my daughter's house for the weekend so we could see our grandson's church program. Instead, we were snowed in ....and still are. Snow & winds and bitter cold. Makes me wonder why I live in Minnesota!

This photo is a view out my kitchen door towards the east(right through the glass, way too cold to go outside!). The trees in the distance are about 1/2 mile away. The blowing snow wasn't quite at it's worst at that moment.


Tonight, I put together some cards for my employees. Yeah! I got to stamp & create.

I stamped the Thomas Kinkade Village Christmas with ADirondack Raisin on a cream card. I stamped "Merry Christmas" & embossed it with clear. I cut a dark red rectangle to fit the card front & embossed it with a Cuttlebug Swiss Dot folder. I then cut an oval out of the center. I cut a slightly smaller oval out of gold paper. I glued the gold oval under the red one, then attached it over the stamped image on the card front. I punched out some tiny branches out of the same gold paper & glued them along the oval opening. I added a burgundy bow and a verse inside.......done.
I can check that off my list....
Keep creating........
-judy

Sunday, December 14, 2008

Past, Present, Future

I posted this card on the Artistic Outpost blog...

This gyspy girl is my favorite of the Fortune Teller stamps. She's so fun to color.

Check out the Artistic Outpost blog for samples using the other new releases: Cutie Pie & Vintage Circus.

I must get working on my Christmas cards........not creating them, just signing, addressing & putting stamps on a few.

-judy

Saturday, December 13, 2008

Fortune Teller

....another card designed with the Artistic Outpost Fortune Teller plate.


Check out the Artistic Outpost blog for more links to other designers projects. There are some really great samples on the blog as well as links to other Guest Designers's blogs.

I colored this image with Copic markers. Then I used Distress inks to age the papers.

I used a piece of acetate from the packaging on some Spellbinders dies for the title. Goin' green! I couldn't bear to just throw it away......

That's it for now......way too tired to write anymore.

-judy

Thursday, December 11, 2008

Illusion...

.....a misleading image presented to the vision.


A bit of illusion created with 4 stamps from the new Artistic Outpost Fortune Teller stamp plate.

Here's a brief description of the steps to make this card:

One...I stamped the hand with Memento black ink on white paper. I stamped it again on Eclipse tape to make a mask which I cut out & applied over my stamped image.

Two...I stamped the man over the hand mask again with black Memento ink. (I used Memento ink because it is water based. I planned to color the image with Copic markers which are alcohol based. The water based ink will not smear because alcohol doesn't affect it.) I also stamped him on Eclipse tape to make a mask & put the mask in place.

Three...I stamped the Almanac calendar background, same ink. I removed the masks.....voila, a collage of all 3 images.

Four...I tore all the edges to the size I thought looked best.

Five...Now, for the coloring. I used Copic markers for all the color....no Distress inks. It was a challenge, believe me! I wanted to pull out my Antique Linen & start rubbing it over the image. I resisted.......I wanted to try achieve a similar look with the markers.

Six...I stamped "Illusion" in black ink & embossed it with clear powder. By using clear I kept the fine detail of the word yet added the shine & raised effect of embossing. (I would not have been able to do that over Distress ink until it had dried completely. One advantage of the Copic markers is that they dry very quickly.)

Seven...I matted it to green Bazzill & striped Reminisce paper. Card size is 4 1/4 x 5 1/2". I added some narrow black ribbon at each edge.

I amazed myself with this card. I wasn't too sure where I was going with the design when I started. (That is usually the case when I'm stamping. I may decide colors or stamps but never quite know the design direction until I get going.) I really like the colors & how the collage worked out.

Perhaps, it's the illusion that I'm seeing........

Smiles

-judy

Tuesday, December 9, 2008

Artistic Outpost New Releases

Today, Artistic Outpost is releasing the new stamp plates for December! Click here to see them on the AO blog.

As a Guest Designer, I had the wonderful opportunity to work with a set called Fortune Teller.

Fortune Teller -
To tell the future, a gift exploited for fun or fortune, has had its place in the folklore and legends of most of the world's cultures.

Here's my first creation with some of the stamps.
I really like this gypsy woman....she seems to look right into one's heart. She's colored with Copic markers & distressed, too. I added some embossed copper tape & floss with beads....my interpretation of a fortune teller.


Here's a closer look at the beads & paper pierced design......a fun card to create!

I have a few more samples to show you in the next few days. I think my designs will also be on the AO blog with the new stamps. So exciting for me!

Enjoy!

-judy

Sunday, December 7, 2008

Over the River.....

.....and through the woods to Grandmother's house we go. The horse knows the way to carry the sleigh..........

Can't you just imagine this sleigh full of gifts gliding over the snow?
I created this sleigh with a Spellbinders die. I love the vintage style.
First, I cut & embossed it out of cream colored paper. Then......guess what I used? Distress inks, of course, starting with Aged Mahogany over the entire sleigh. Then I rubbed the Black Soot pad directly over the embossed areas. The firm surface of the pad keeps most of the ink on just the raised areas...keep the pad flat.
Next I added Brilliance Gold to the packages & runners. I used foam tape to lift the sleigh from the card front on an oval of Cosmo Cricket paper matted with dark red paper. (Spellbinders oval dies) I added the little words around the edge of the oval with a stamp from Penny Black's Crystalline set. It was a bit hard to get it to curve so the words didn't print very well. I decided it was okay as the card is meant to look vintage & a bit worn!
To create the shaped cream border, I laid the oval on the back side of a piece of cream paper the same width as the card (5 1/4"). I centered the oval on the strip & traced it with a pencil. Then I cut straight in from each edge to about 1/4" away from the pencil line and continued cutting 1/4" away from the line. I turned it over, added Antique Linen & Vintage Photo to the edges & mounted it the top of a dark red paper. I added Black Soot to all edges of the card once it was put together. A verse at the bottom & a gold edged ribbon finish the design.
Supplies
Stamps: CHF Pretty Pattern, Joyeux Noel, Penny Black Crystalline
Spellbinders Sleigh & Oval dies
Paper: Cosmo Cricket, Bazzill, Cream Linen
Inks: Distress Aged Mahogany, Black Soot, Antique Linen, Vintage Photo, Versafine Black Onyx, Brilliance Gold


Enjoy!
-judy

Saturday, December 6, 2008

Skater's Pond Two Ways

Tuesday night I took a break from baking cookies (I quit baking tonight at 10:30 with 49 1/2 dozen.........close enough to the 50 I signed up to do.) to create these 2 cards.

Both cards use the same Thomas Kinkade Skater's Pond stamp as well as the same greeting yet they have a totally different look. Both are stamped in black ink: one on kraft color paper & the other on glossy white paper. That's about where the similarity stops....

I used Versafine Black Onyx to stamp the image & added just a touch of color with Copic markers to the ice, sky & windows. Frosted Lace Stickles gives the snowy areas sparkle. The snowflake paper is My Mind's Eye.


I used Distress Inks Antique Linen & Vintage Photo to age the image after stamping it with StazOn ink on glossy paper. The background paper is actually from Cosmo Cricket's Halloween line......the pattern just seemed to fit for this card. I used a Spellbinders die to cut just the ends of the mat & then ran a black marker along the edge. I couldn't find a ribbon to match so.......I colored a black & cream striped ribbon with Distress inks.........not waterproof but just fine for this card.

Make time to create something.

Enjoy!

-judy

Tuesday, December 2, 2008

Tim's 12 Tags of Christmas

Have you seen the tags Tim Holtz is showing on his blog? He's doing 12 tags of Christmas. Great photos of the steps. Lots of technique tips.

Check them out! They're incredible!

I'm certainly inspired to create something.

-judy

Monday, December 1, 2008

Vintage Santas

December 1........the countdown to Christmas begins.

...and the countdown to the annual Cookie Walk at our church this Saturday. I'm baking cookies every night after work..........my goal is 50 dozen: 17 done, only 33 to go! The hardest part is giving up my stamping time.......

I went through my collection to find some vintage Santa cards to share with you tonight. These have become keepsakes. I send most of my cards to family & friends but there are a few that I can't seem to part with. All of these Santas are in that category.

I made this Santa 2 years ago.........

........he's colored with Distress inks. The actual stamp is a bit bigger than shown. I cropped it to fit the card. The foil tape was colored with Ranger Adirondack alcohol inks & embossed with QuicKutz embossing dies. The letters for "believe" were cut with QK Frankie.
This was last years card.........

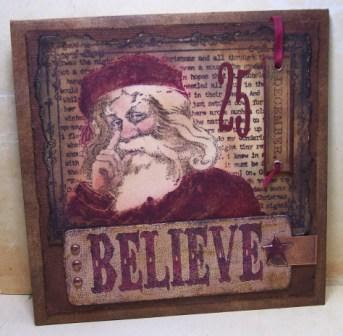
.......created with a Tim Holtz stamp set. I had fun with this card.....lots of products used: Distress Crackle paint, Distress inks, Ranger Paint Dabbers, QuicKutz Abigail for "25" and some hardware.

The 3rd vintage Santa was made this fall............

.........with an Artistic Outpost stamp set called Snowy Woods. I posted this card on the Fond Memories blog and it was also featured on the Artistic Outpost blog. This Santa was colored with Adirondack markers......a switch from Distress inks. I did use Antique Linen over him to make him more vintage. I used 2 Spellbinders square dies to cut the frame, a McGill punch for the branches, a bit of twill tape & some hardware. The papers are by Cosmo Cricket.

Until next time.......keep creating!

Enjoy!

-judy